
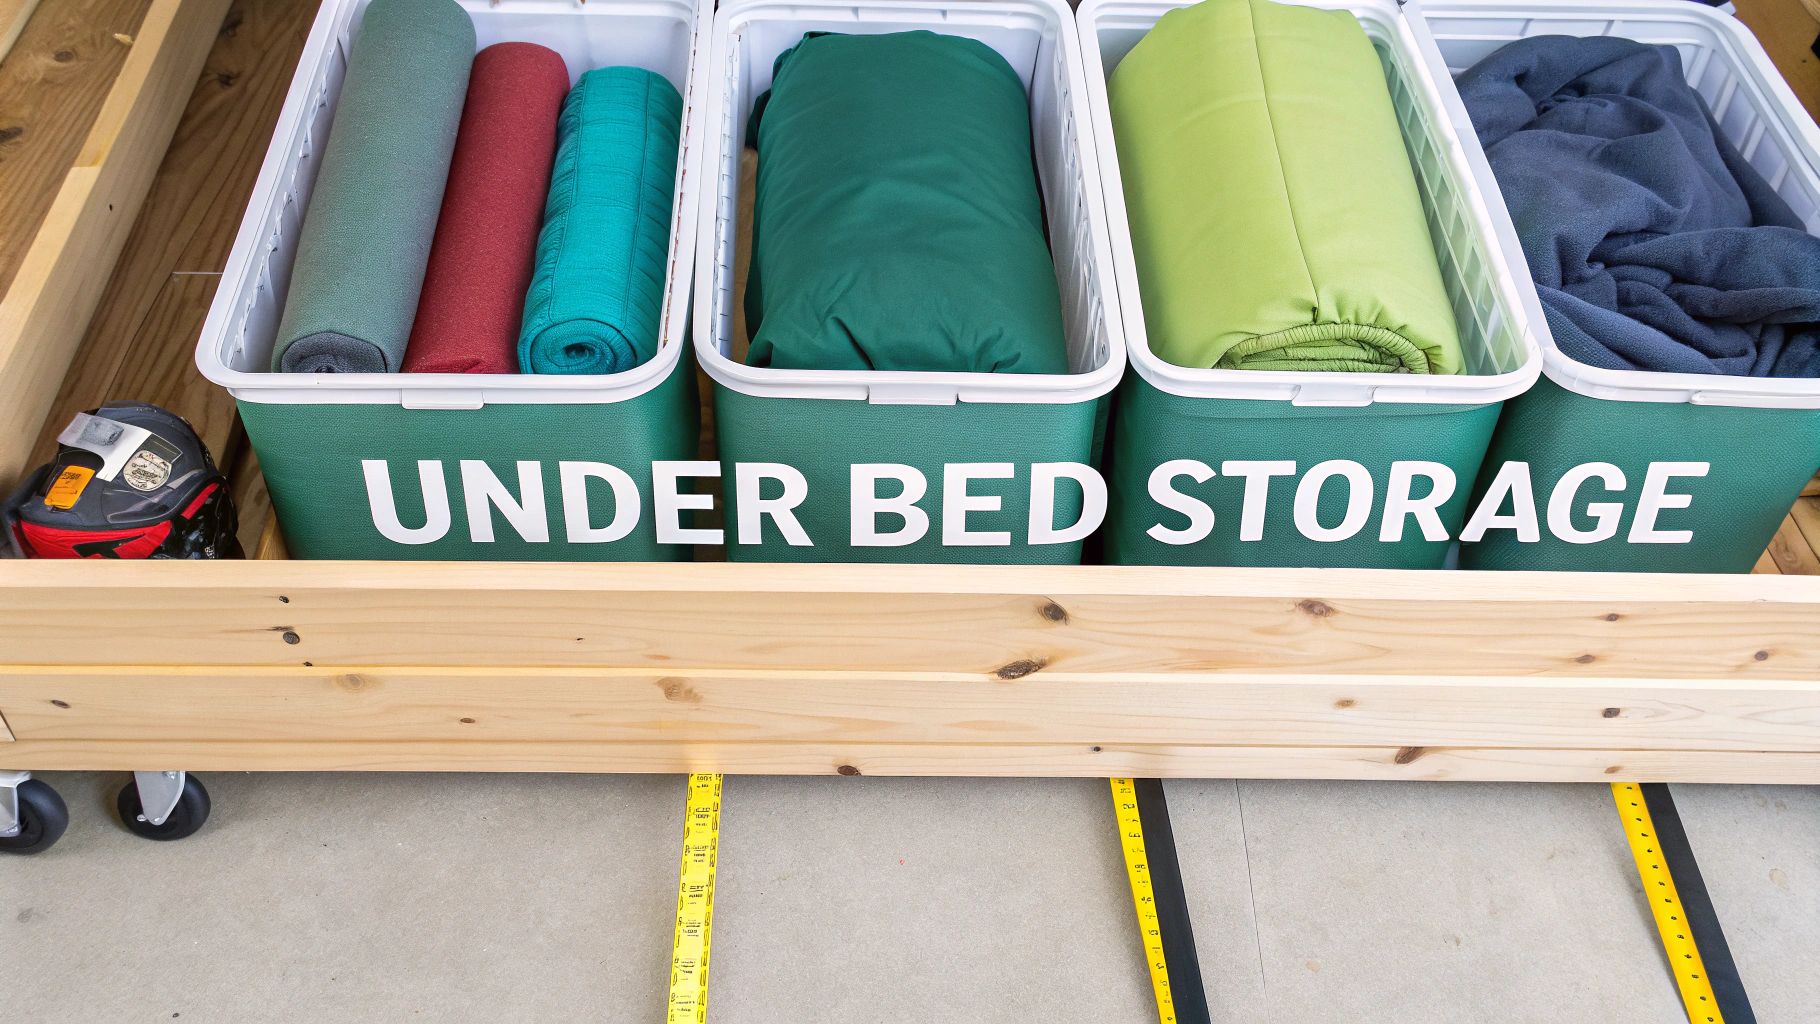
That empty void under your bed is one of the most overlooked storage opportunities in any home. A smart DIY under bed storage project transforms this dead zone into a functional, organized space, perfect for everything from seasonal clothes to extra bedding. This guide is your starting point for conquering that clutter and reclaiming valuable square footage.
Your Guide To Smart Under Bed Storage
Let’s be honest, that dusty, forgotten space beneath your mattress is pure potential. In small apartments or homes where every inch counts, using this area isn't just a clever trick—it's essential for keeping your space tidy and functional. DIY solutions are fantastic because they let you create something that fits your exact needs, bed frame, and budget.
But before you start cutting wood or buying fabric, the most important part is the planning. A great project always starts with precise measurements and a clear idea of what you actually need to store. Getting this part right prevents common headaches, like building a container that’s too tall to fit or too short to actually hold anything useful.
Start With Accurate Measurements
Grab a tape measure and get three key dimensions:
- Height: Measure from the floor to the lowest point of your bed frame's side rail. This is your absolute maximum clearance.
- Width: Measure the distance between the legs of your bed frame, from one side to the other.
- Length: Measure from the head of the bed to the foot, again staying between the legs.
Don't forget to look for any obstructions! A center support leg or low-hanging frame slats can really change your usable dimensions. I always recommend subtracting at least half an inch from your final height measurement. This little bit of wiggle room ensures your new storage solution slides in and out without scraping the frame.
A common mistake is forgetting to account for flooring. If you have thick carpeting, your measurements might be slightly different than on a hardwood floor. Always measure from the solid floor surface up.
Choosing The Right Project For You
With your measurements in hand, you can confidently pick a project that works for you. Not sure where to start? This decision tree can help you visualize the path from planning to building.
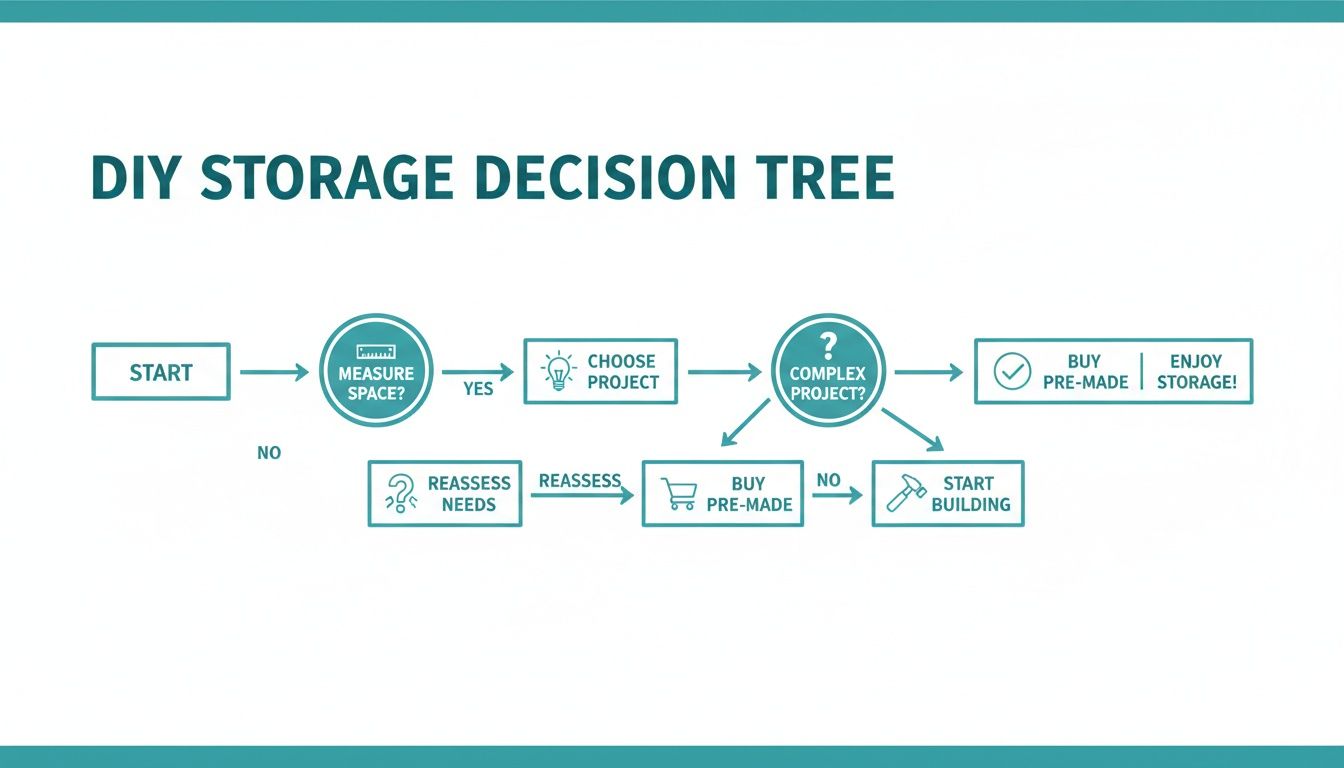
This process helps you land on a DIY project that not only fits your space but also matches your skill level and what you need to store.
Of course, under-bed storage is just one piece of the puzzle. Exploring other ways to organize your bedroom can make a huge difference. For more ideas, check out these 5 bedroom solutions to eliminate clutter to totally transform your room. If you're living in a compact space, finding the right strategy is everything. You can learn more about making the most of your square footage in our article on the best storage for small spaces.
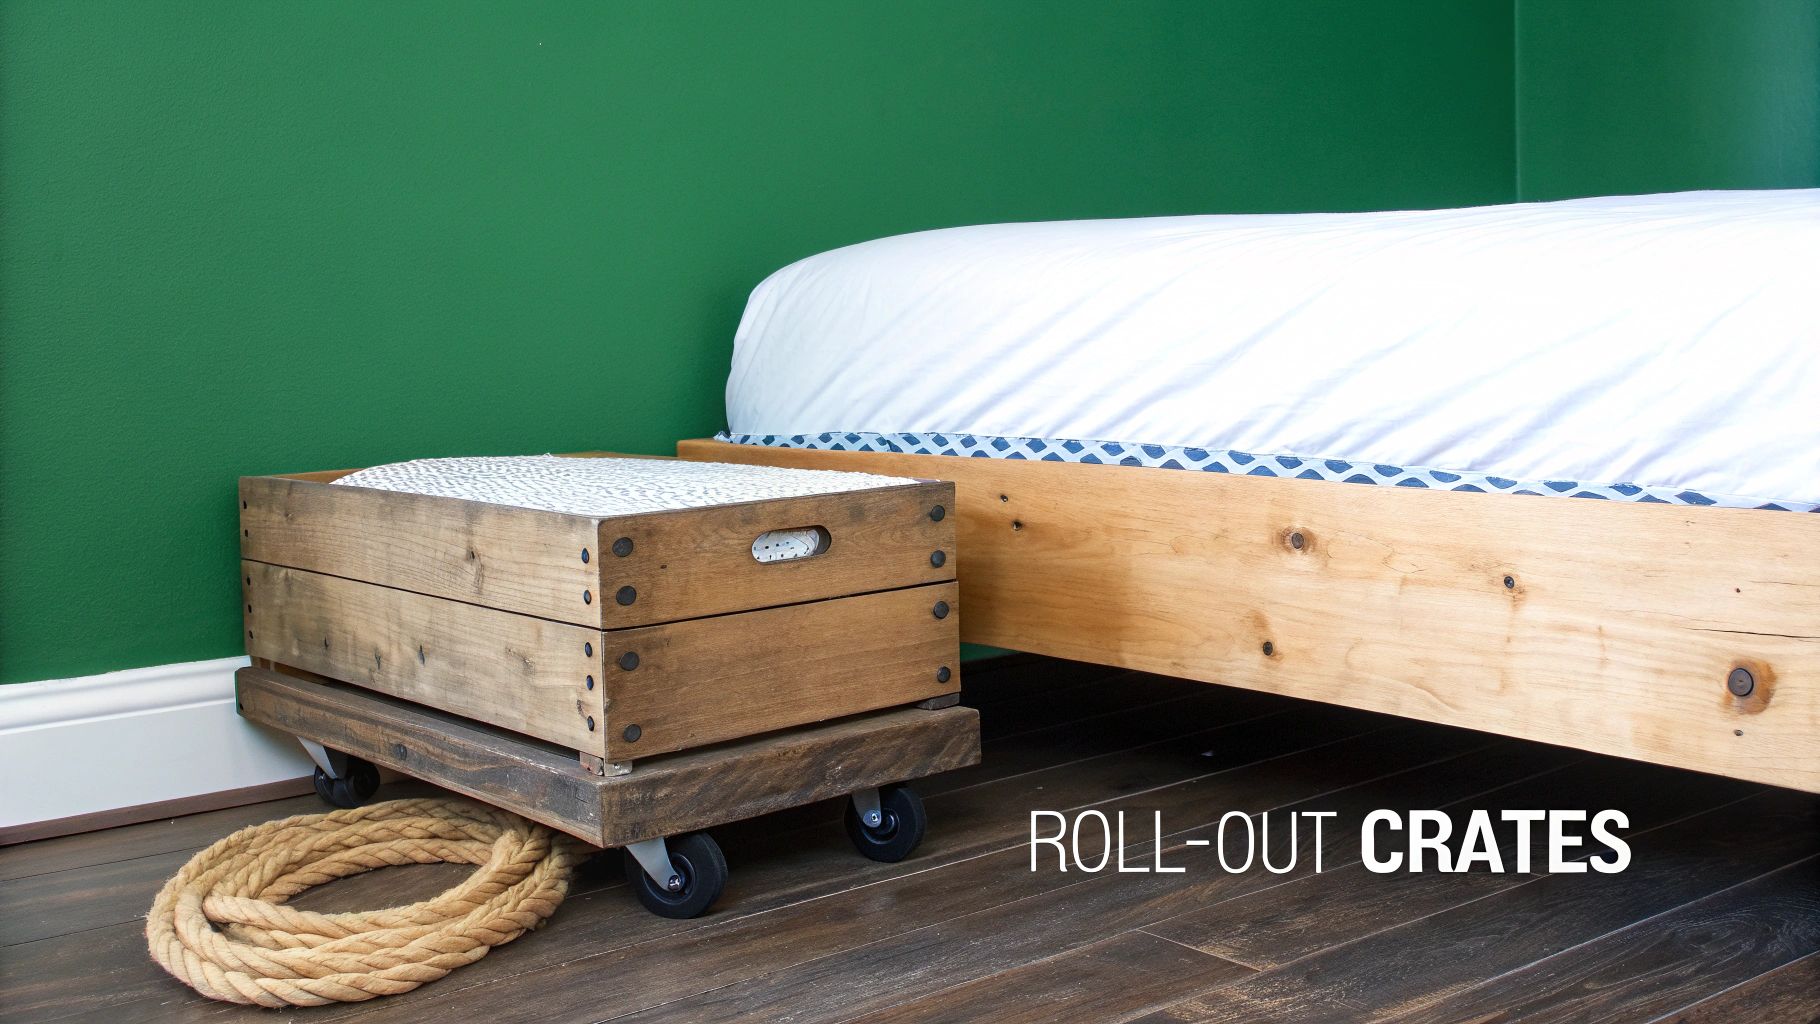
Building Easy-Roll Storage Crates
If you're looking for a DIY under bed storage solution that's dead simple but incredibly useful, rolling crates are your answer. They're my go-to for stashing away bigger things like extra blankets, a shoe obsession, or all that off-season clothing. This isn't just about building a box; it's about creating sturdy, accessible containers that glide out when you need them and disappear when you don't.
We’re going to get into the nitty-gritty details that actually make a project like this work—from picking the right wood to the final assembly. Let's turn that dusty no-man's-land under your bed into some seriously functional storage.
Gathering Your Materials
The heart of a good, sturdy crate is the wood you choose. You could definitely use reclaimed wood for a more rustic vibe, but for a solid blend of strength and value, 3/4-inch plywood is tough to beat for the base. For the sides, I find that 1x8 or 1x10 pine boards are perfect—they look great and are easy to work with.
Now, let's talk about the wheels, or casters. This is a crucial choice, as it's all about protecting your floors and getting that smooth glide.
- Hardwood or Laminate Floors? Go for soft rubber casters. These guys absorb little bumps and won't leave scratches on delicate surfaces.
- Carpeted Floors? Hard plastic or nylon casters are what you want. They roll over carpet with much less fight than rubber wheels will.
Finally, you’ll need some basic hardware. Wood screws are a must for assembly, and I always recommend adding wood glue to the joints for an extra-sturdy build. You might also want to grab some rope or leather strips to fashion some handles—a small touch that adds a lot of style and function.
Constructing Your Crates
Got your materials? Great, it’s time to build. Start by cutting your wood down to the dimensions you measured out. Here’s a key tip: don't forget to subtract the height of your casters from your total under-bed clearance. That'll give you the absolute maximum height for your crate's sides.
The assembly is just a simple box construction. You'll attach the four side pieces to the plywood base with wood screws. I always pre-drill the holes to keep the wood from splitting—it's a small step that saves a lot of headaches. Before screwing them together, run a thin bead of wood glue along the edges. It creates a much stronger bond, especially if you plan on loading these crates up with heavier items.
Pro Tip: Build the crate on a perfectly flat surface to make sure it ends up square. After attaching the sides to the base, drive a few extra screws into the corners where the side boards meet. This will give you maximum stability.
Once the box is together, flip it over to attach the casters. Put one in each corner, about an inch in from the edges, and screw them in place. Double-check that your screws aren’t too long; you definitely don't want them poking through the bottom of your crate!
Finishing Touches and Personalization
This is the fun part, where you get to make the project yours. Before you do the final assembly, give all the wood pieces a good sanding for a smooth finish that’s ready for paint or stain. Pick a color that ties into your bedroom decor, or just use a clear sealant to let the natural wood grain shine.
Adding handles makes a world of difference for pulling the crates out. Just drill two holes on the front panel and thread a thick piece of rope through, tying big knots on the inside to hold it tight. It’s practical and looks fantastic. For even more creative sparks, take a look at our guide on DIY storage ideas for small spaces to get some more inspiration.
Creating Custom Fabric Storage Sleds
Got a bed frame that sits super low to the ground? You already know that bulky wooden crates or those standard plastic bins just aren't going to cut it. This is where you get to be clever with a great DIY under bed storage solution: custom fabric sleds.
Think of them as soft, flexible containers perfect for sliding into those tight spaces. They're amazing for protecting delicate items from dust and making every last inch of that minimal clearance count.
I like to picture them as structured bags that glide effortlessly on either carpet or hardwood. They’re my go-to for things like out-of-season sweaters, spare linens, or even that sprawling collection of scarves and accessories. The best part? Their forgiving nature. If your measurements are a tiny bit off, the fabric has some give that a rigid box just doesn't.
Choosing The Right Materials
The success of your fabric sleds really comes down to the materials you pick. You need something tough enough to withstand all that pulling and pushing, but you also don't want it scratching up your floors.
- Durable Fabric: Heavy-duty canvas, thick denim, or upholstery fabric are all fantastic choices. They hold their shape well and are tough to tear.
- Base Reinforcement: To give your sled some real structure, you'll need a rigid but thin base. I’ve found that a piece of corrugated plastic or even heavy-duty cardboard cut to size works perfectly.
- Sturdy Handles: Webbed nylon strapping—the same stuff on backpacks—makes for incredibly strong and easy-to-grab handles.
This kind of project is a perfect example of how people are getting more creative with their storage. It's a trend that's grown right alongside the massive North America home storage market, which hit US$45.5 billion in 2023. More specifically, the global market for under-bed storage reached USD 2.18 billion in 2024, a number driven by city dwellers in small apartments who need every inch of space to count.
No-Sew And Sewing Assembly Options
Not everyone has a sewing machine, and that's totally fine. This project works just as well with no-sew methods, so you can pick the route that’s best for you.
For the no-sew approach, a strong permanent fabric glue is your best friend. After cutting your fabric pieces (one large rectangle for the base and four for the side panels), you’ll basically fold and glue the seams together around your reinforced base. Use heavy books to press the seams flat while the glue cures to get a really strong bond.
If you're sewing, the process is a bit more traditional. You'll stitch the four side panels to the rectangular base piece, creating an open-top box shape. I always recommend double-stitching the corners for extra durability. Before sewing that last side, just slide your cardboard or plastic base into a fabric pocket at the bottom to give it that crucial structure.
My Personal Tip: Whichever method you choose, attach the handles first. It's so much easier to sew or glue the nylon straps onto the front panel before the whole container is put together. This gives you a cleaner look and a much stronger connection point for pulling.
Once your sled is assembled, you can even add simple fabric dividers inside to keep smaller items organized. For things like delicate woolens, I love combining these sleds with vacuum-sealed bags to really maximize space and protection. If you want to go that route, you might be interested in our guide on the best vacuum storage bags to complement your new DIY project.
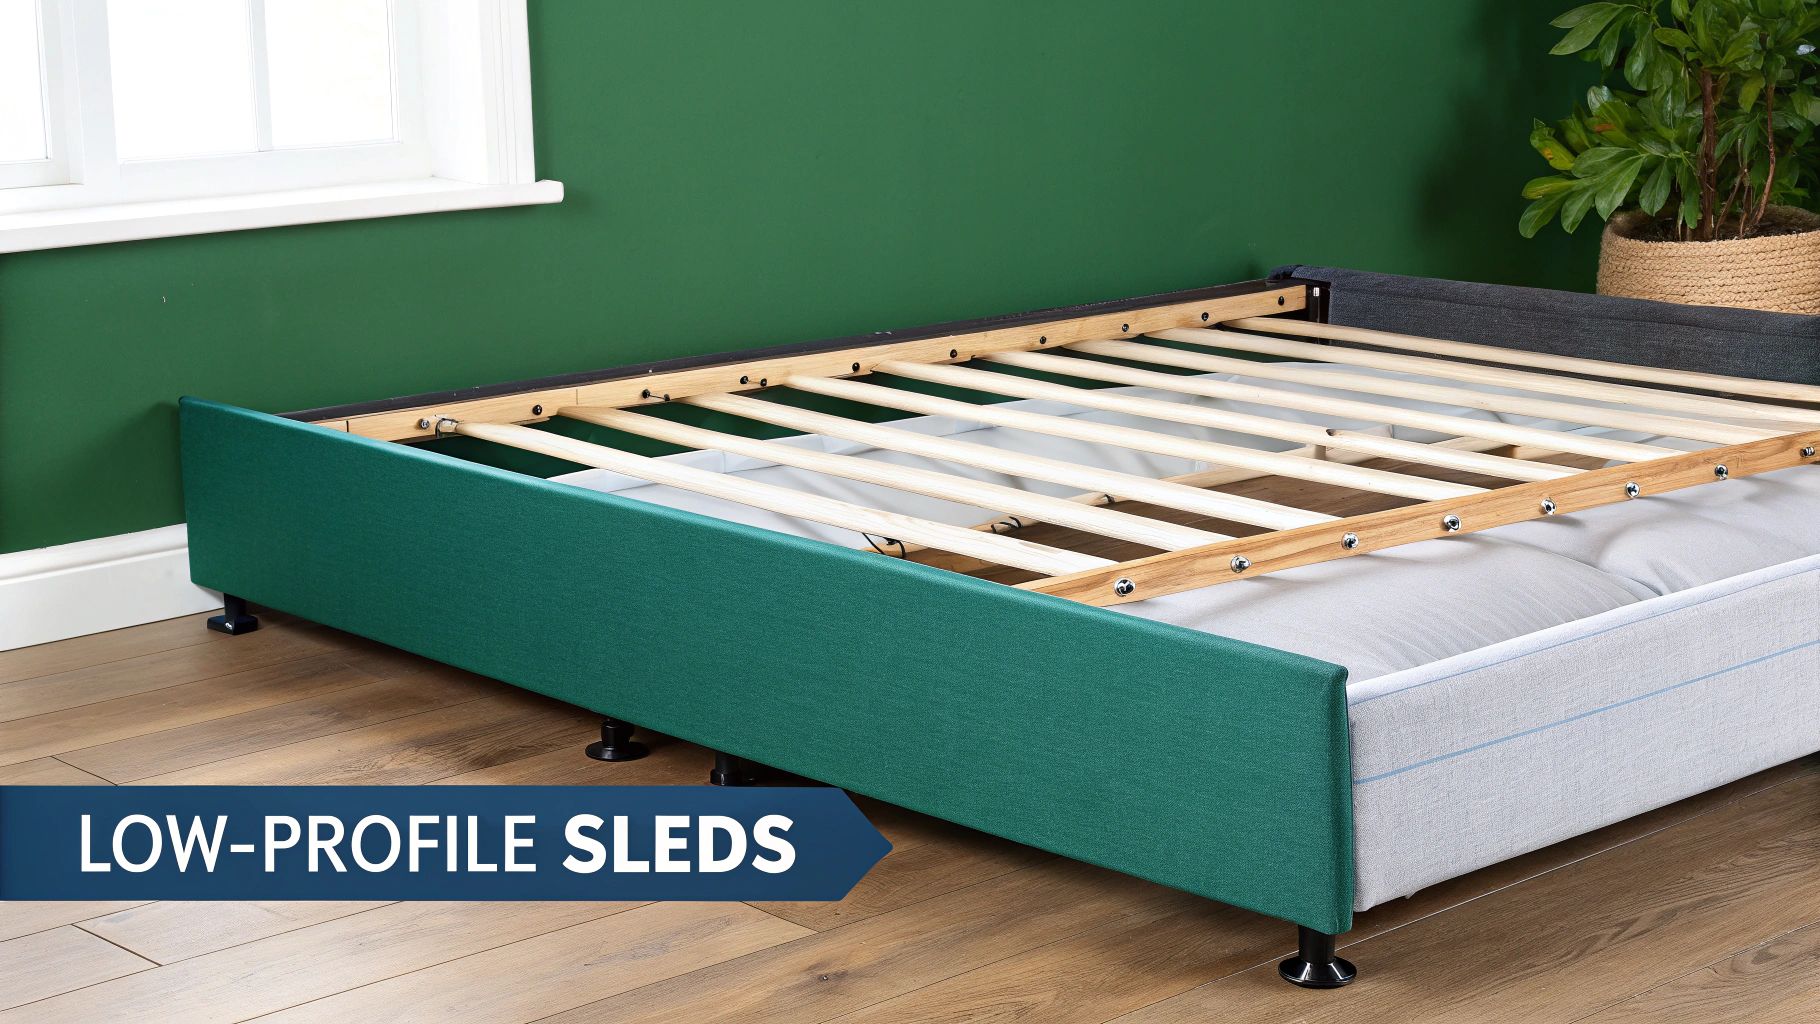
Constructing Integrated Pull-Out Drawers
Ready to take your DIY under-bed storage to the next level? Building integrated pull-out drawers is the ultimate upgrade. This project transforms a standard bed frame into a high-end, functional piece of furniture where the storage looks like it was always part of the design. Unlike simple rolling crates, these drawers glide smoothly on mounted slides, giving you that satisfying, controlled motion.
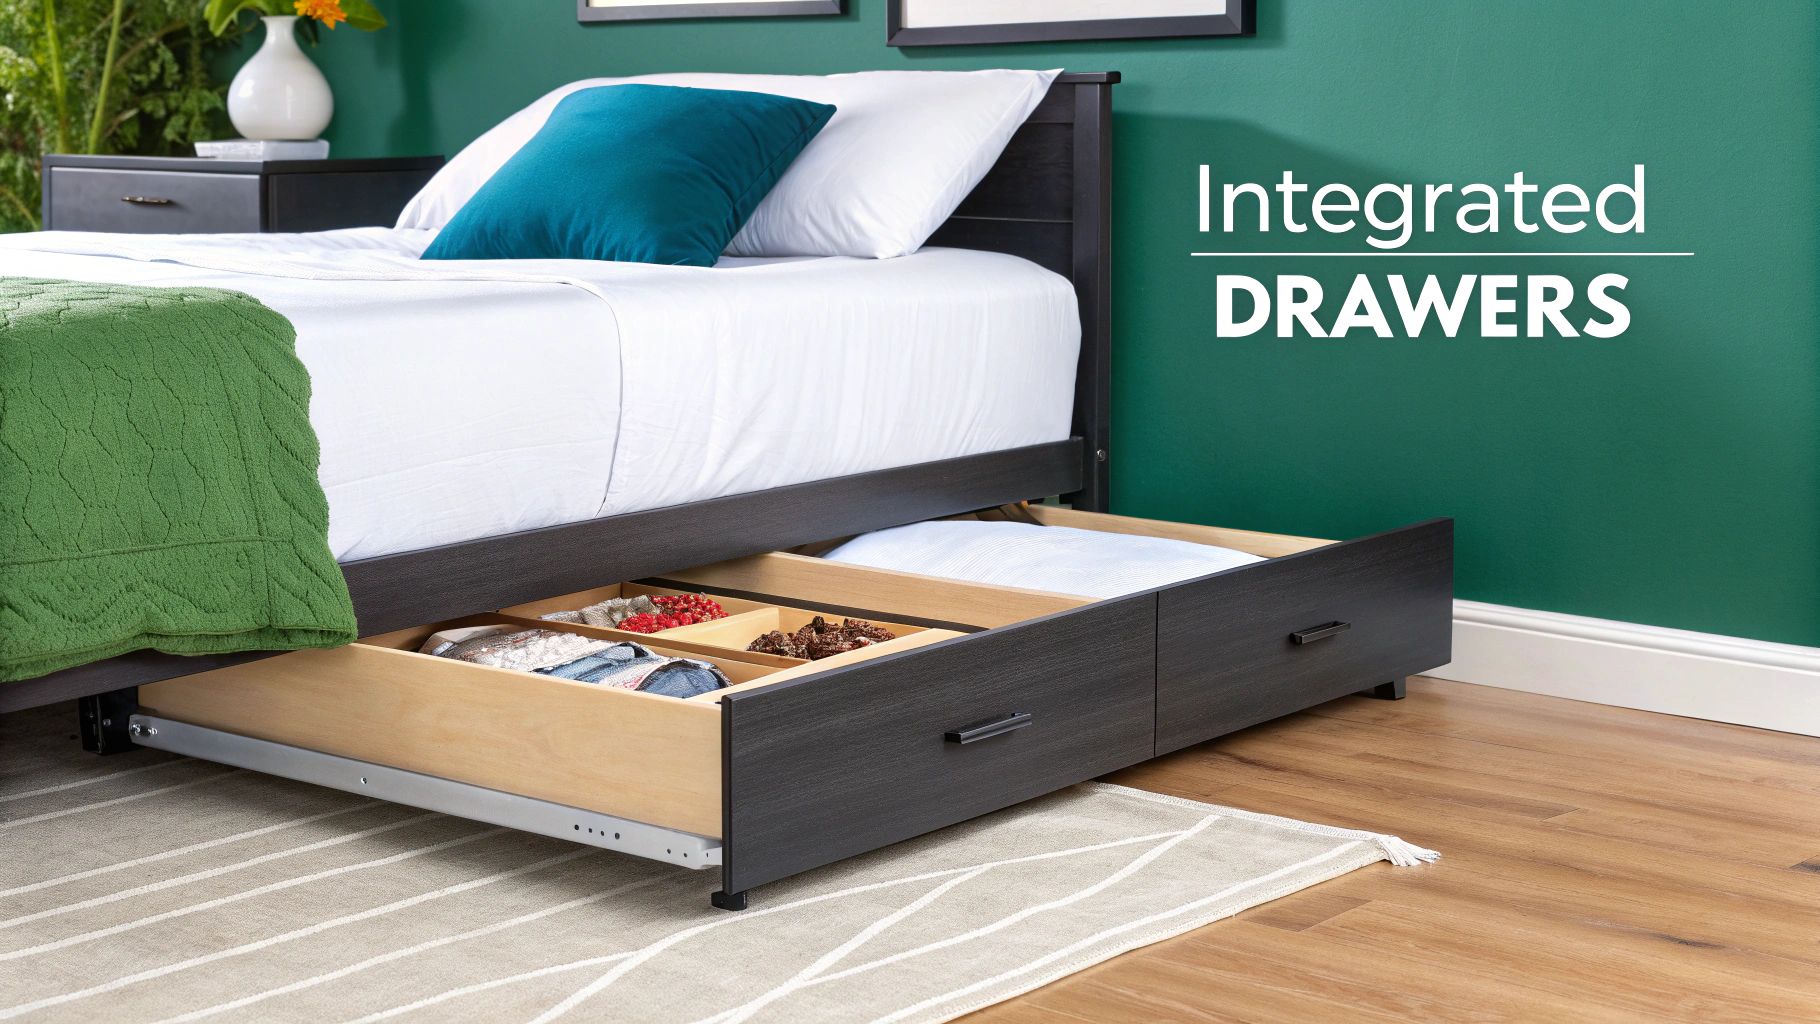
I'll be honest, this one is for the more experienced DIYer. It demands precise measurements and a good dose of patience, but the payoff is a professional-looking system that uses every last inch of that valuable under-bed real estate.
Mastering Drawer Slides
The real magic behind this build is the drawer slides. Getting the hardware right is absolutely essential for a smooth glide and a clean finish. You'll mainly come across two types:
- Side-Mount Slides: These are the workhorses—common, affordable, and incredibly stable. They attach to the sides of your drawer box and the inside of the bed frame.
- Under-Mount Slides: If you want that completely invisible, high-end look when the drawer is open, under-mount slides are the answer. They cost a bit more and require more precision during installation, but the premium feel is undeniable.
No matter which style you pick, make sure the slides you buy match the depth of your drawer. A 22-inch slide, for example, is the perfect partner for a 22-inch deep drawer box.
The most critical part of this whole process is getting your installation perfectly level and parallel. Trust me, a slightly crooked slide will cause the drawer to stick, jam, or sag over time. Use a level and a square like they're your best friends.
Building and Assembly Techniques
The drawer box itself is a pretty straightforward construction. Most people use 3/4-inch plywood for the sides to give it strength and a thinner 1/4-inch plywood sheet for the bottom.
When you’re at the saw cutting your pieces, don’t forget to account for the clearance your slides need. Most side-mount slides require a 1/2-inch gap on each side of the drawer. A successful build is all about accuracy here. Carefully measure the opening under your bed frame and subtract the slide clearance to get the final width for your drawer box.
For anyone living in a small apartment, a project like this is more than just a weekend hobby—it's a game-changer. It’s no surprise the global under-bed storage box market hit USD 4.28 billion in 2024, a number driven largely by city dwellers getting creative to reclaim wasted space.
Once the box is assembled, the final touch is the drawer front. This is your chance to make it look truly built-in. Grab a piece of wood that matches your bed frame, stain it to match, and attach it to the front of the drawer box from the inside for a clean, hardware-free look.
This DIY approach delivers an incredibly satisfying result, but if building from scratch just isn't in the cards, you can find ready-made options. For example, a deluxe bed with under bed storage gives you a convenient, all-in-one alternative. To see more ways custom furniture can transform your home, check out our guide on space-saving furniture.
When Your DIY Storage Is Not Enough
So, you’ve done it. You built the perfect DIY under bed storage, and that once-useless void is now a masterpiece of organization. Your drawers slide out like a dream, the sleds glide without a hitch, and your bedroom finally feels like it can breathe.
But what happens when you hit a wall? It’s a common problem, especially in cozy apartments or during big life changes like a move. Even the most clever DIY projects have their limits. Sometimes, the answer isn’t to build more storage but to rethink what you’re storing—and where. Your awesome handcrafted solutions are perfect for the everyday stuff, but what about everything else?
Figuring Out Your Storage Overflow
Take a minute to think about the items you cherish but don’t actually need day-to-day. I’m talking about things like old photo albums, inherited heirlooms, or that massive collection of winter coats you only wear for three months a year. What about the camping gear or snowboard that hogs closet space all summer?
These are the ideal candidates for a different kind of storage.
Your new custom-built drawers are prime real estate. If you fill them with things you only touch once or twice a year, you’re wasting incredibly valuable, easy-access space that could be holding your shoe collection or your go-to sweaters.
A smart organization system isn’t just about having a place for everything; it’s about having the right place for everything. Sure, you could store holiday decorations under the bed, but that space might be better used for things you need on a regular basis.
A Smarter Fix For The Extra Stuff
This is where a service like Endless Storage can be the perfect partner to your DIY spirit. Instead of letting your overflow create new clutter zones in the corner of your room, you can send it off to a secure spot without ever having to leave your apartment.
This frees up your beautifully crafted DIY under bed storage for the things you actually use.
The home organization market is absolutely booming—it’s expected to hit USD 12.05 billion by 2025, and storage boxes are a huge part of that. But even the best DIY setup has its breaking point. For everything that pushes past that limit, Endless Storage makes managing the overflow simple. You can ship boxes starting at just $7.99/month, check on your items online, and have anything you need delivered back to you within 48 hours. You can learn more about the trends in the United States home organizers and storage market.
This hybrid approach—DIY for daily life, Endless for the rest—lets you keep a clean, minimalist home while ensuring your less-used belongings are safe and just a click away. If you're weighing your options, our guide on finding an alternative to a traditional storage unit might be a helpful next read.
Common DIY Under Bed Storage Questions
Even with the best plan, you're bound to run into a few questions when you start a new DIY under bed storage project. Getting a handle on these common hurdles is often the difference between a wobbly, frustrating build and a sturdy, satisfying result. Let's walk through some of the key details that will help your project go off without a hitch.
One of the first things people wonder about is which materials to use. For projects that need to be seriously strong—like rolling crates or pull-out drawers that will hold a lot of weight—your best bet is 1/2-inch or 3/4-inch plywood. It hits that sweet spot of durability and cost.
If you’re making something lighter, like a fabric sled, go with tough materials like canvas or denim that can handle being dragged around. I'd personally steer clear of particle board. It has a nasty habit of sagging under weight and just doesn't hold up over the long haul.
Navigating Space and Floor Protection
Another thing that trips people up is clearance. You have to know exactly how much space you're working with. This is a non-negotiable first step, so always measure from the floor to the lowest part of your bed frame’s side rail.
- For fabric sleds, you can get away with just 3-4 inches of clearance.
- For rolling crates, you’ll need a bare minimum of 5-6 inches to make room for the crate itself and the height of the caster wheels.
- For integrated drawers with slides, plan on at least 7-8 inches to give the hardware enough space to operate without catching.
Protecting your floors is another biggie. You don't want your awesome new storage solution to leave a trail of scratches. For hardwood or laminate, soft rubber caster wheels are your best friends. If you’re building something that slides without wheels, applying felt furniture pads to the bottom is a simple, cheap, and super effective fix.
On the other hand, if you've got carpet, hard plastic casters will glide much more easily than their rubber counterparts.
Here's a pro tip I've learned from experience: always build your storage to be slightly smaller than your measurements. Aim for at least a half-inch of wiggle room on the height and sides. This prevents scraping and makes sure everything fits easily.
Of course, keeping your new storage organized is just as important as building it. For a deep dive on that, check out our guide on the best way to label storage bins. It’s full of tips to help you find what you need without pulling everything out.
Even the most clever DIY project can't solve every storage problem. When you've maxed out your space but still have overflow, Endless Storage offers a simple solution. We'll pick up, store, and return your items on demand, freeing up your home for what matters most. Learn more about our hassle-free storage options.
Frequently Asked Questions
Unveiling the Secrets to Effortless Storage
Endless Storage is available nationwide. You pick a plan, tell us where to pickup, and we'll send a UPS van to collect, whichever state you're in.
Your shipping label will be sent to your email within a few minutes, if not instantaneously. It can also be accessed through your customer profile.
Your box will be shipped to one of our climate controlled self storage facilities in our closest self storage facility. Our manager will accept your package, notify you that your box has been received, and securely stored. Only our managers will have access to Endless Storage boxes.
Email us at admin@endless-storage.com click to live chat with us, or send us a message below.
Never! We're committed to transparent pricing with no surprises. You'll lock in your rate with no hidden fees and no long-term contracts.
Fast access guaranteed! Your boxes will arrive at your doorstep within 48 hours of requesting them back. Need to check on delivery? We provide tracking information for complete peace of mind.
Totally flexible! Store month-to-month with no long-term commitment and cancel anytime.
Everything's online! Use your account dashboard to:
• Set up automatic monthly payments
• Request box returns
• Update your address
• Order additional boxes
• Track shipments
Your boxes are insured up to $100 each. Our customer service team will help you file any necessary claims and resolve issues quickly.
Don't worry – we'll email you right away if there's a payment issue. Your items stay safe, though you may have temporary service interruption or late fees until payment is resolved.
When you request our free storage kits, you'll have 30 days to send in your boxes to activate your 3 months of free storage. Think of it like starting a gym membership – your activation window begins when you receive your kits, and your full free trial begins once you send in your first box. During your free months, you'll experience our complete storage service at no cost.
Your 30-day activation window begins when you receive your storage kits. We'll send you an email confirmation when your kits are delivered, marking the start of your activation period.
If you haven't sent any boxes for storage within your 30-day activation window, your free trial will expire and we'll begin charging the regular monthly rate of $9.99 per box. This helps ensure our storage kits go to customers who are ready to use our service.
A box costs $9.99 per month to store (plus sales tax). This price includes free shipping for standard boxes under 50 lbs. and smaller than 16"x16"x16"
Log into your Endless Storage account, locate the box you would like returned, and simply click Return My Box.
Yes, each box stored with us is insured for up to $100 throughout transit as well as the duration of storage within our facilities.
Your box will be at your doorstep within 48 hours of you requesting it back.
Store 10+ boxes? We'll pick them up for free! After your purchase, we'll contact you to schedule a convenient pickup time and arrange UPS collection.
We trust UPS with all shipments, and every box includes $100 insurance coverage. You'll receive tracking information to monitor your items' journey.
Yes! Visit any of our locations by appointment. Just bring a photo ID matching your customer profile.
For everyone's safety, we can't store hazardous materials, firearms, or perishables. All items must fit within our standard boxes.
It's easy! Order your storage kit online, and we'll ship it to you within 1-2 business days. Your shipping labels will be emailed instantly and available in your account.
We're here to help! Email us at admin@endless-storage.com, use our live chat, or send us a message through your account.
To cancel your storage service with Endless Storage, please email your cancellation request to admin@endless-storage.com. Our team will process your request within 2 business days and confirm your cancellation via email.
We understand packing takes time. However, to maintain your free trial benefits, you'll need to send at least one box within the 30-day activation window. If you need more time, you can always start with one box to activate your trial and send the rest later. You can always reach out to admin@endless-storage.com if you have any issues or concerns.
When you request our free storage kits, you're starting a 30-day window to begin using our storage service.
Important: To activate your free trial, send at least one box for storage within 30 days. If no boxes are sent within this 30-day window, a one-time $50 fee applies to cover materials and shipping costs. This fee is clearly disclosed before you sign up.
Think of it like reserving a hotel room – we're setting aside space and sending specialized packing materials for your use. The fee only applies if you request materials but don't begin storage, similar to a hotel's no-show charge.