Storing Winter Tires: Your Ultimate How-To Guide for 2026

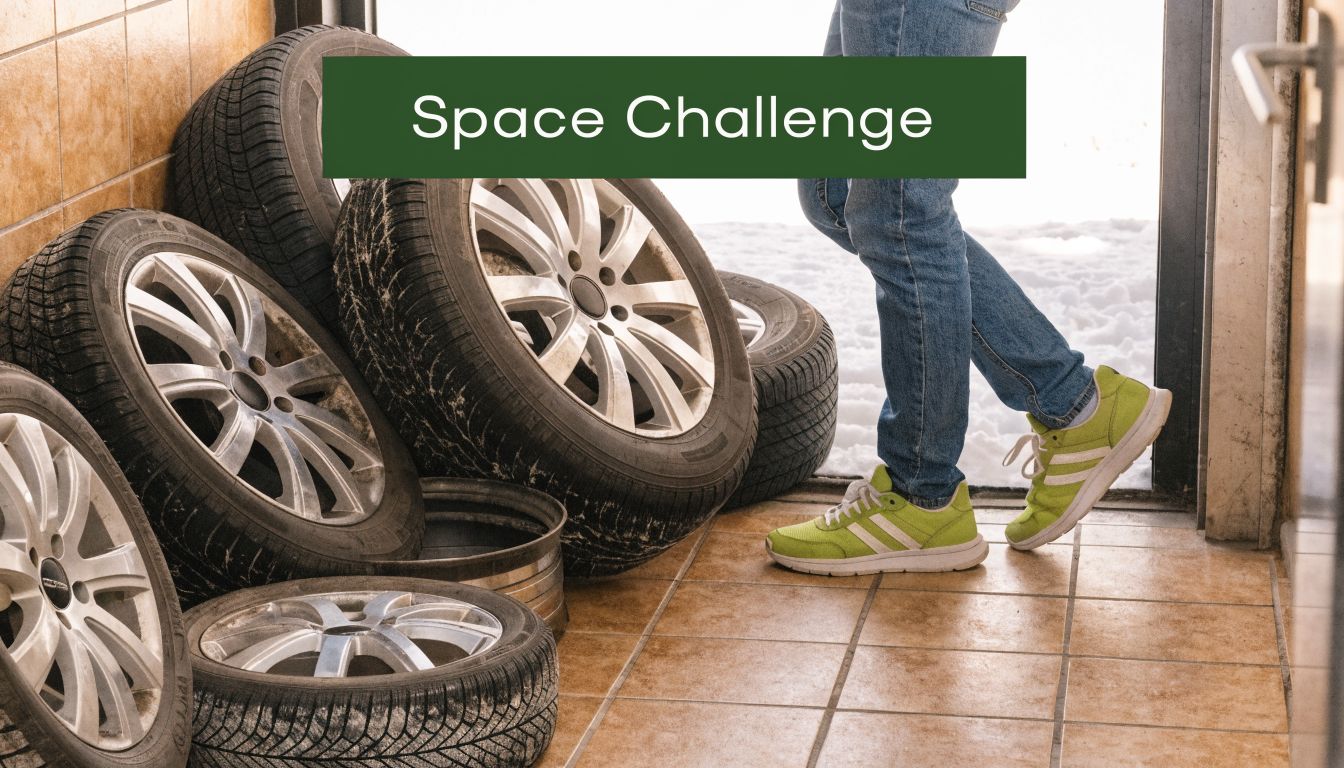
You’ve swapped the winter set off the car, and now four bulky, dirty tires are sitting in the hallway, the corner of the bedroom, or maybe beside a bike you already trip over. That’s an actual storing winter tires problem for city living. It’s not abstract. It’s floor space, mess, and the nagging sense that if you shove them onto a balcony or into a hot garage corner, you’re probably shortening their life.
That instinct is right. Tires age even when they’re not rolling, and bad storage will turn a good set into an expensive problem. If you live in a small apartment, the challenge isn’t just where to put them. It’s how to protect the money you already spent without giving up half a closet or turning your home into a tire rack.
Why Proper Winter Tire Storage Matters
Spring tire swap season usually starts with the same question. Where are these things supposed to go now?
For apartment dwellers, winter tires become dead weight fast. They’re heavy, awkward, and hard to hide. A lot of people settle for whatever space is available: a warm garage, an outdoor corner under a tarp, a shared storage cage, or a sunny spot near a wall. That works for getting them out of the way. It doesn’t work for preserving the tires.
Tires age in storage too
Proper storage of winter tires can extend their usability up to 6 to 10 years, well beyond a typical 4 to 6 seasons, while poor conditions can halve their life and lead to replacement costs averaging $600 to $1,200 per set, according to this guide on how long tires last in storage.
That’s the part many people miss. Storage isn’t just housekeeping. It’s maintenance.
Heat, sunlight, humidity, ozone, and big temperature swings all work against rubber. Once sidewalls dry out or the casing deforms, you can’t undo it with a wash and a quick inflation. The tire may still look usable from across the room, but rubber that’s been cooked, cracked, or flattened won’t age gracefully.
Practical rule: If the storage spot feels like a bad place for wine, houseplants, or electronics, it’s usually a bad place for tires too.
The hidden cost of “good enough”
The cheapest storage option often becomes the expensive one later. A free corner in a shed or a hot garage sounds practical until the tires come out months later with signs of drying, cracking, or shape distortion. Then you’re paying for replacement sooner than expected.
Urban drivers have another issue. Living space costs real money, even if you don’t calculate it that way every month. Four tires eating up a closet, entryway, or bedroom wall have a cost too. That’s why climate stability matters, and why it helps to understand which items need climate-controlled storage before you commit to a “close enough” solution at home.
Your Pre-Storage Preparation Checklist
If you want your winter set ready for next season, the job starts before the tires ever touch the storage floor. Don’t bag them dirty and call it done. That’s how road film, salt, and moisture sit on the rubber for months.
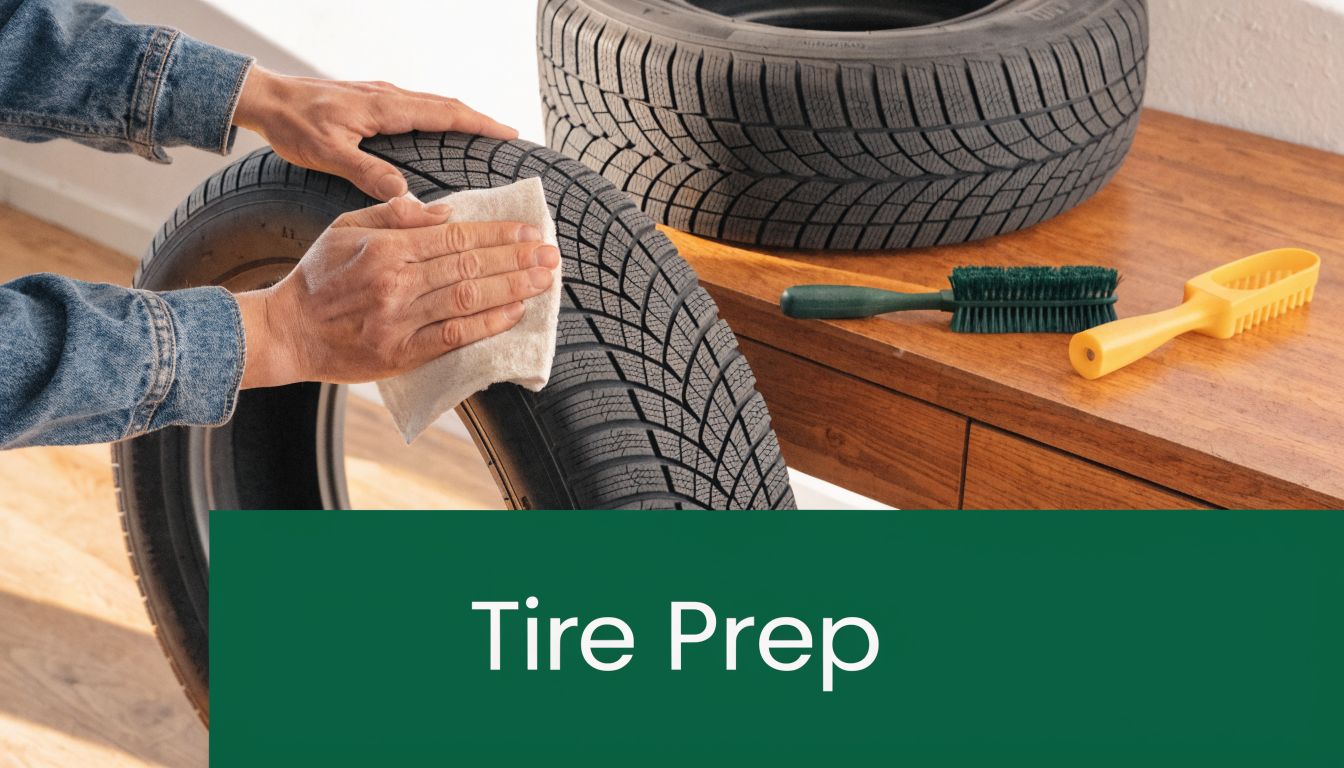
Clean them like you plan to keep them
Road salt and brake dust aren’t harmless leftovers from winter. Thorough cleaning matters because salt exposure can accelerate rubber degradation by up to 30% in humid conditions, and trapped moisture is a common mistake affecting 25% of improperly stored tires, as noted in this step-by-step tire storage guide.
Use a simple setup:
- Mild soap and water: Skip harsh dressings and shiny tire products before storage. You want clean rubber, not a coating that traps grime.
- Soft brush on tread and sidewalls: Get the packed debris out of grooves, especially if the tires saw slushy roads late in the season.
- A clean towel for final wipe-down: This helps catch residue the rinse missed.
A bucket, dish soap, soft wheel brush, microfiber towel, and a little patience do the job. You don’t need specialty chemicals for this part.
Drying is not optional
A tire that looks dry on the outside can still hold moisture in the tread blocks, around the bead, or near the valve stem if it’s mounted. Let them air dry fully before you cover or bag them.
If you’re cleaning them in a shared parking area or driveway, bring them inside only after they’re dry. Sealing damp tires into bags is one of the easiest ways to create storage damage yourself.
Moisture trapped during storage causes more trouble than a little leftover dust. Dry first. Bag second.
Inspect before the off-season hides problems
Storage season is the easiest time to inspect the full tire because you can see everything clearly. Look for:
Uneven wear
If one edge is wearing faster than the other, storage won’t fix it. Make a note to check alignment or suspension before next winter.Cracks in the sidewall or tread blocks
Small surface checking matters. Rubber damage tends to get worse, not better.Embedded objects
Pulling out a nail in your living room is a bad surprise. Better to spot puncture issues before the tire disappears into storage.Curb damage on mounted sets
Bent rims or damaged beads are easier to deal with now than during the first cold snap next season.
If anything looks questionable, have a tire shop inspect it before storage. Don’t wait until the first snowfall.
Label now and save yourself a headache later
Once the tires are clean and dry, mark their previous position on the vehicle. Use chalk, painter’s tape, or a tire marker. Keep it simple: LF, RF, LR, RR.
That tiny step saves time during the next changeover and makes planned rotation easier. If you’re already organizing seasonal gear, the same logic used in labeling storage bins clearly works here too. Clear labels reduce mistakes.
A quick prep checklist worth following every spring:
| Task | Why it matters |
|---|---|
| Wash off salt and grime | Residue left on rubber during storage can speed deterioration |
| Dry completely | Prevents moisture-related damage |
| Inspect all sides | Catches wear or damage before the tires are tucked away |
| Label each tire position | Makes seasonal reinstall simpler |
| Bag or cover after prep | Keeps dust, light, and air exposure down |
Stack or Stand Storing Tires With and Without Rims
Many people are often mistaken about tire storage. The right storage position depends on whether the tire is mounted on a rim or unmounted. Treat both types the same, and you risk distortion.
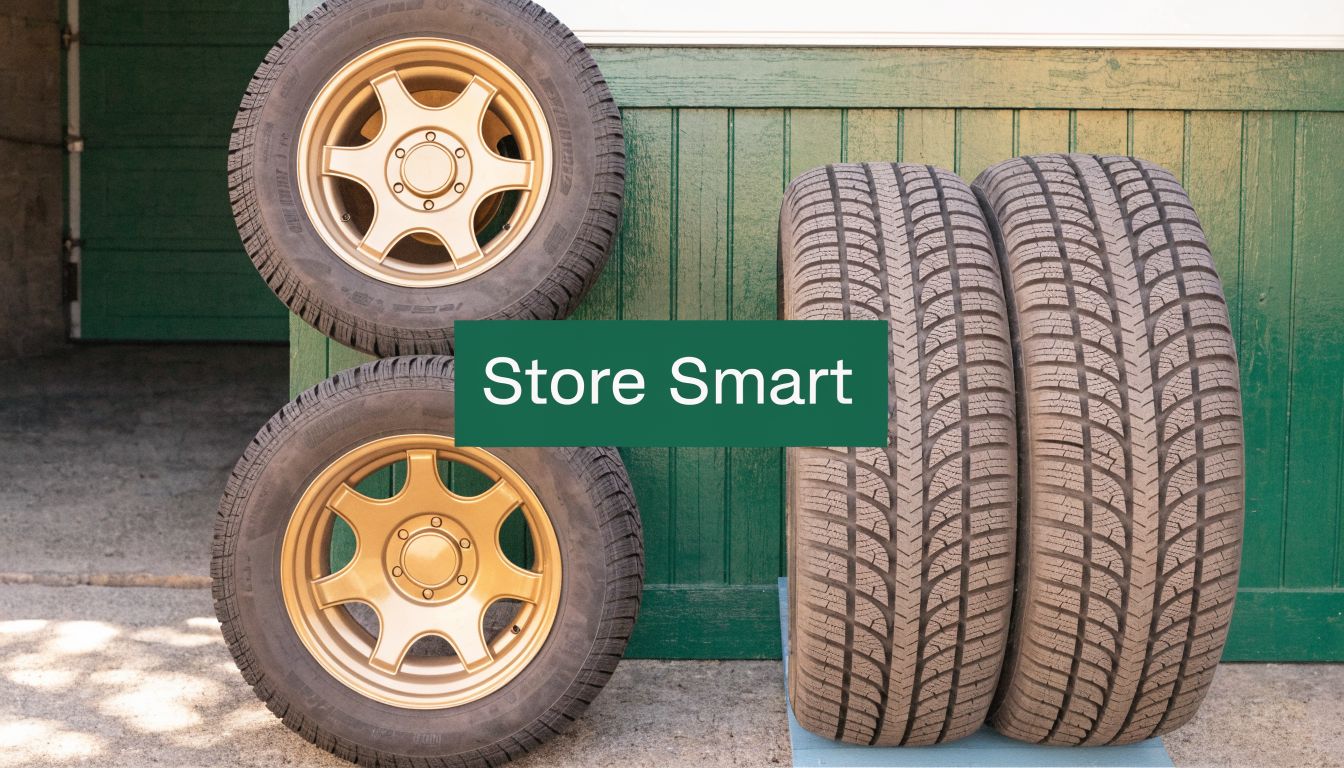
Mounted tires need a different setup
Mounted winter tires have the wheel supporting the structure, so they’re more flexible in storage. If your snow tires stay on their own rims, you’ve got two practical options.
Horizontal stacking works well when floor space is tight. Keep the stack neat and stable, and don’t wedge it into a hot corner beside a furnace or appliance.
Rack storage or hanging by the rims can also work if the hardware is solid and the tire weight is supported properly.
Mounted sets are often easier for apartment living because they’re simpler to move as a group and easier to cover cleanly.
Unmounted tires should stand upright
A bare tire without a wheel inside it needs support differently. Store unmounted tires vertically, side by side, not piled flat for long-term storage and not hanging.
That upright position helps the tire hold its shape. If you leave an unmounted tire hanging, the sidewall can distort. If you store it flat for months, the contact area can deform.
Store mounted tires stacked or racked. Store unmounted tires standing upright. That one distinction prevents a lot of avoidable damage.
A quick side-by-side guide
| Tire type | Best position | Avoid |
|---|---|---|
| Mounted on rims | Stack horizontally or support by the rim on a proper rack | Leaning loosely where they can topple or sit in direct sun |
| Unmounted | Stand upright in a row | Hanging or leaving flat for extended storage |
Small-space advice that actually works
If you live in an apartment, mounted tires are usually easier to manage because you can stack them into a compact footprint and cover them. Some people even hide a covered stack in a storage nook, under a workbench, or in a corner with a fitted cover so it doesn’t dominate the room visually.
Unmounted tires need more frequent attention. They shouldn’t just be lined up and forgotten. Rotate their position occasionally so the same part of the casing isn’t taking the load the whole time.
A few practical mistakes to avoid:
- Don’t lean unmounted tires at odd angles: That loads one sidewall unevenly.
- Don’t hang bare tires on hooks: The tire isn’t meant to carry itself that way long term.
- Don’t overstack mounted sets in unstable piles: Keep the stack tidy and secure.
- Don’t store any tire directly against sharp edges or clutter: Sidewalls are tough, not indestructible.
If you’re choosing between storing on rims or off rims and you have the option, mounted sets are usually the more apartment-friendly choice.
Finding the Right Storage Environment at Home
The best storage position won’t save tires from the wrong room. Rubber hates unstable conditions, and most home storage problems come from the environment more than the orientation.
What the tire actually needs
The target is simple: a cool, dry, dark space with stable temperature and minimal exposure to ozone or chemicals. The verified guidance puts ideal storage conditions around 60ºF to 70ºF, with additional benchmarks of 40 to 75°F and low humidity, while warning that temperatures above 77ºF, direct sunlight, and ozone exposure speed degradation, as outlined in this resource on temperature-controlled storage.
That rules out more places than people expect.
Best and worst spots at home
A basement is often the strongest home option if it’s dry and reasonably climate-stable. It’s usually darker, cooler, and less exposed to daily temperature spikes than a garage.
A garage is mixed. It’s convenient, but many garages get hot in summer, cold in winter, and damp during seasonal changes. If you’re storing there, even basic upgrades that improve temperature stability can help. Homeowners trying to moderate those swings may find this guide on garage door insulation useful because the door is often the weakest point in the space.
A closet or interior room can work surprisingly well in an apartment if you have the footprint and can keep the tires bagged, clean, and away from direct heat sources.
A balcony, shed, or outdoor corner is a bad bet. Even covered tires are still dealing with environmental swings and ambient moisture, which is exactly what winter tire rubber doesn’t need during the off-season.
Watch for the less obvious hazards
Some storage spots look fine at first glance but still cause trouble:
- Concrete floors: They can wick moisture. Raise tires on wood, shelving, or a rack instead of placing them directly on the slab.
- Furnaces and utility rooms: Ozone and heat are both bad for stored rubber.
- Window-adjacent storage: Sunlight through glass still exposes the tires to UV.
- Chemical storage areas: Solvents, fuels, and similar products don’t belong near tires.
If the only available spot is bright, hot, damp, or next to machinery, it’s not a storage solution. It’s a delay before damage.
For renters, home storage often proves insufficient. You may not have a basement. You may not control the garage conditions. And a cheap, non-climate-controlled locker can be little better than a shed.
Smart Storage for Small Spaces and Professional Options
Small-space tire storage is a game of trade-offs. You’re balancing protection, convenience, appearance, and the plain fact that four tires consume usable square footage. Most guides skip that reality. They assume you’ve got a basement wall or a roomy garage bay waiting for seasonal gear.
That’s not how apartment living works.
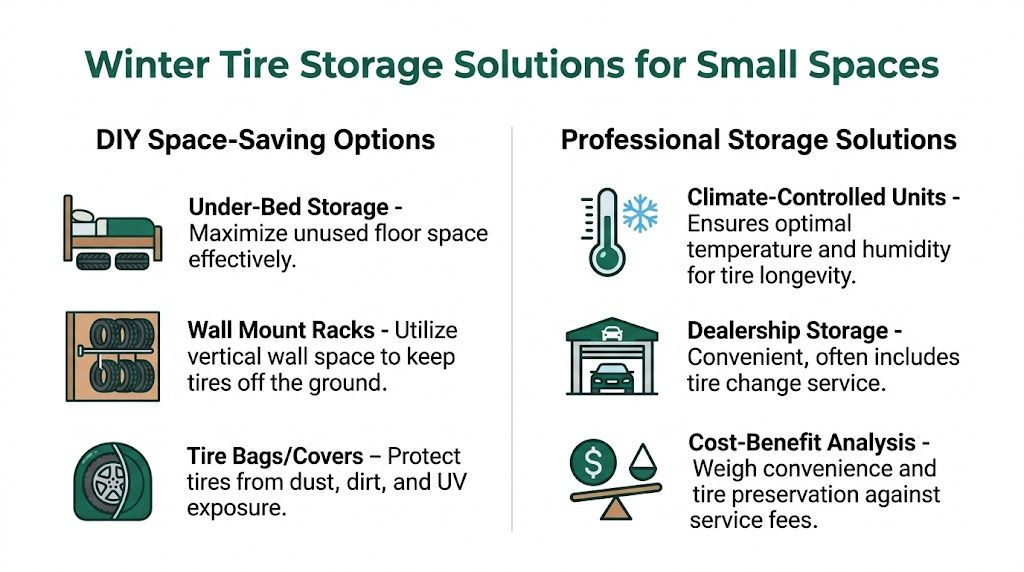
DIY options that don’t wreck your apartment
If you’re committed to keeping the tires at home, the goal is to make them compact, clean, and out of your daily path.
Some workable apartment-friendly ideas:
- Under-bed storage for smaller sets: This only works if your bed frame is high enough and the tires are bagged well, but it can reclaim otherwise wasted space.
- A covered corner stack: Mounted tires stacked neatly with a fitted cover look far better than four exposed black circles in the living room.
- Wall-mounted racks in a private garage space: If your building gives you a secure parking spot or storage alcove with wall access, a proper rack gets the tires off the ground.
- Closet placement for unmounted tires stored upright: This works only if the closet is dry, dark, and not already doing three jobs.
Some people get creative and turn a covered stack into a side table in a utility room or entry nook. It’s not glamorous, but it beats leaving the tires exposed to sunlight and dust.
The hidden cost of DIY storage
Home storage sounds free because there’s no monthly bill attached to the tires themselves. But DIY storage still has costs.
You may need:
- bags or covers
- a rack or platform
- floor protection
- a dehumidifier, depending on the space
- the willingness to give up valuable living area for months
The more important cost is harder to measure. Four tires in a small apartment don’t just occupy space. They reduce flexibility. That spare corner could hold a desk, a stroller, a shelf, or nothing at all, which in a small place is its own kind of value.
Mainstream tire storage advice rarely addresses these urban trade-offs. As noted in this article about storage unit alternatives, this often results in people paying in clutter, inconvenience, or unsuitable storage conditions even when they think they’re saving money.
When professional storage makes more sense
The verified guidance on urban tire storage points out that most storage advice assumes basements or garages and ignores the economic trade-offs for people in small apartments. It also notes that professional, climate-controlled storage can be a cost-effective alternative to buying equipment for an unsuitable home setup, while protecting tires and freeing living space, as discussed in this Hercules tire storage guide.
That doesn’t mean every paid option is automatically smart. You still need to compare what you’re getting.
Comparing your realistic choices
| Option | What it does well | Where it falls short |
|---|---|---|
| Home apartment storage | Immediate access, no travel | Takes up living space, can be hard to keep cool and dark |
| Shared garage or building locker | Keeps tires out of the apartment | Often unstable temperature and humidity |
| Traditional self-storage | More room for bulky items | You may pay for more space than the tires need |
| Professional climate-controlled storage | Better environment and less clutter at home | Ongoing monthly fee |
For many city drivers, the decision comes down to this: are you storing tires, or are you storing a tire problem inside your apartment for half the year?
A useful way to think about storage quality
If you’ve ever looked into how people protect tools, inventory, or seasonal goods in more extreme spaces, the same lesson comes up again and again. Environment control matters more than improvised shelter. That’s why resources on topics like UK shipping container insulation are interesting even outside the container world. The principle is the same. A box or enclosed area isn’t automatically protective if temperature and moisture aren’t controlled.
Paying for the right environment can be cheaper than replacing tires early and living around them for months.
Who benefits most from outsourcing tire storage
Professional storage tends to make the most sense for:
- Apartment renters: You don’t have a basement, and your building storage is limited or unreliable.
- People moving between places: Tire storage is one more thing to carry through a transition.
- Multi-vehicle households: More tire sets mean more floor space gone.
- Anyone with premium winter tires: The better the tire, the more painful it is to shorten its life through careless storage.
If your home storage option is cool, dry, dark, and out of the way, use it. If your real option is a hot parking garage corner or a stack beside the couch, professional storage starts looking less like a luxury and more like the tidy, rational answer.
Your Long-Term Plan for Healthy Tires
Good tire storage is a repeatable routine. Once you’ve done it properly once, the next year gets easier.
A strong long-term plan is simple. Clean the tires after removal, dry them fully, inspect them, label them, position them correctly based on whether they’re mounted, and keep them in a stable environment. During longer storage periods, check on them occasionally instead of assuming silence means everything is fine.
A quick seasonal checklist
- Clean before storage: Get salt, grime, and brake dust off.
- Dry completely: Don’t seal moisture in with the tire.
- Inspect closely: Spot wear, cracks, or punctures before next season sneaks up.
- Store by type: Mounted and unmounted tires shouldn’t be positioned the same way.
- Protect the environment: Dark, dry, stable, and away from heat or ozone.
- Recheck over time: Especially if the tires stay stored across multiple seasons.
The equity side matters too. Mandatory winter tire policies can place more burden on renters and lower-income households who often don’t have garages or basements, which is why flexible professional storage can be a practical access solution, as discussed in this piece on mandatory winter tires and poverty.
Think beyond this season
Properly stored winter tires can remain usable for years, but they still deserve periodic inspection as they age. If you’re keeping a set long term, build in a habit of checking condition before every install and reviewing broader long-term storage tips for anything you plan to keep off-site or out of rotation for extended periods.
The best storage plan is the one you’ll follow every year. Consistency beats a perfect setup that falls apart after one season.
If your apartment doesn’t have a suitable place for storing winter tires, Endless Storage gives you a cleaner option. Their storage-by-the-box model is useful for seasonal gear when you want climate-controlled protection without renting a full unit or sacrificing valuable floor space at home.