Backyard Landscaping DIY: A Start-to-Finish Guide

A lot of backyard projects stall before they even start. Not because the ideas are bad, but because the space is already doing too many jobs at once. The grill is shoved against the fence, extra pots are stacked by the back door, kids' stuff has migrated into every corner, and the first few bags of soil or gravel make the whole yard feel smaller instead of better.
This is the nature of backyard landscaping diy in a small urban space. You're not working with a blank canvas. You're working around clutter, tight access, limited staging room, and the fact that your backyard still needs to function while you build it.
That's also why the best DIY yards rarely happen in one heroic weekend. They come together in phases, with a plan that matches the site, a layout that respects how people move through the space, and a clear way to keep materials from taking over the project. I've seen this play out over and over in small yards. The people who finish aren't always the most skilled. They're usually the ones who stay organized, make fewer rushed decisions, and keep the work area usable.
Your DIY Landscaping Journey Begins Here
A desire to improve a yard that feels unfinished, cramped, or wasted often prompts action, not an initial feeling of confidence. A patchy lawn, a narrow patio, a fence line full of random containers, and one corner that became storage for everything that didn't fit inside.

The good news is that DIY landscaping is normal, not niche. 54.07% of homeowners handle their own lawn care, and they spend about 70 hours annually on maintenance, according to LawnStarter's landscaping statistics roundup. Plenty of homeowners are already doing hands-on outdoor work. The challenge isn't whether you can do it. It's whether you can do it in a way that stays manageable.
What makes small-space DIY different
A suburban yard lets you spread out. A city yard doesn't. In a tighter backyard, every decision has a ripple effect.
- Material delivery matters: A pile of pavers can block your only path.
- Tool storage matters: A wheelbarrow, shovel, rake, tamper, and hose can swallow a patio fast.
- Sequence matters: If you plant first and build second, you'll trample your own work.
- Daily reset matters: When the yard still connects to the kitchen, laundry, pets, or bikes, disorder gets old quickly.
That's why I like practical resources that keep beginners grounded in what they can build. R.E. and Sons' DIY landscaping guide is a good example of project-focused inspiration that helps you think in doable pieces instead of one giant makeover.
A good backyard doesn't come from doing everything. It comes from choosing a few things that solve the space well.
Start smaller than your ambition
The best first move is rarely the flashiest one. It's usually clearing, measuring, and making room to work. Once you can move through the yard without stepping over clutter, key ideas come into focus. A gravel sitting area, a clean paver path, one raised bed, a privacy screen, or lighting along a fence can do more than a long list of half-finished upgrades.
That shift matters. A project feels possible when the space starts cooperating.
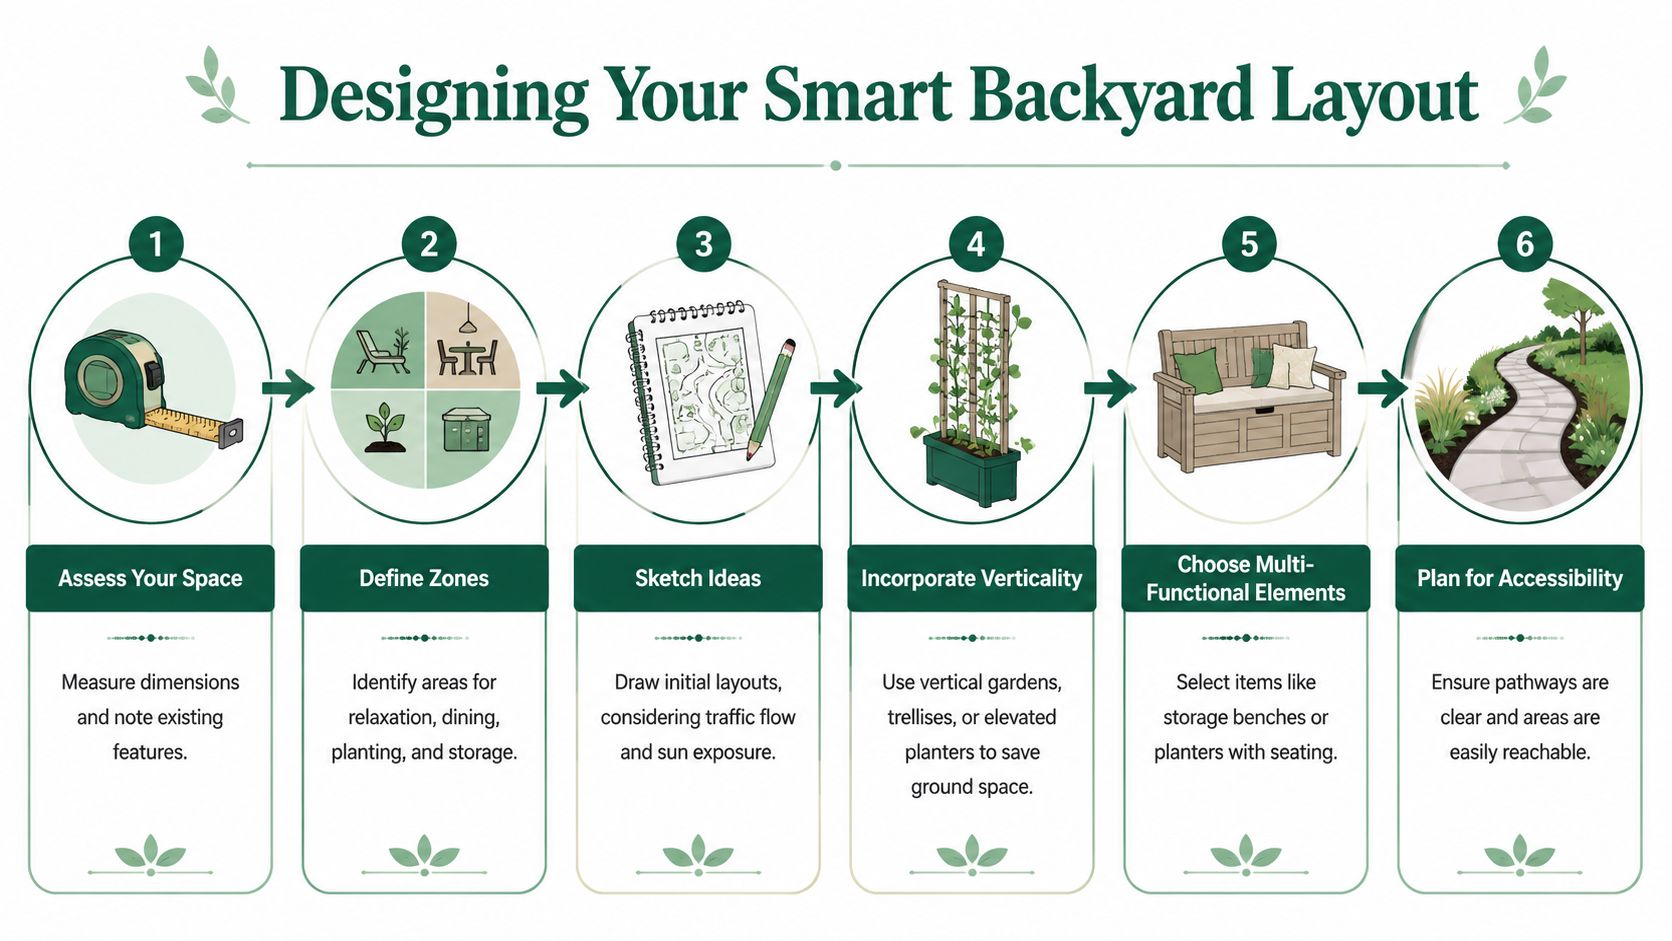
Assess Your Space and Define Your Vision
Before buying plants, pavers, edging, or outdoor furniture, spend time reading the yard you already have. Most expensive mistakes happen because the plan looked good on paper but ignored sun, drainage, soil, or scale.
The strongest DIY plans begin with site analysis, not shopping. The Life-Scape Method ties project success to that early work. It reports 70 to 80% completion rates for DIYers who break projects into milestones and start with a clear outcome statement, while skipped site analysis is linked to 60% of failures from poor soil or plant mismatches, according to The Garden Continuum's explanation of the Life-Scape Method.
Read the yard before you redesign it
Walk the space at different times of day. Don't guess where the sun lands. Check it in the morning, midday, and late afternoon. Notice where water lingers after rain and where the soil dries out first.
Look closely at these basics:
Dimensions and access
Measure fence-to-house depth, side-yard access, door swings, gate width, and any narrow pinch points. If a wheelbarrow can't pass easily, your material plan needs adjusting.Light
Track full sun, partial sun, and deep shade. A bright yard in winter may become much shadier once trees leaf out.Drainage
Watch where runoff collects. If one corner stays soggy, don't force a seating area there unless you're willing to fix grading first.Soil
Dig a few test holes. Check whether the soil is compacted, rocky, sandy, or heavy with clay. If you're testing pH, the recommended target from the same Life-Scape guidance is 6.0 to 7.0.Existing assets
Mature shrubs, decent fencing, an old concrete pad, or a wall with good reflected light can save work if you build around them wisely.
Write one outcome statement
This sounds softer than it is. It is a decision filter.
Try a sentence like this: I want this backyard to feel calm, easy to maintain, and usable for coffee in the morning, dinner with two friends, and container herbs near the kitchen.
That statement keeps you from designing a lounge, dining room, cutting garden, kids' zone, storage bay, and fire pit area all inside one small rectangle.
Practical rule: If a feature doesn't support the way you want the yard to feel or function, it's probably clutter in disguise.
A lot of people also underestimate how much hidden stuff affects planning. Before drawing the new version of your yard, it helps to get a realistic inventory of what's already competing for space. A quick pass through an organization tool like the Endless Storage clutter assessment calculator can help you spot how much of the project is design, and how much is volume management.
Notice the non-negotiables
Some realities don't care about your Pinterest board.
| Site condition | What usually works | What usually fails |
|---|---|---|
| Low light by fences | Ferns, shade containers, seating nook | Full-sun flowering border |
| Poor drainage corner | Gravel, drainage fix, rain-friendly planting | Wood furniture set placed directly on wet ground |
| Tight access path | Bagged materials, smaller loads, hand tools | Oversized delivery dumped all at once |
| Hot reflective wall | Heat-tolerant pots, trellis, herbs | Thin-leafed shade plants |
Once you've done this step, the project gets simpler. You stop trying to impose a fantasy yard on a difficult site and start building the right yard for the space you own.
Design a Smart Layout for Your Backyard
Small backyards improve fast when the layout does more work than the decor. You don't need many elements. You need the right elements in the right places.
The easiest way to design a usable yard is to divide it into zones. Even a narrow urban backyard can usually support two or three. Think in functions, not features. Sitting. Cooking. Planting. Moving through the space. Storing what has to stay outside.
Build the plan around movement
A backyard feels cramped when circulation is an afterthought. The fix is often simple. Draw the walking path first, then fit everything else around it.
A few layout choices tend to work well in tight spaces:
- Keep one clear route: From door to gate, patio, or seating area.
- Push bulky functions to edges: Benches, raised beds, and planters usually belong along boundaries, not floating in the middle.
- Use vertical surfaces: Trellises, wall planters, and slim shelves free up ground area.
- Choose pieces with two jobs: A bench with storage, a planter that screens a neighbor view, or a gravel strip that also handles runoff.
Sketch in phases, not all at once
Many backyard landscaping diy projects become more manageable at this stage. You do not need to build the entire yard immediately. You need a sequence you can afford and finish.
A phased approach is backed by useful budget discipline. Following a timeline that starts with planning and moves through hardscaping before planting can lead to 75% of projects finishing under budget, compared with 40% for non-phased projects, according to Homes and Looms' backyard planning guide. The same guide notes that late-season plant shopping can cut softscaping costs by up to 50%.
That changes how you draw the yard. Instead of designing one final reveal, map what gets built first.
A layout sequence that works
Here's a practical order for a small backyard:
Walking surface first
Patio, path, gravel pad, or stepping route. If the circulation is bad, everything else feels bad.Structural edges next
Raised beds, retaining elements, edging, privacy screens, and fence-side trellises.Planting after the dust settles
This protects roots from foot traffic and prevents rework.Accessories last
Lighting, stools, side tables, textiles, and decorative pots should be the final layer.
If your drawing needs every inch filled to look good, the design is too crowded.
Make the yard feel larger
You can change the perception of space without changing square footage.
- Repeat materials: One gravel type, one wood tone, one paver shape.
- Limit level changes: Tiny spaces don't handle too many platforms well.
- Use larger pavers or fewer visual breaks: Busy patterns make compact yards feel chopped up.
- Leave negative space: An open patch of gravel or paving helps the eye rest.
A clean layout usually beats a complicated one. When in doubt, remove one thing from the plan. Then check if the yard feels calmer. It usually does.
Manage Clutter with a Smart Storage Strategy
This is the part most DIY guides skip, and it's the part that derails a lot of otherwise good projects. Materials don't just appear and disappear neatly. They pile up. Existing furniture has to go somewhere. Half-used bags of soil, plant trays, hand tools, hoses, cushions, and old pots start competing with the project itself.

In a small yard, clutter isn't just ugly. It blocks progress. Research around awkward and small outdoor spaces notes that many small-space dwellers abandon DIY projects due to material clutter, and that design advice often ignores the main issue of where to put tools, mulch bags, and off-season items during active work, as discussed in this article on landscaping awkward yards.
Why staging matters more than people think
If the yard is your only outdoor space, then the project area also becomes the storage area by default. That's where things go wrong.
You lose time moving the same objects over and over. You buy duplicates because tools disappear under tarps or behind planters. New plants dry out because they sat in the wrong place for three days. The project starts to feel like chaos management instead of progress.
A cleaner build sequence starts with a staging plan. Before delivery day, decide what stays, what moves, what gets discarded, and what needs temporary off-site storage. If that sounds excessive, it isn't. It's the difference between a working site and a jammed one.
What to move out before work starts
Don't wait until the first truck arrives. Clear the yard early.
- Seasonal furniture and soft goods: Cushions, umbrellas, outdoor rugs, and covers get dirty fast around hardscape work.
- Seldom-used garden supplies: Empty pots, backup tools, spare stakes, old bags of amendments.
- Household overflow: Bikes, folding chairs, coolers, kids' gear, pet items.
- Decor that slows you down: Lanterns, side tables, wall art, fragile containers.
If the volume has crept up on you, a practical reset helps. A quick decluttering pass using ideas from this guide on how to get rid of clutter can separate trash, donation candidates, and items worth keeping out of the work zone.
The backyard has to become a jobsite for a while. If you treat it like a finished patio during construction, the project drags.
Here's a useful visual walkthrough before you start shifting materials around:
Keep only active materials on site
One of the best habits in a small backyard is this: only keep the current phase in the yard.
If you're building a paver path this weekend, keep the base material, pavers, hand tamper, level, rubber mallet, and string line on site. Don't also store next month's trellis, six extra ceramic pots, and winter covers in the same footprint.
A simple rotation table helps:
| Item type | Keep on site | Move off site |
|---|---|---|
| Current-phase tools | Yes | No |
| Bulk decorative pots | No | Yes |
| Plant stock for same-week install | Yes | No |
| Off-season decor | No | Yes |
| Spare lumber and leftover pavers | Depends on immediate use | Usually yes |
That discipline protects momentum. The yard stays workable, the home stays calmer, and you can see the transformation happen instead of tripping over it.
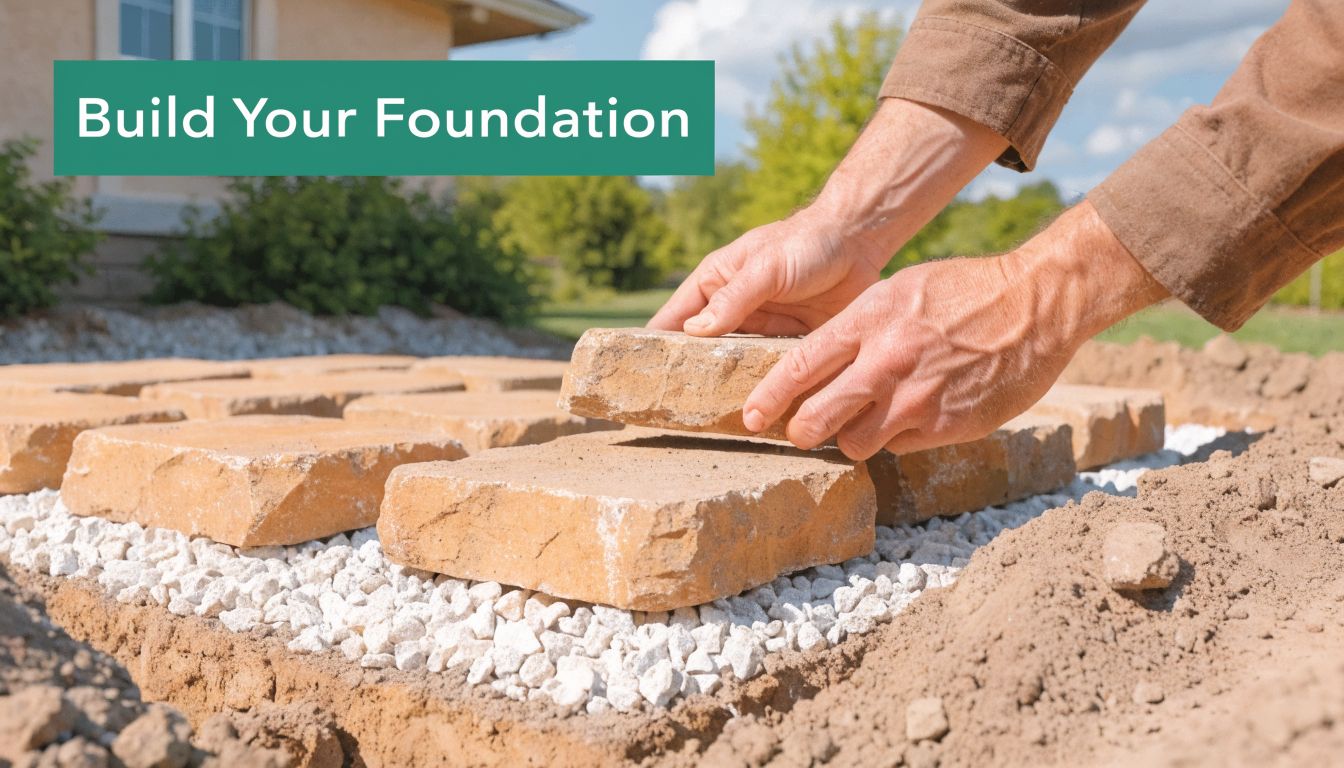
Build Your Foundation with DIY Hardscaping
Hardscaping is the skeleton of the yard. When it's solid, everything else looks intentional. When it's rushed, even great plants can't hide it.
For a beginner, the smartest hardscape projects are simple, forgiving, and high impact. A compact paver patio, a gravel seating area, a stepping-stone path, or a raised bed kit can all change the yard without requiring advanced masonry skills. The trick is not choosing the easiest-looking project. It's choosing one that matches your tools, access, and patience.
A gravel seating area is often the best first win
If your yard is uneven, damp, or awkwardly shaped, gravel is more forgiving than a fully laid patio. It drains well, installs with basic tools, and fits modern, cottage, or utilitarian designs depending on edging and furniture.
A straightforward build usually needs:
- Marking tools: Tape measure, stakes, string line, marking paint
- Digging tools: Flat shovel, spade, garden rake
- Base prep tools: Hand tamper, level, weed barrier fabric if appropriate
- Materials: Base rock if needed, gravel topping, steel or composite edging
The basic sequence is simple. Mark the footprint. Excavate to a consistent depth. Remove roots and obvious debris. Set edging before the final fill so the shape stays crisp. Compact in layers instead of dumping everything at once and hoping it settles evenly.
Pavers reward patience, not speed
A paver path or small patio gives a yard instant structure, but base prep matters more than placement. Most problems trace back to skipped compaction, uneven excavation, or bad slope.
Use a level often. Check from multiple directions. Keep a rubber mallet handy for small adjustments. If you're laying a path, dry-fit the pavers before you commit so you can fine-tune spacing and avoid weird cuts at the end.
Field note: A crooked edge is more noticeable than a slightly imperfect center. Spend your energy on borders and lines.
Raised beds are ideal in tough urban soil
If the native soil is compacted, contaminated, or full of construction rubble, raised beds save frustration. Kits are fast, but simple lumber builds work too if you're comfortable cutting boards and driving exterior screws.
They're also useful when you're moving or downsizing into a smaller yard. Outdoor overflow is common in those transitions. Furniture, planters, and seasonal pieces often arrive before the new layout is figured out. That challenge is highlighted in Houzz's discussion of oddly shaped backyards, which points to how poorly most guides handle overflow during a move. If you're in that situation, it helps to keep the hardscape plan modular so you're not building around temporary clutter.
For anyone tackling a gathering space, a small fire feature can be a strong centerpiece if local rules allow it. Van Dyke Outdoors' fire pit plans are a useful reference for understanding shape, material planning, and safe sequencing before you commit.
If your project overlaps with a move, don't underestimate logistics outside the yard itself. A practical guide to portable storage for moving can help you think through how to keep household overflow from colliding with yard work.
What works and what usually doesn't
| Project choice | Usually works well | Usually creates problems |
|---|---|---|
| First hardscape project | Gravel pad or simple path | Complex retaining wall |
| Tool strategy | Rent specialty tools you'll use once | Buy everything before the plan is tested |
| Material order | Small, staged deliveries | Full project dump into tiny yard |
| Drainage approach | Plan slope early | Hope the surface “settles right” later |
The foundation phase is where the yard starts looking deliberate. Keep it simple, build it level, and leave yourself enough room to move while you work.
Add Life with Plants, Soil, and Lighting
Plants are the stage where a backyard starts feeling like a place to spend time, not just a project site. In a small urban yard, this is also where DIY plans can bog down fast. Bags of soil pile up by the gate, nursery pots take over the patio, and the shovel you need ends up buried behind three trays of plants waiting to go in. If you do not make room for this phase, even a simple planting plan turns frustrating.
Start with soil before you buy much of anything. Good plants struggle in compacted fill, builder debris, or bone-dry ground, and no amount of last-minute fertilizer fixes that. I have had better results from improving average soil and planting fewer things than from dropping expensive shrubs into bad ground and hoping for the best.
A practical prep routine works in most backyards:
- Loosen compacted soil with a garden fork.
- Pull out roots, rocks, and rubble so new plants are not competing with junk.
- Mix in compost where the soil is thin, sticky, or lifeless.
- Match plants to the light and moisture you have.
- Mulch after planting to hold moisture and slow weed growth.
Keep mulch to a modest layer, enough to cover the soil without burying stems or piling against trunks. Too little dries out fast. Too much traps moisture where you do not want it and can make young plants sulk.
In a tight yard, a restrained plant palette usually looks better and stays easier to manage. Repeating a few reliable plants creates order, which matters even more when fences, neighboring buildings, and stored household items already add visual noise. One evergreen for structure, one flowering perennial, one grass or strappy foliage plant, and one climber is often plenty.
Spacing matters more than beginners expect. Small nursery plants make people want to pack beds too tightly, especially when the yard still looks bare after hardscaping. Give plants room to reach their mature size. The bed looks cleaner, air moves better, and you spend less time hacking things back six months later.
Containers solve several small-yard problems at once. They help when the native soil is poor, when you rent, or when parts of the yard still need to stay flexible because materials and tools are rotating through the space. Use fewer, larger pots rather than a scatter of tiny ones. Larger containers dry out slower, look calmer, and are easier to group along an edge so the center of the yard stays usable.
If you need to relocate container plants during the project or between homes, this guide on how to pack plants for moving safely is a useful reference.
Lighting should follow the same rule as planting. Keep it simple and place it with purpose. A few warm lights near seating, one or two path lights where feet land, and a spotlight on a fence or small tree usually does more for the yard than a dozen scattered solar stakes. Light circulation routes first. Accent features second.
Watering deserves the same level of restraint. Drip irrigation works well for beds and containers if you know hand watering will become inconsistent, but it still needs setup time, a pressure check, and occasional adjustments. For very small yards, a hose with a shutoff wand can be enough if the planting plan stays compact. The right choice is the one you will keep up with in August, not the one that looked impressive on install day.
This phase goes better when the yard stays organized while you work. Stage soil in one spot, stack empty nursery pots immediately, and keep one clear path from storage to planting area. The plants will make the space feel softer. The process stays manageable because the site does not turn into a maze.
Maintain and Enjoy Your New Outdoor Space
A finished backyard starts aging the day you stop building it. That isn't a bad thing. It just means the yard needs light, regular attention instead of one big rescue every season.
Most maintenance is easier than people expect when the design was sensible to begin with. Clear paths, properly spaced plants, and a limited material palette reduce the amount of ongoing work. The goal is to keep the yard functional and pleasant, not preserve it like a showroom.
A simple seasonal rhythm
You don't need a complicated checklist pinned to the fridge. You need a few habits tied to the calendar.
Spring
- Refresh mulch: Top up beds where coverage has thinned.
- Prune winter damage: Remove dead stems and broken growth.
- Check irrigation: Run the system and look for clogs, leaks, or missed pots.
- Clean hardscape: Sweep gravel back into place and wash down paving if needed.
Summer
- Water thoroughly, less often: Shallow daily watering creates weaker roots.
- Deadhead selectively: Keep flowering plants tidy without turning maintenance into a chore.
- Watch container soil: Pots dry out faster than in-ground beds.
- Reset furniture zones: Move chairs and tables back into alignment after heavy use.
Fall
- Cut back what needs it: Leave attractive seed heads if you like winter texture.
- Clear leaf buildup: Especially from drains, gravel areas, and path joints.
- Store soft goods: Cushions and textiles last longer when they're dry and protected.
- Plant for the next cycle: Cooler weather is often easier on new additions.
Winter
- Protect fragile containers: Move or group them in sheltered areas.
- Drain sensitive watering components: Don't let water sit where freezing is a risk.
- Inspect wood and metal: Catch loose screws, rust spots, or rot early.
- Keep traffic off soggy beds: Wet soil compacts fast.
Protect the calm you created
The easiest way to ruin a finished small yard is to let it become overflow storage again. Patio corners gradually fill. One folded chair turns into four. Extra pots become a stack. The “temporary” bag of fertilizer stays there for months.
That's why seasonal rotation matters. Items you only use part of the year should leave the yard when they're off duty. The same principle works for camping gear, folding chairs, coolers, and recreation equipment. This guide on how to store camping gear is useful even if your backyard clutter isn't strictly camping-related, because the storage logic is the same.
The yard feels finished when every item in it earns its place.
Make time to actually use it
A lot of DIYers stay in project mode too long. They keep adjusting pots, rethinking layouts, or planning the next upgrade before they've enjoyed what's already done.
Put a chair out. Have coffee there. Eat outside on an ordinary evening. Turn the lights on for no reason. A backyard doesn't need to be elaborate to feel good. It just needs to support your life better than it did before.
Frequently Asked DIY Landscaping Questions
Do I need a permit for a small patio or retaining wall
Sometimes yes, sometimes no. It depends on your city, the height of the wall, drainage impact, and whether the work changes grade near a property line. A simple gravel area or low freestanding raised bed often falls into easier territory, but you should still check local building and zoning rules before buying materials.
If you're dealing with electrical work, gas lines, major grading, or a structural wall, don't guess. Call the local department and ask direct questions. It's faster than tearing something out later.
When should I rent tools instead of buying them
Rent when the tool is expensive, bulky, or only useful for one phase. Plate compactors, demolition hammers, larger tile saws, and specialty trenching tools usually make more sense as rentals for a homeowner.
Buy the tools you'll keep reaching for. A solid shovel, hand tamper, wheelbarrow, bypass pruners, hose nozzle, level, and rubber mallet earn their place in most yards. Cheap versions of those tools usually become frustrating fast.
What if I hit an unexpected problem underground
Stop digging and reassess. Tree roots, buried rubble, old concrete, mystery pipes, and utility lines are common surprises. Don't keep pushing just because you're close to finishing the trench.
If you suspect a utility issue, treat it seriously. Mark the area, step back, and follow local procedures for utility verification. Delays are annoying, but damage is worse.
What projects are worth hiring out
Hire out anything that has meaningful structural, safety, or code consequences if you get it wrong. That often includes major retaining walls, electrical work, gas fire features, complex drainage correction, large concrete pours, and tree work near structures.
You can still keep a lot of the project DIY. It's common to hire for one high-risk phase and handle demolition, cleanup, planting, staining, furniture assembly, or finishing work yourself.
How do I choose between gravel, pavers, and decking
Choose based on drainage, budget, skill level, and how permanent you want the result to feel.
| Surface | Best for | Watch out for |
|---|---|---|
| Gravel | Drainage, budget-friendly seating areas, informal paths | Migration, edge control, weeds if neglected |
| Pavers | Defined patio or path, durable finish, cleaner look | Base prep errors show later |
| Decking | Uneven sites, elevated feel, warm underfoot | Framing complexity and maintenance |
If the site is damp or slightly uneven, gravel is often the least stressful start. If you want a crisp entertaining surface, pavers usually look more finished. Decking makes sense when grade changes are awkward or you want a platform effect.
How many plants should I buy at once
Fewer than you think. It's better to install a smaller number well than leave dozens sitting in nursery pots while you keep adjusting the layout.
Buy the anchor plants first. Place them. Live with them for a few days if needed. Then fill gaps with smaller supporting plants. That approach reduces impulse purchases and helps the design feel more intentional.
What's the biggest beginner mistake in backyard landscaping diy
Trying to solve the whole yard in one shot. That usually leads to rushed layout decisions, bad sequencing, clutter everywhere, and half-finished details.
A close second is underestimating logistics. In small spaces, the project succeeds or fails on movement, staging, and keeping the work zone under control. The prettier the final plan, the more important that practical discipline becomes.
If your backyard project is stuck because your home and yard are both overloaded, Endless Storage can help create the breathing room you need. Their storage-by-the-box model is useful for seasonal outdoor items, extra household overflow, and the in-between phases of a DIY renovation when you need space to work without giving up the things you want to keep.