
Getting your paintings ready for a move is all about having the right materials and the right approach. You'll need things like acid-free paper, plenty of bubble wrap, and proper art boxes. The basic idea is to wrap the painting's surface with paper, cushion it with bubble wrap, protect the corners, and then fit it snugly inside a box that’s the right size. This strategy is your best defense against scratches, punctures, and impact damage while it's on the move.
The Essential Framework for Moving Your Art Safely
Moving your art doesn't have to be nerve-wracking. Forget the guesswork; there’s a clear, professional framework for packing paintings that takes the anxiety out of the process. It really comes down to three foundational principles that every art owner should get familiar with before they even think about grabbing the packing tape.
Mastering these core concepts is the key to a successful, damage-free move.
Core Principles of Art Protection
First and foremost, you have to protect the surface from abrasion. A painting’s face is its most vulnerable part. Something as simple as dust, debris, or even the wrong kind of plastic wrap can cause tiny scratches that dull the finish or, even worse, damage the paint. That's why using specialized, non-abrasive materials is non-negotiable.
Next up is securing the frame against impact. I’ve seen it happen too many times—the corners are especially prone to getting dinged and dented during a move. A dropped box or a quick shift in the truck can easily chip a delicate frame, which messes with both the look and the structural integrity of the piece. Purpose-built corner protectors are a simple and effective fix for this common problem.
Finally, you need to brace the entire piece for the realities of transit. Your artwork is going to experience vibrations, bumps, and shifting. The goal here is to create a packing system that completely immobilizes the painting inside its box, absorbing any shocks and preventing the kind of movement that leads to disaster.
Key Takeaway: A successful art move isn't about one magic trick. It's a combination of surface protection, frame security, and transit bracing. Nail these three elements, and you've built the foundation for getting your artwork to its destination in perfect condition.
Setting Up for Success
Let's skip the generic advice and household hacks. We're diving straight into the specific materials and mindset that make the difference between a smooth move and a heartbreaking one. Think of this as your mental roadmap before we get into the nitty-gritty of each technique. Grasping these fundamentals ensures your art is truly prepared for the journey. For a wider view on getting everything else organized, our guide on general packing and moving strategies is a great companion piece to these art-specific tips.
Beyond just the physical packing, knowing how to preserve acrylic paintings for longevity also plays a big role in safe handling. Understanding the art itself helps you make better decisions during transport, ensuring it arrives just as you left it.
This framework helps you start thinking like a professional art handler. It’s not just about tossing a painting in bubble wrap; it’s about creating a custom-fit shield designed to counter the specific risks of moving. By focusing on these principles, you turn a stressful task into a methodical process that gives your art the respect and protection it deserves.
Choosing the Right Art Packing Materials
When you're packing up your art, the materials you pick are just as critical as the methods you use. It's so tempting to just grab whatever is lying around—old towels, newspaper, that roll of duct tape in the junk drawer—but that's one of the biggest and most expensive mistakes you can make. These everyday items can introduce acid, hold moisture, and have abrasive surfaces that can cause permanent, heartbreaking damage to your paintings.
Think of it like this: you wouldn't wash a delicate silk shirt with harsh dish soap. Your artwork deserves the same level of care. It needs professional-grade materials designed specifically for protecting fragile surfaces and finishes. This isn't about being fussy; it's a small investment in the right supplies to protect a much, much larger one.
The Non-Negotiable First Layer
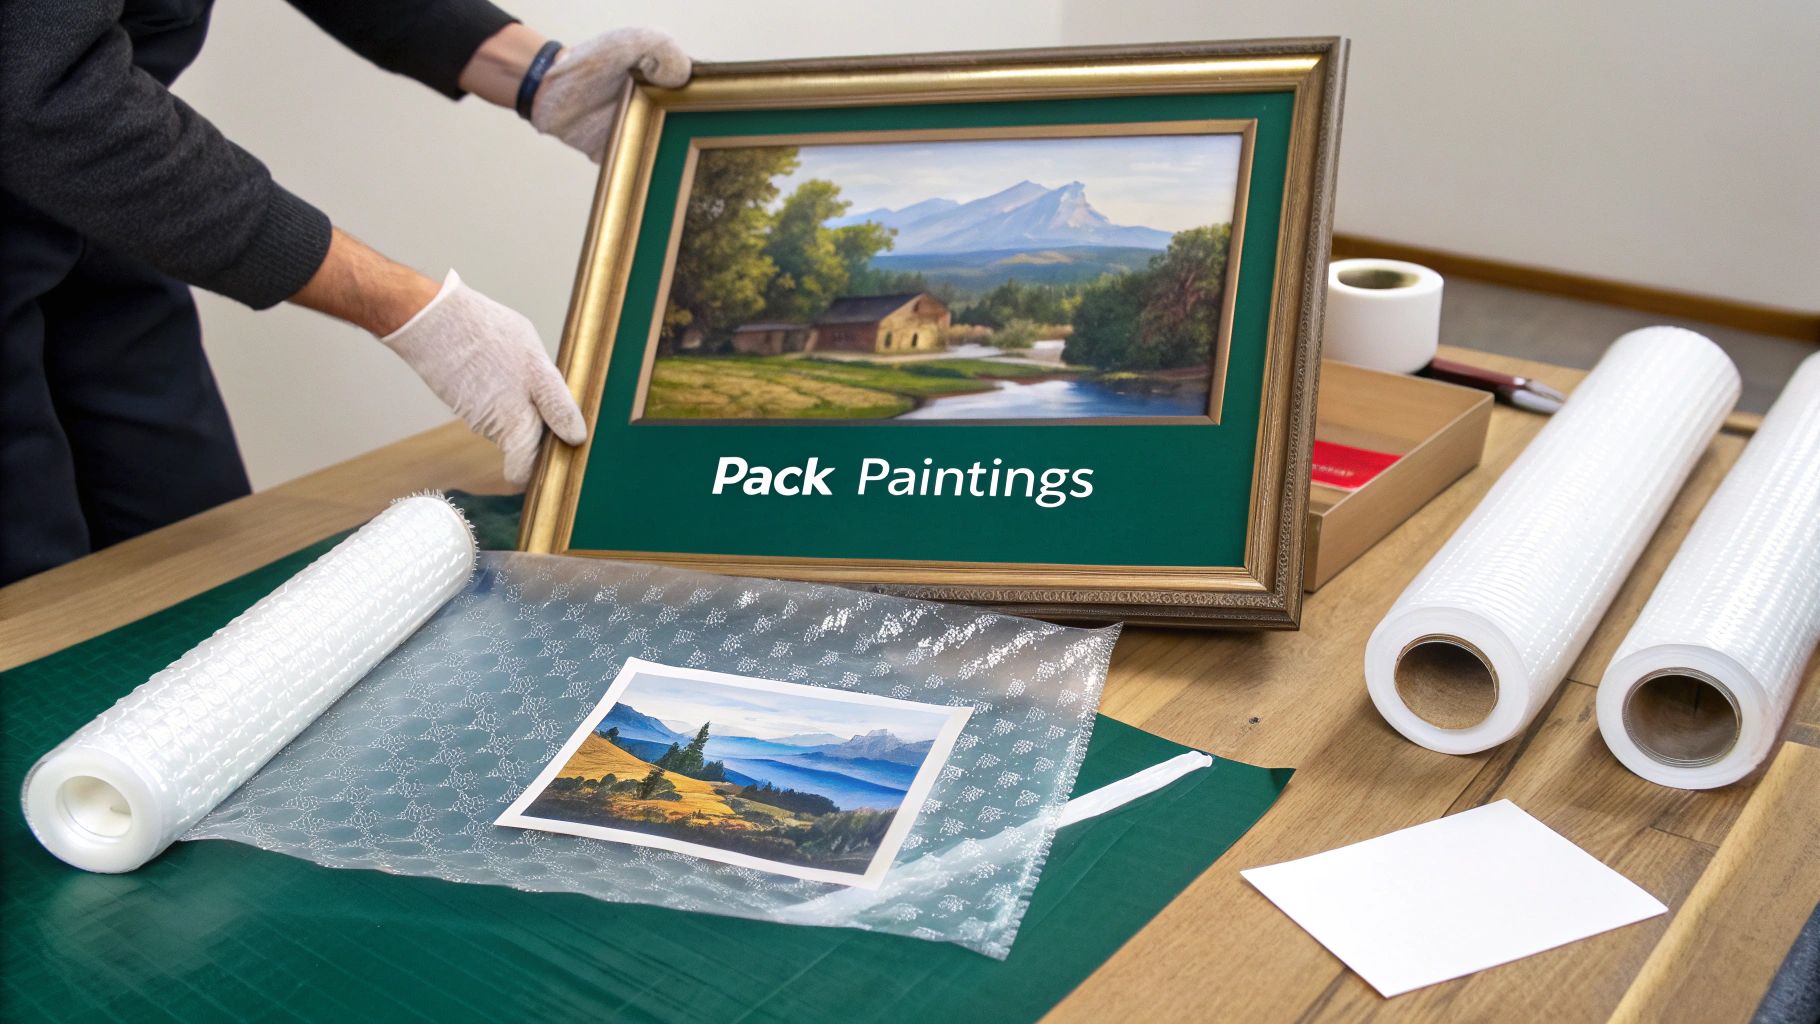
The absolute first thing that should ever touch the surface of your painting is glassine paper. This isn't just regular paper. It's a super smooth, glossy, and completely acid-free barrier that acts like a shield.
Glassine is moisture-resistant and cuts down on friction, which is a lifesaver for paintings with a lot of texture, like works with heavy impasto oil paint or delicate pastels and charcoals.
So why not just use plastic wrap? While it seems like a great seal, standard plastic can actually trap humidity right against the painting’s surface. This can lead to mold or cause the varnish to soften and get sticky. Glassine, on the other hand, lets the artwork breathe while still offering fantastic protection.
Pro Tip: Whatever you do, never let bubble wrap directly touch a painting's surface. The air-filled bubbles can leave permanent indentations on the varnish or paint, especially if things get warm during the move. Always, always wrap in glassine paper first.
Tapes and Adhesives
This is another area where good intentions can go horribly wrong. Using the wrong kind of tape can completely ruin a frame's finish or, even worse, tear the art itself if it makes contact.
- Artist’s Tape or Blue Painter's Tape: This is your go-to for anything near the artwork. It has a low-tack adhesive that won't strip paint or varnish when you peel it off. It’s perfect for making a large 'X' across the glass on framed pieces to keep the shards in place if it happens to break.
- Packing Tape: This powerhouse adhesive should only be used for one thing: sealing the final, outer cardboard box. It's designed for cardboard, not for picture frames or the materials wrapped around your art. One misplaced strip can pull the finish clean off a beautiful frame.
Padding and Structural Support
Once the surface is safely covered, the next job is to cushion the piece from bumps, drops, and impacts. This calls for a smart combination of soft padding and rigid support to create a protective shell.
With the global art market showing consistently high transaction volumes, protecting these kinds of assets during a move has never been more important. Market growth projections just underscore the increasing value of collections, which makes proper packing an absolutely critical step for any collector. You can learn more about art market trends and what they mean for artists from various industry reports.
But for your immediate needs, let's get back to the right tools for padding and support.
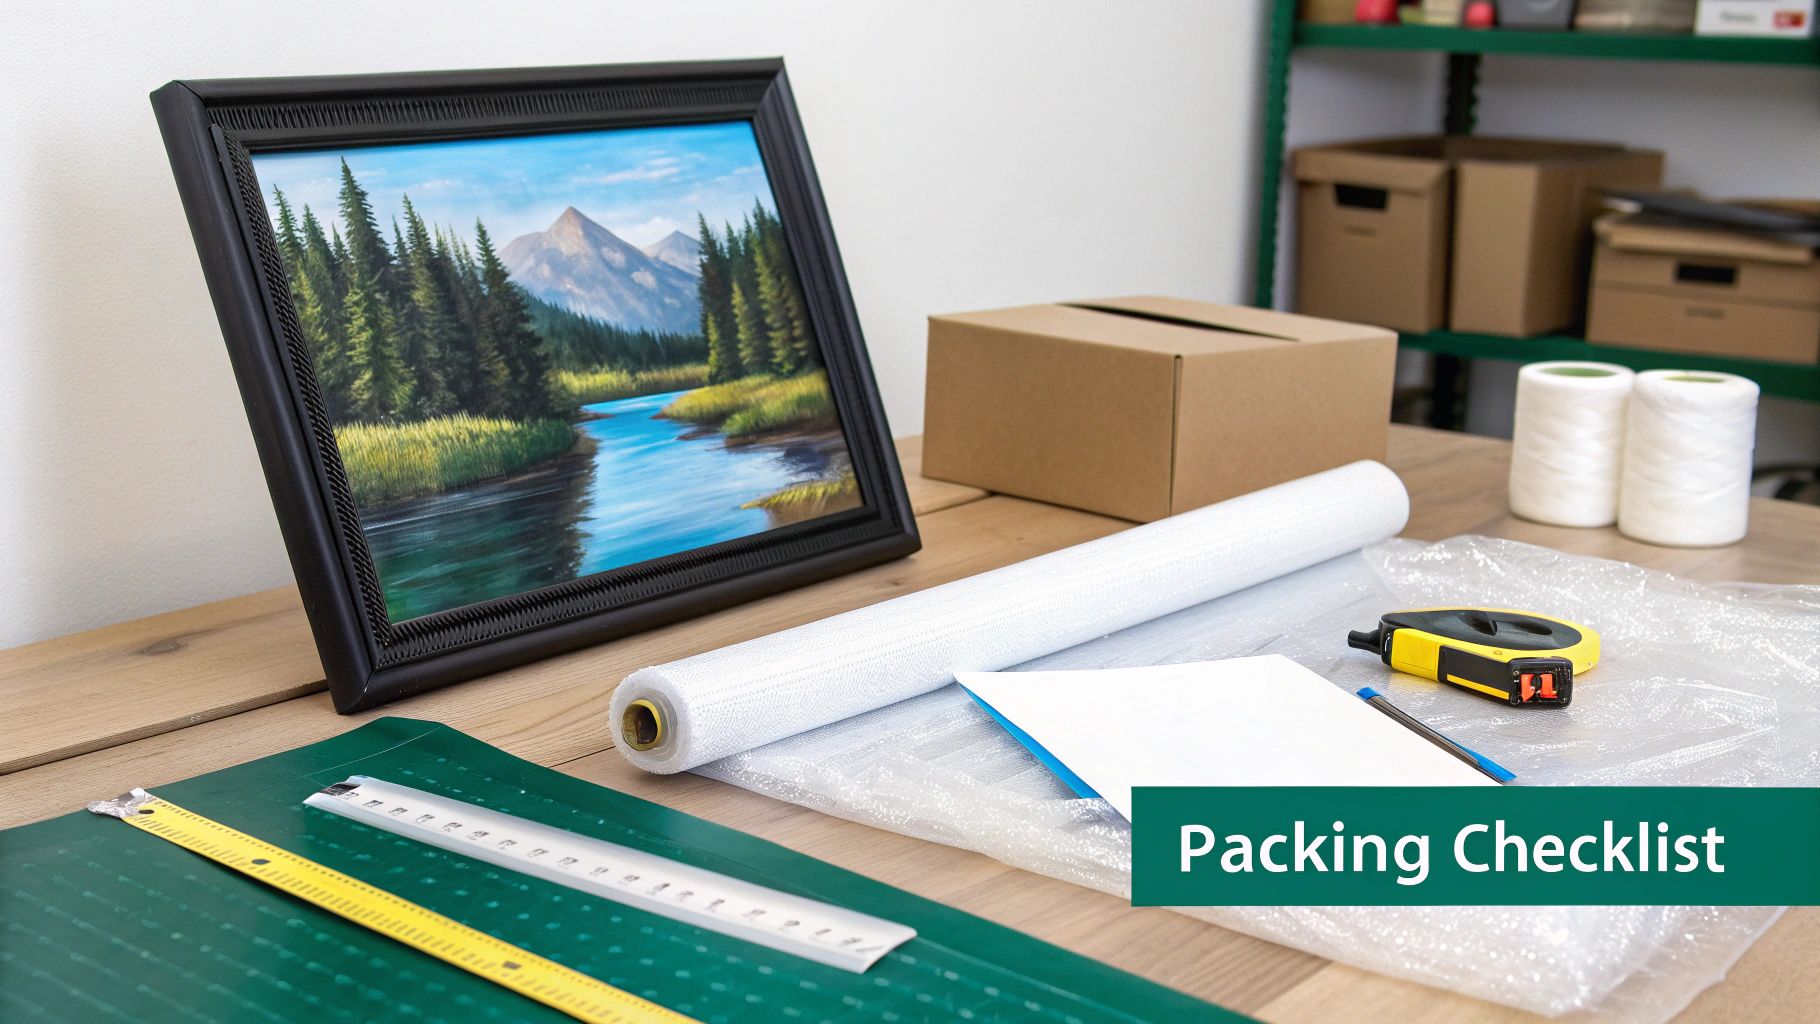
Essential Art Packing Materials Checklist
To do this right, you need a specific set of tools. I've put together a checklist of the non-negotiables to make sure you have everything you need before you start wrapping.
This combination of materials creates a multi-layered defense system that will give your artwork the best possible chance of arriving in perfect condition.
For a more comprehensive look at supplies that work for all sorts of valuables, check out our guide on essential packing materials for fragile items. It’s a great resource for building out a complete packing kit for everything delicate you own.
Finally, the box itself matters immensely. Standard moving boxes are usually too flimsy and the wrong size. You'll want to find specialized telescoping picture boxes, sometimes called mirror boxes. They're built from heavy-duty cardboard and, best of all, they adjust to fit the exact dimensions of your wrapped art. This snug fit is key—it stops the piece from sliding around inside the box during transit.
Wrapping Framed Paintings for Maximum Protection
Alright, you’ve got your materials ready. Now for the hands-on part. Wrapping a framed painting properly is a methodical process—think of it as creating a protective cocoon around your art. Just throwing bubble wrap on it is a rookie mistake that can lead to scratches or worse. We’ll start with the crucial prep work first.
Before any wrapping touches the art, knock out two quick but essential tasks: cleaning and documenting. Grab a soft, dry microfiber cloth and gently wipe down the frame and any glass. Why? Dust particles trapped under the wrapping can easily cause fine scratches when the package shifts in transit.
Next, pull out your phone and create a quick visual record. Snap clear, well-lit photos of the painting from a few different angles—front, back, and close-ups of the corners are perfect. This documentation is gold for your inventory list and absolutely critical if you ever need to file an insurance claim.
Taming the Threat of Broken Glass
If your painting is framed behind glass, you have one extra, non-negotiable step. Broken glass is a painting’s absolute worst enemy. Shards can slice through a canvas in a heartbeat. The goal here isn't necessarily to prevent the glass from breaking but to contain the pieces if it does.
Take your blue painter's tape and make a large 'X' or an asterisk pattern across the entire glass surface, stretching from corner to corner. Press it down firmly. This simple move ensures that if the glass cracks under pressure, the shards will be held together in a single sheet instead of scattering and shredding your artwork.
The Multi-Layer Wrapping Technique
Now we get to the actual wrapping. This isn't just about covering the piece; it's about using multiple layers, where each layer serves a specific protective purpose. The sequence is everything.
The very first thing that should touch your art is a soft, non-abrasive layer like glassine paper.
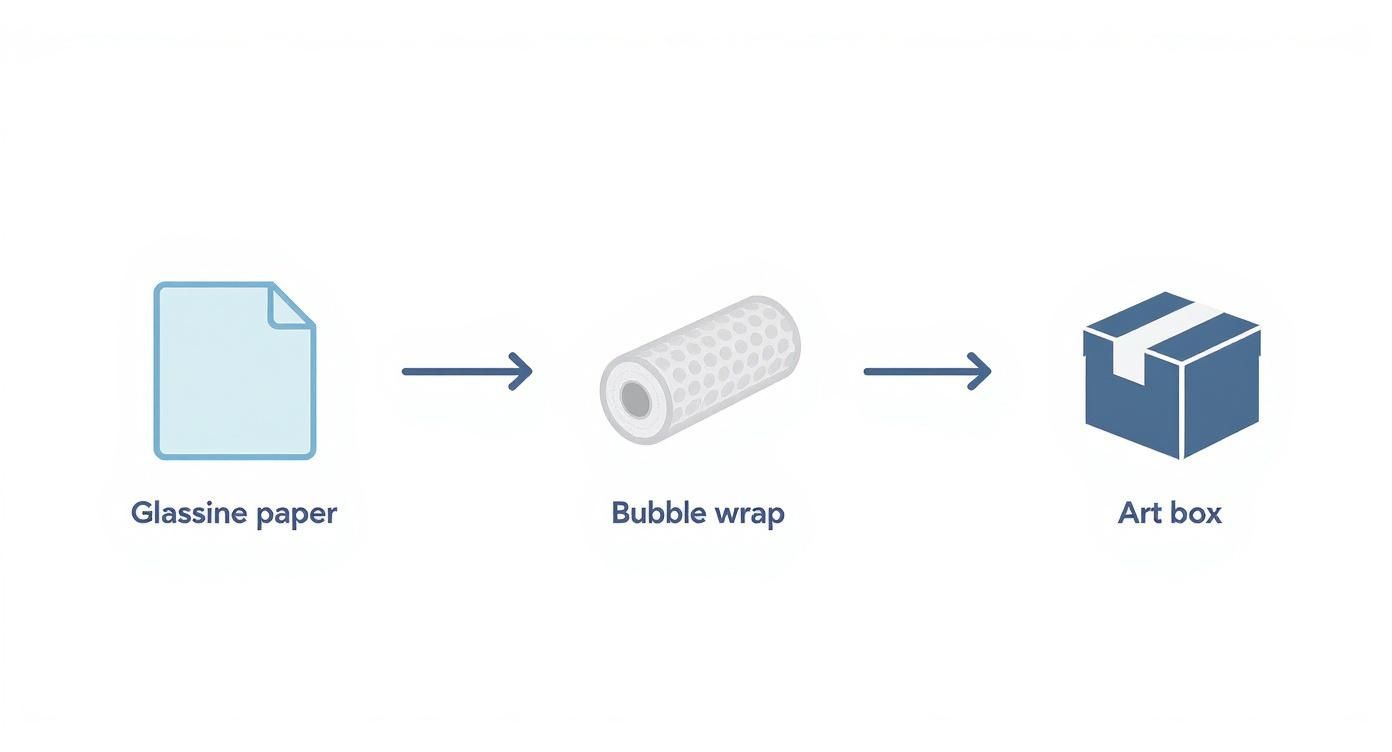
This simple flow—protective paper, then cushioning wrap, then a sturdy outer box—is the gold standard for getting your artwork to its destination safely.
With the glassine paper in place, it's time for the bubble wrap. Don't be shy with it; this is your primary shock absorber.
- Lay Out the Bubble Wrap: Roll out a section on a clean, flat surface, making sure it’s at least twice the size of your painting. Always place it bubbles-side up, so the flat side is against your art. This keeps the bubbles from leaving little impressions on the glass or frame.
- Wrap the Painting: Place your painting face-down in the center. Fold the sides over it like you’re wrapping a gift, making sure every inch of the frame has at least one—and preferably two—layers of cushioning.
- Secure with Tape: Use painter’s tape to hold the bubble wrap in place. Never, ever let packing tape touch the frame itself. Its strong adhesive can easily strip the finish right off. Painter's tape is strong enough to secure the wrap but won't cause damage if it accidentally makes contact.
Fortifying the Corners
Corners are, without a doubt, the most vulnerable part of any frame. A small drop or a bump against a doorframe can easily lead to a chip, crack, or dent. This is where corner protectors are your best friend.
Pro Tip: No commercial foam or cardboard protectors? No problem. You can make your own in about a minute. Just cut triangles from a sturdy cardboard box and fold them into a three-sided pocket that fits snugly over each corner. A small piece of painter's tape will hold them in place.
Slide a protector over each of the four corners, right on top of the bubble wrap. This adds a tough, impact-resistant layer exactly where you need it most. We cover more techniques like this in our guide on the best way to pack picture frames for moving, which has extra tips for different frame styles.
Now your artwork is fully prepped, wrapped, and fortified. It's a self-contained, protected unit, ready for the final step: being placed into a perfectly sized picture box where it will stay immobilized and safe for the entire journey.
Handling Unframed Canvases and Oversized Art
Not every painting fits neatly into a standard picture box. When you’re dealing with unframed canvases or oversized pieces, the usual packing methods just won’t cut it. These works pose their own unique challenges.
An unframed canvas, for instance, is incredibly vulnerable. Without the rigid support of a frame, the painted surface and delicate edges are exposed to every potential poke, pressure point, and puncture. Likewise, large-scale art simply won’t squeeze into off-the-shelf boxes, which means you’ll need a custom solution to keep it stable and protected.
Given the investment these pieces often represent, getting the packing strategy right is non-negotiable. The core idea is to create a sturdy, protective shell where one doesn't already exist.
Protecting Unframed Canvases
With an unframed canvas, your top priorities are shielding the painted surface and stopping the canvas from flexing or getting punctured. This is where a "soft wrap" technique, beefed up with rigid support, really shines.
First, lay a sheet of acid-free glassine paper over the entire painted surface. This is critical—it’s the only material that should ever touch the front of your painting, as it prevents moisture from getting trapped and protects against scuffs.
Next, you'll create a protective "sandwich." Cut two pieces of a rigid material, like foam core or clean, heavy-duty cardboard, so they're slightly larger than the canvas. Place one on the front (over the glassine) and one on the back.
Key Insight: That rigid backing is the single most important step for an unframed canvas. It essentially serves as a temporary frame, absorbing any pressure and preventing anything from pushing against the fabric during the move.
Use artist's tape to secure the sandwich together, making sure the tape only sticks to the backing boards, not the canvas itself. Once it's secure, wrap the entire bundle in a few layers of bubble wrap (bubbles facing out) and slide it into a telescoping art box. For canvases that might need a little tweaking after the move, knowing how to stretch a painted canvas is a super useful skill for any art collector.
The Custom Crate for Large or Valuable Art
When you're faced with a particularly large, heavy, or valuable piece, a cardboard box isn't going to provide the protection you need. It’s just too risky. The potential for crushing, impact, or environmental damage is too high. In these cases, a custom-built wooden crate is the only way to go.
Whether you build it yourself or hire a pro, a crate needs to be constructed with precision to create a secure, shock-absorbent home for your art.
- Accurate Measurements Are Crucial: Start by measuring your fully wrapped artwork—height, width, and depth. The crate's interior needs to be snug, with at least two inches of foam padding on every side.
- Line the Crate Interior: The inside of the crate must be lined with a high-density, shock-absorbing foam. Ethafoam is the industry standard for a reason; it's rigid and fantastic at dampening vibrations and impacts.
- Immobilize the Artwork: The painting cannot be allowed to shift, period. Use extra foam bracing inside the crate to ensure there is absolutely zero room for movement. Even the slightest jiggle during transit can cause serious abrasion or damage.
Deciding Between DIY and Professional Crating
So, should you build the crate yourself or call in a professional art handler? A DIY crate can definitely save you some money, but it demands the right tools, materials, and a fair bit of skill. If the crate isn't built properly—if the joints are weak or the padding is insufficient—it can fail spectacularl and cause even more damage.
For art that's extremely valuable or sentimentally priceless, hiring a professional is almost always the right call. They have the experience to build museum-quality crates and typically offer transit insurance for peace of mind.
And if you think you might need to store the piece for a while, remember that extreme temperatures can wreak havoc on art. It's worth looking into a climate-control self-storage unit to keep your collection safe from the elements long-term.
Final Steps for Loading and Transit Success
All that meticulous wrapping and boxing can be completely undone in seconds if you aren't careful during the final stretch. This last phase—labeling, loading, and managing the move itself—is where all your hard work truly pays off. Think of it as the final mile of protection for your artwork.
Clear communication is your best friend here. Every single box or crate needs to be labeled so boldly it's impossible to miss, even in a dimly lit truck.
Get a thick, dark marker and write on at least three sides of every box. Make your labels direct, non-negotiable commands that anyone can understand.
- FRAGILE – ARTWORK
- DO NOT STACK
- THIS SIDE UP ↑
These simple instructions guide movers—whether they’re professionals or your friends—to treat the contents with the respect they deserve. Never assume they know what's inside; your labels need to tell them everything.
Snap a Quick Photo Inventory
Before you tape up the boxes for good, pull out your phone and create a quick photo inventory. It’s a simple step that serves two huge purposes: it's an organizational checklist and crucial evidence if you ever need to file an insurance claim.
- Group and Shoot: Arrange a few packed paintings together.
- Number Each Box: Assign a unique code to each one (e.g., ART-01, ART-02).
- Get the Shot: Take a clear photo of the group where the labels and numbers are easy to read.
This visual log is a lifesaver when you're unloading. You can quickly confirm every piece arrived without having to tear open every box.
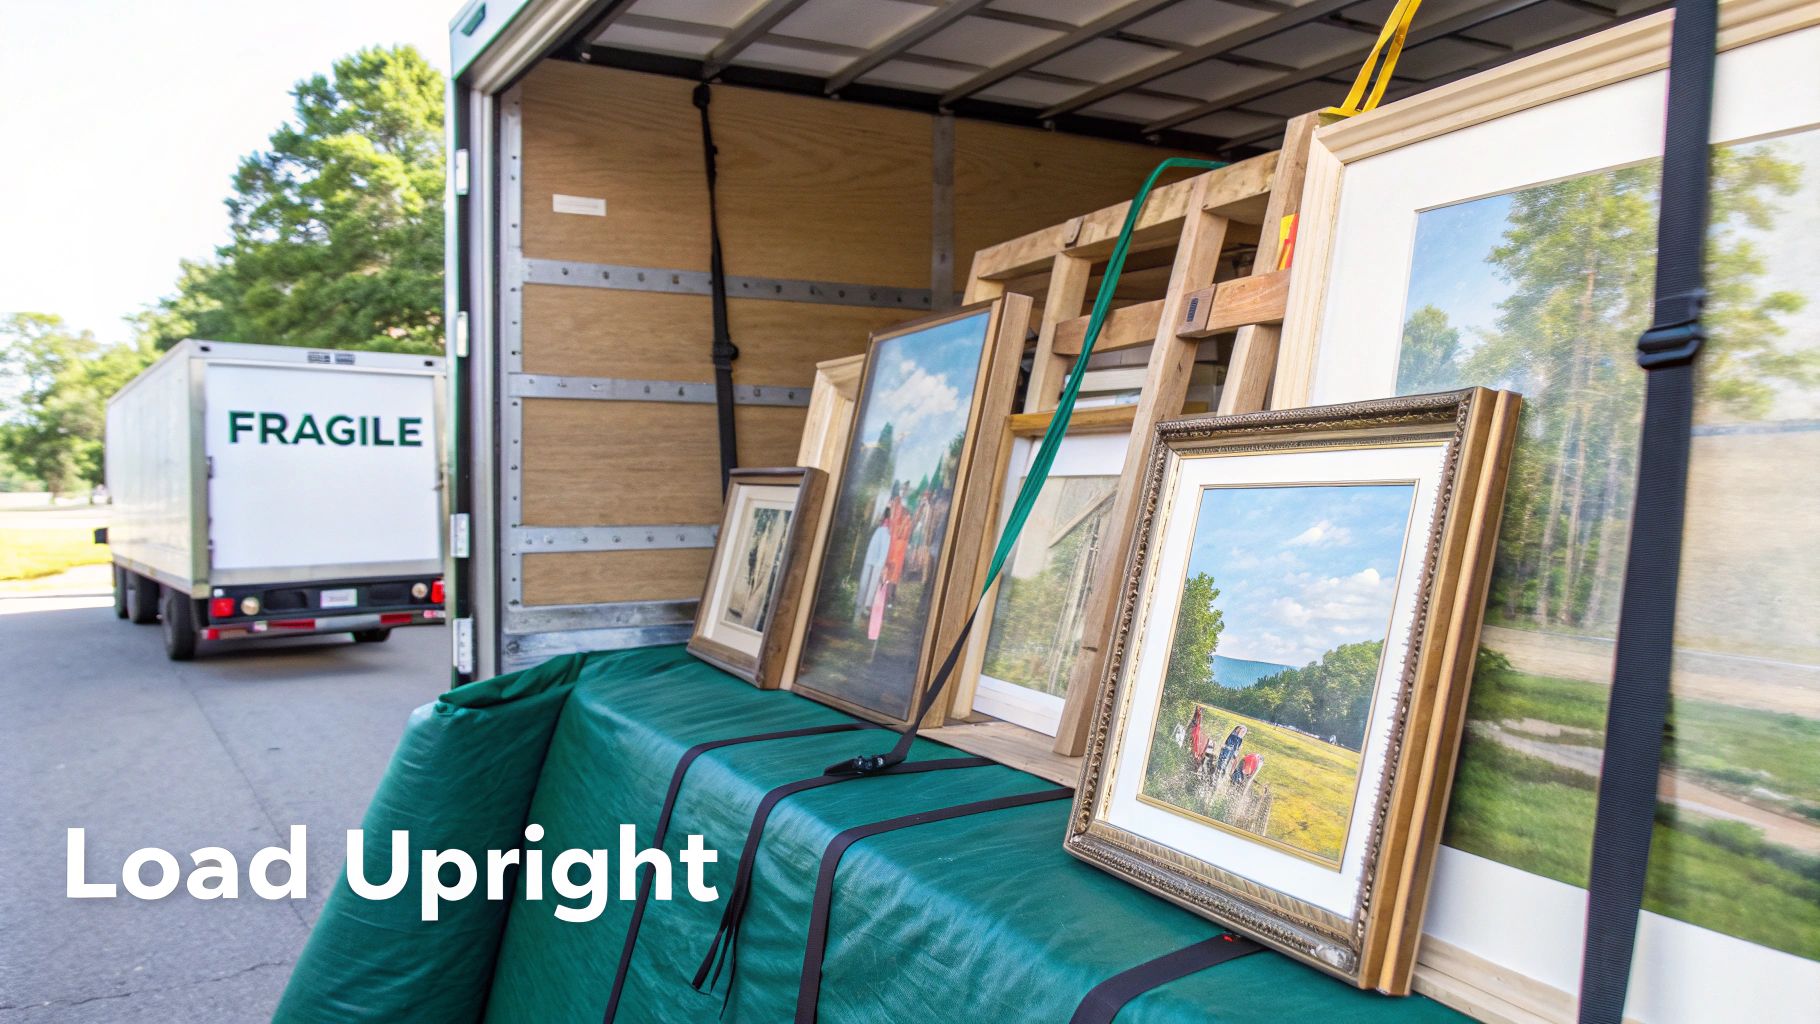
The Golden Rule of Art Transport
Now for the single most important rule of moving paintings: always transport them vertically, on their edge. Never, ever lay a painting flat.
When a canvas is laid flat, its entire surface becomes a target. The slightest weight from another box can create a pressure point, easily puncturing the canvas or cracking old paint. Road vibrations also get amplified across that wide, flat surface.
But when a painting stands on its edge, the sturdy frame does its job, absorbing the shock and pressure of the move. This is exactly how every professional gallery and museum transports art, and for good reason. It’s the most effective way to prevent catastrophic damage in transit.
Expert Insight: Placing paintings on their edge utilizes the structural integrity of the frame to protect the art. Laying them flat exposes the vulnerable canvas to direct pressure and impact, which is the leading cause of punctures and tears during a move.
Securing Art Inside the Moving Truck
Once your art is in the truck, it needs to be completely immobilized. Even a small shift during a turn or a sudden stop can send boxes tumbling. Your goal is to create a secure, stable zone where nothing can move an inch.
- Positioning is Key: Place your paintings along a solid, flat wall of the truck. Keep them far away from heavy furniture or anything with sharp corners.
- Create a Buffer: Pack soft items like mattresses, cushions, or furniture pads around the art boxes to create a buffer zone. This prevents them from making contact with hard surfaces.
- Strap Them In: Use moving straps to secure the paintings firmly against the truck wall. Make sure the straps are tight enough to prevent any movement but not so tight that you risk crushing the boxes.
For a deeper dive into arranging your vehicle, check out our guide on the best way to pack a moving truck. It offers a comprehensive game plan for loading everything safely.
Finally, don't forget about the climate. Never leave your artwork in a vehicle overnight, especially during extreme heat or cold. Wild temperature swings can cause paint to crack, canvases to warp, and condensation to build up. If you're moving in rough weather, make your art the last thing you load and the first thing you unload to keep its exposure to the elements at an absolute minimum.
Of course. Here is the rewritten section, crafted to sound like an experienced human expert, following all your provided guidelines and examples.
Common Questions About Packing Paintings
Even with the best instructions, you're bound to have questions when you’re about to wrap a piece of art you love. It’s completely normal. Let's walk through some of the most common things people ask, so you can move forward with total confidence.
Think of this as the final check-in before you start taping up boxes. Getting these details right is what separates a smooth move from a stressful one.
Can I Just Use Blankets or Towels to Wrap My Paintings?
This is a tempting shortcut, but it's a huge risk. Never let household blankets or towels touch the surface of your artwork directly. They aren't acid-free and often trap dust, grit, and moisture—all of which can scratch, stain, or damage the paint and varnish.
Save those blankets for external padding. Once a painting is fully wrapped and boxed, a moving blanket can offer great cushioning inside the truck. But the first layer touching your art must always be something clean and archival-grade, like glassine paper.
Should I Take My Painting Out of Its Frame Before Moving?
For most art, the answer is a hard no. The frame is your painting’s best friend during a move. It provides critical structural support and acts like a built-in bumper, protecting the fragile edges of the canvas from bumps and scrapes. Taking it off just exposes the art to unnecessary risks like flexing and punctures.
The only time you might consider this is if you have an incredibly valuable, ornate, or fragile antique frame that needs its own custom crate. But for over 99% of paintings, leaving it in the frame is by far the safest bet.
What's the Single Biggest Mistake People Make When Moving Art?
Hands down, the worst thing you can do is transport a painting flat. When a canvas is laid horizontally, it becomes a target. Any weight placed on top creates direct pressure, and the vibrations from the road are magnified, which can easily cause the canvas to crack or tear.
The Golden Rule of Art Transport: Always, always transport paintings standing vertically on their edge. This position lets the strong, rigid frame do its job by absorbing shock and protecting the delicate artwork.
Following this one simple rule will save you from the most common—and most devastating—types of damage.
Is My Mover's Standard Insurance Good Enough for My Art?
It’s almost guaranteed to be insufficient. Basic moving insurance, often called "released value protection," is based on weight, not worth. This typically pays out as little as $0.60 per pound. For a 10-pound painting, you’d only get $6.00, which is nowhere near enough to cover even a modest piece.
You need to take extra steps to protect your investment.
- Check your existing policies: Look at your homeowner's or renter's insurance. You may already have a fine art rider or floater policy that covers items during a move.
- Get separate transit insurance: You can buy a policy specifically for the move that covers the full appraised value of your collection.
- Document everything: Before you pack anything, take clear, dated photos of each piece to record its condition. This is essential proof if you ever need to file a claim.
Don't just assume you're covered. Always do your homework and get the right insurance in place. It's the only way to have real peace of mind.
Don't let valuable art or seasonal items clutter your new space. With Endless Storage, you can securely store your belongings on a per-box basis in climate-controlled facilities. We deliver boxes, you pack, and we pick them up—it's that simple. Get your hassle-free storage solution today.
Frequently Asked Questions
Unveiling the Secrets to Effortless Storage
Endless Storage is available nationwide. You pick a plan, tell us where to pickup, and we'll send a UPS van to collect, whichever state you're in.
Your shipping label will be sent to your email within a few minutes, if not instantaneously. It can also be accessed through your customer profile.
Your box will be shipped to one of our climate controlled self storage facilities in our closest self storage facility. Our manager will accept your package, notify you that your box has been received, and securely stored. Only our managers will have access to Endless Storage boxes.
Email us at admin@endless-storage.com click to live chat with us, or send us a message below.
Never! We're committed to transparent pricing with no surprises. You'll lock in your rate with no hidden fees and no long-term contracts.
Fast access guaranteed! Your boxes will arrive at your doorstep within 48 hours of requesting them back. Need to check on delivery? We provide tracking information for complete peace of mind.
Totally flexible! Store month-to-month with no long-term commitment and cancel anytime.
Everything's online! Use your account dashboard to:
• Set up automatic monthly payments
• Request box returns
• Update your address
• Order additional boxes
• Track shipments
Your boxes are insured up to $100 each. Our customer service team will help you file any necessary claims and resolve issues quickly.
Don't worry – we'll email you right away if there's a payment issue. Your items stay safe, though you may have temporary service interruption or late fees until payment is resolved.
When you request our free storage kits, you'll have 30 days to send in your boxes to activate your 3 months of free storage. Think of it like starting a gym membership – your activation window begins when you receive your kits, and your full free trial begins once you send in your first box. During your free months, you'll experience our complete storage service at no cost.
Your 30-day activation window begins when you receive your storage kits. We'll send you an email confirmation when your kits are delivered, marking the start of your activation period.
If you haven't sent any boxes for storage within your 30-day activation window, your free trial will expire and we'll begin charging the regular monthly rate of $9.99 per box. This helps ensure our storage kits go to customers who are ready to use our service.
A box costs $9.99 per month to store (plus sales tax). This price includes free shipping for standard boxes under 50 lbs. and smaller than 16"x16"x16"
Log into your Endless Storage account, locate the box you would like returned, and simply click Return My Box.
Yes, each box stored with us is insured for up to $100 throughout transit as well as the duration of storage within our facilities.
Your box will be at your doorstep within 48 hours of you requesting it back.
Store 10+ boxes? We'll pick them up for free! After your purchase, we'll contact you to schedule a convenient pickup time and arrange UPS collection.
We trust UPS with all shipments, and every box includes $100 insurance coverage. You'll receive tracking information to monitor your items' journey.
Yes! Visit any of our locations by appointment. Just bring a photo ID matching your customer profile.
For everyone's safety, we can't store hazardous materials, firearms, or perishables. All items must fit within our standard boxes.
It's easy! Order your storage kit online, and we'll ship it to you within 1-2 business days. Your shipping labels will be emailed instantly and available in your account.
We're here to help! Email us at admin@endless-storage.com, use our live chat, or send us a message through your account.
To cancel your storage service with Endless Storage, please email your cancellation request to admin@endless-storage.com. Our team will process your request within 2 business days and confirm your cancellation via email.
We understand packing takes time. However, to maintain your free trial benefits, you'll need to send at least one box within the 30-day activation window. If you need more time, you can always start with one box to activate your trial and send the rest later. You can always reach out to admin@endless-storage.com if you have any issues or concerns.
When you request our free storage kits, you're starting a 30-day window to begin using our storage service.
Important: To activate your free trial, send at least one box for storage within 30 days. If no boxes are sent within this 30-day window, a one-time $50 fee applies to cover materials and shipping costs. This fee is clearly disclosed before you sign up.
Think of it like reserving a hotel room – we're setting aside space and sending specialized packing materials for your use. The fee only applies if you request materials but don't begin storage, similar to a hotel's no-show charge.