Top Tips for Maximizing Space in a Studio Apartment (2025)

Living in a studio apartment offers a unique blend of coziness and urban convenience, but it comes with a distinct challenge: making one room serve every aspect of your life. The art of maximizing space in a studio apartment isn't just about cramming things into corners; it's a strategic design process that transforms a limited footprint into a functional, stylish, and comfortable home. Forget the obvious advice you've heard a dozen times. In this guide, we'll move beyond generic tips and delve into specific, high-impact strategies that address the core spatial dilemmas of studio living.
We will explore innovative furniture, clever layout techniques, and storage solutions that create distinct zones and reclaim valuable square footage. Embracing certain minimalist design principles can also significantly enhance the feeling of space, but our focus here is on tangible, structural changes you can implement. From wall beds that vanish by day to convertible dining tables and vertical storage systems, each solution is designed to give you more room to breathe. Whether you are setting up your first place or looking to optimize your current one, these actionable ideas will empower you to create a space that feels expansive, organized, and perfectly suited to your lifestyle.
1. Murphy Bed (Wall Bed) Solution
The Murphy bed, also known as a wall bed, is the ultimate transformer for maximizing space in a studio apartment. This isn't your grandparents' clunky, spring-loaded contraption; modern designs are sophisticated, safe, and incredibly functional. The concept is simple yet revolutionary: a bed that folds vertically into a wall-mounted cabinet or recess, instantly converting your sleeping area into a functional living room, home office, or workout space. This single piece of furniture effectively gives you back an entire room's worth of floor space.
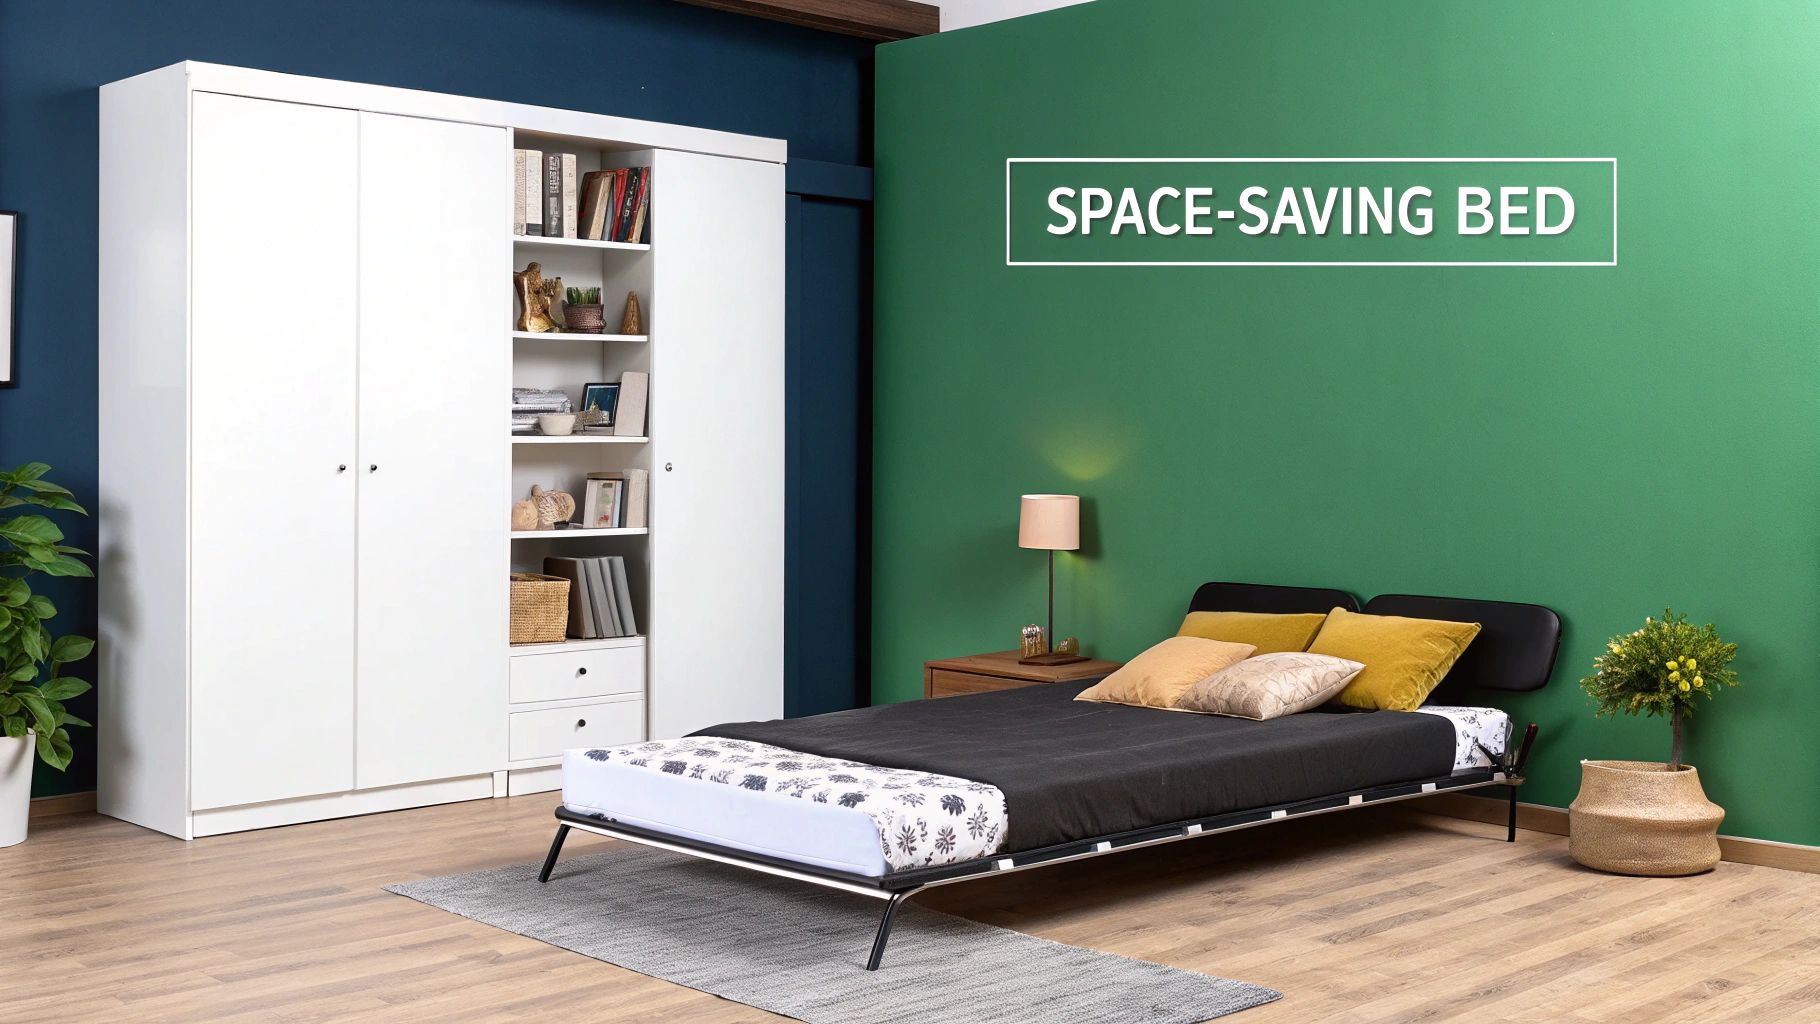
When stowed away, the bed seamlessly integrates into your décor, often disguised as a stylish cabinet, a bookshelf, or even a wall with a built-in sofa. This dual-purpose functionality is essential for any studio dweller looking to create distinct zones for living and sleeping without erecting permanent walls.
Why It's a Game-Changer for Studios
A Murphy bed tackles the biggest space-hog in any studio: the bed itself. By reclaiming that footprint during the day, you unlock the full potential of your apartment. This allows for a more open, uncluttered environment that feels significantly larger and more versatile. It is the core strategy behind many professionally designed micro-apartments, where every square inch is critical.
High-end manufacturers like the Italian brand Clei and suppliers like Resource Furniture have elevated the Murphy bed into a luxury, multi-functional system. These units can include integrated desks that remain level as the bed is lowered, wrap-around shelving, or even a full-sized sofa that the bed folds down over.
Actionable Tips for Implementation
Before investing in a Murphy bed, careful planning is key to ensuring it works for your space.
- Measure Everything: A standard vertical Murphy bed requires a ceiling height of at least 8 feet. Measure your ceiling, wall width, and the floor projection space needed when the bed is open.
- Consider a Horizontal Model: If you have low ceilings or a narrow room, a horizontal (or "side-mount") Murphy bed is an excellent alternative. It folds along its longer side, requiring less vertical wall space.
- Prioritize a Quality Mechanism: The lifting and lowering mechanism is the most important part. Look for modern piston or spring systems that are counterbalanced, ensuring smooth, safe, and effortless operation.
- Use Lightweight Bedding: To make daily conversion easier, opt for lightweight bedding like a duvet instead of heavy, layered comforters and quilts. Many systems include straps to hold your mattress and basic linens in place.
2. Vertical Storage Solutions
When floor space is at a premium, the only way to go is up. Vertical storage is a foundational strategy for maximizing space in a studio apartment, transforming your walls from mere dividers into high-capacity storage hubs. This approach involves using floor-to-ceiling shelving, tall bookcases, and wall-mounted organizers to draw the eye upward, creating an illusion of height and airiness while freeing up precious square footage below. It’s about leveraging the most underutilized real estate in any small home: the vertical plane.
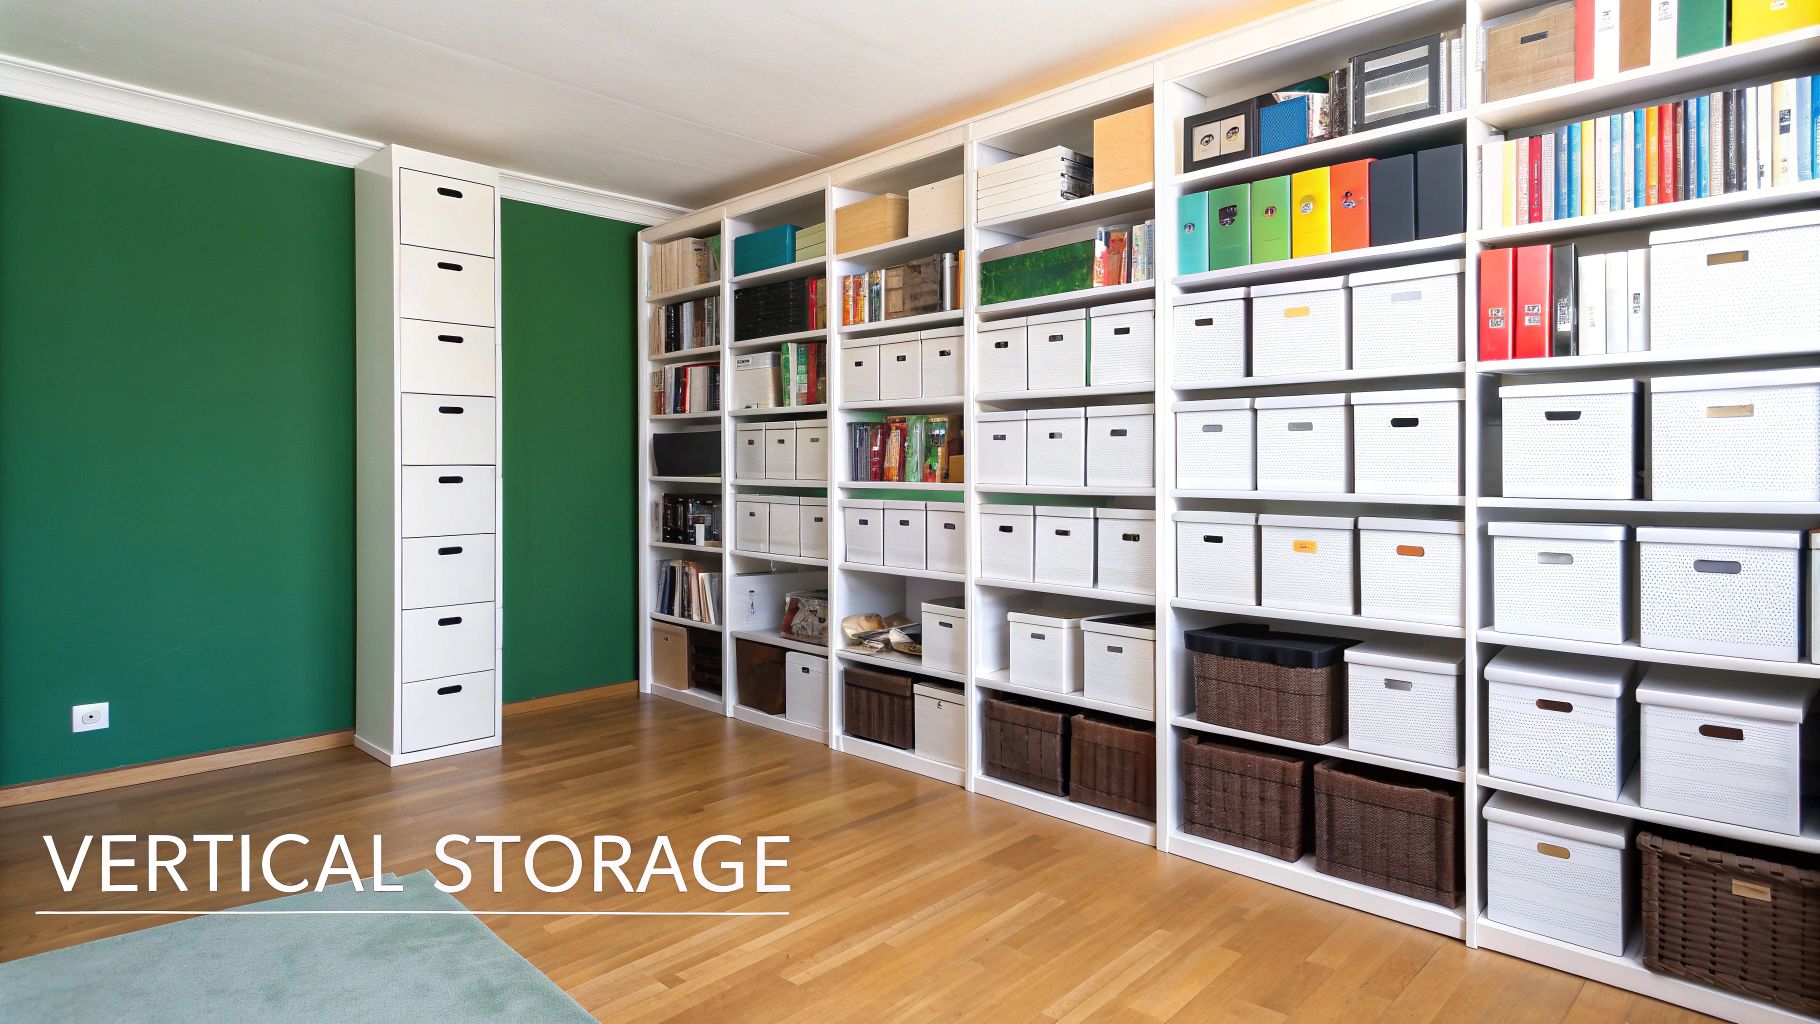
By building storage vertically, you consolidate clutter into a designated zone, which keeps the main living area open and breathable. This method is incredibly versatile, with solutions ranging from sleek, modular systems to simple floating shelves. Brands like IKEA and The Container Store have popularized this concept, offering customizable and affordable systems like the ALGOT or Elfa, which are frequently adapted from closets to serve as primary storage in urban studios.
Why It's a Game-Changer for Studios
Vertical storage fundamentally changes the way you interact with your apartment’s volume, not just its footprint. It allows you to store a significant amount of belongings, from books and décor to kitchen supplies and clothing, without sacrificing a single inch of walkable floor area. This strategy is essential for creating a functional, organized, and uncluttered environment, making your studio feel intentionally designed rather than simply cramped.
Custom solutions from companies like California Closets or adaptable retail systems can even double as room dividers. A tall, open-backed shelving unit can delineate your sleeping area from your living space, providing storage and separation without blocking light completely. You can explore a variety of methods to organize small apartments and find what works for you by reading more about vertical organization strategies on endless-storage.com.
Actionable Tips for Implementation
Proper planning and installation are crucial for making vertical storage both functional and safe.
- Secure Everything Properly: Always use wall anchors rated for the combined weight of the shelf and its contents. This is non-negotiable for safety, especially with tall, heavy units.
- Leave Breathing Room: Install your highest shelf about 12 to 18 inches below the ceiling. This prevents the room from feeling top-heavy or claustrophobic and maintains an open feel.
- Organize by Weight and Use: Place heavier items on lower shelves for stability and store less-frequently used or seasonal items on the highest shelves. Use decorative bins and baskets to conceal clutter.
- Play with Color and Light: Use lighter colors for shelves and storage boxes, especially higher up, to reflect light and keep the space feeling bright and expansive. Dark, bulky units can make a wall feel like it's closing in.
3. Multi-Functional Furniture
Beyond the bed, the principle of transformation is key to maximizing space in a studio apartment. Multi-functional furniture pieces are designed to serve multiple purposes, allowing you to furnish your home with fewer items. This approach focuses on investing in versatile, intelligent pieces that adapt to your needs throughout the day, eliminating clutter from single-use furniture. Think of a coffee table that rises to become a dining table, an ottoman that hides your extra blankets, or a chic console that expands to seat six for dinner.
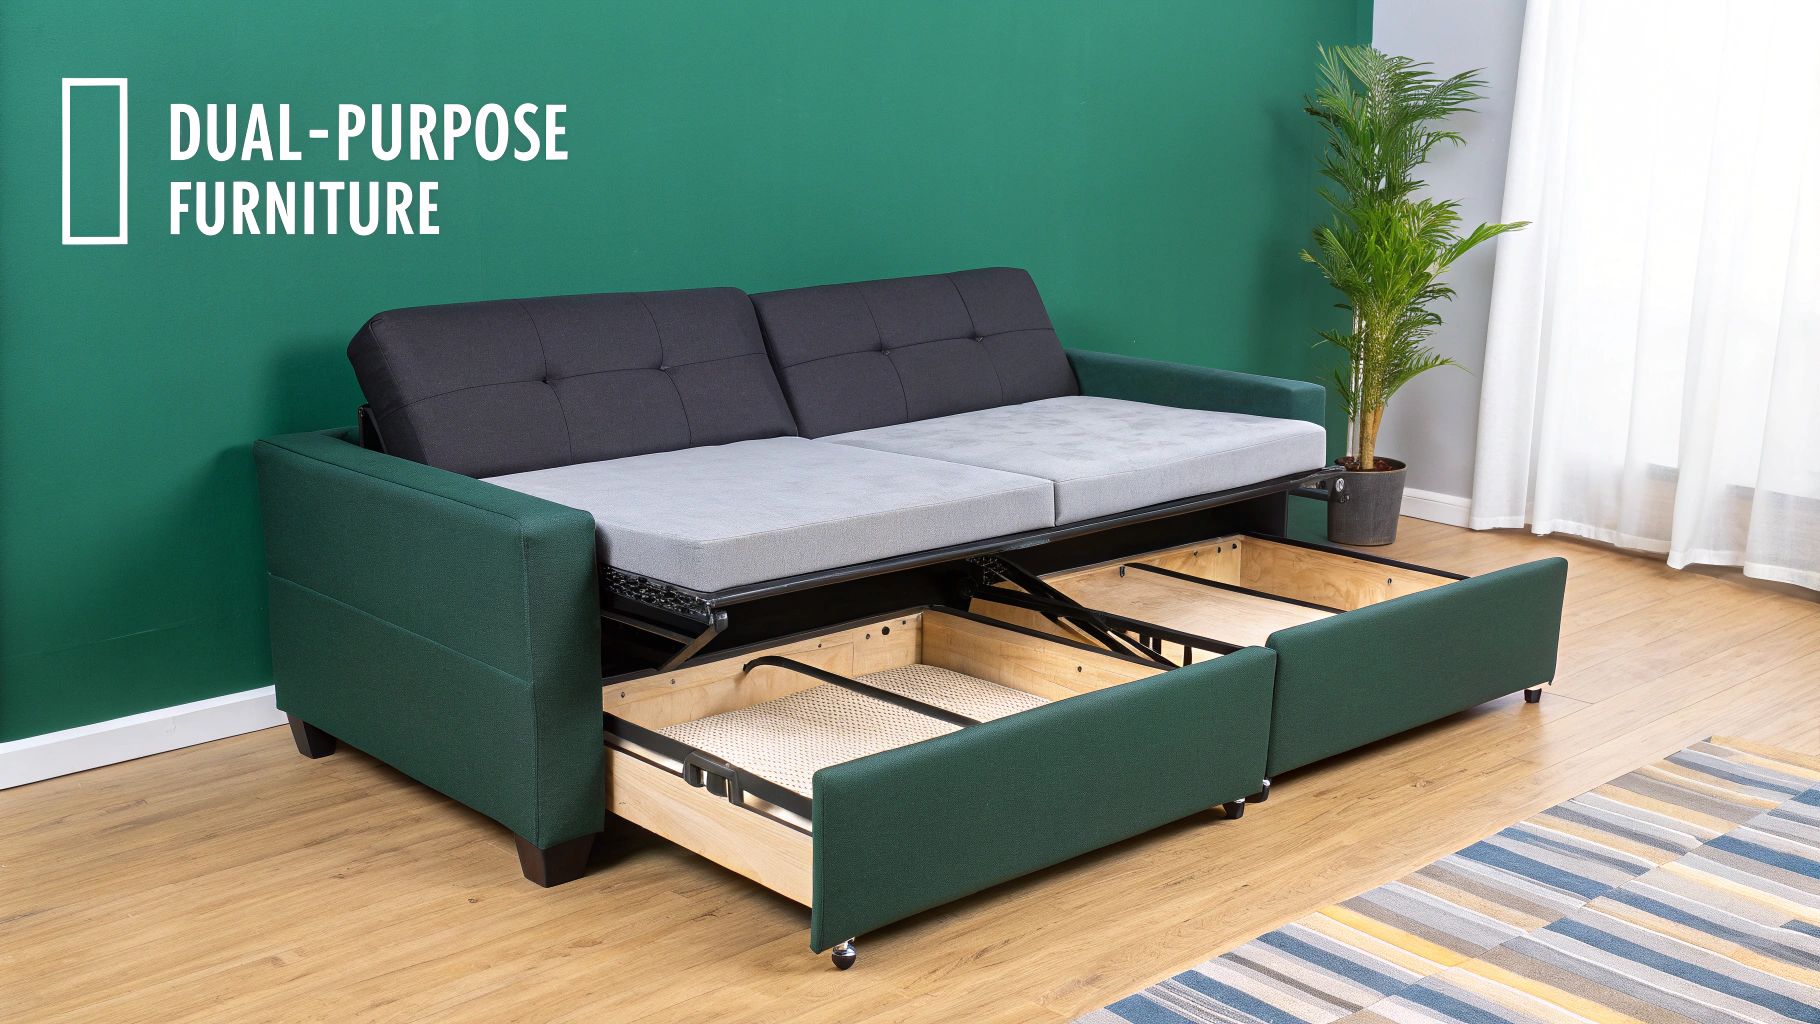
This strategy allows every piece of furniture to earn its keep, providing functionality without sacrificing precious square footage. Instead of trying to squeeze a separate desk, dining table, and coffee table into one small room, you can have a single, high-quality piece that performs all three functions flawlessly.
Why It's a Game-Changer for Studios
Multi-functional furniture empowers you to live a larger life in a smaller space. It directly combats the primary challenge of studio living: accommodating diverse activities like working, dining, relaxing, and entertaining in a single, open area. By choosing furniture that can adapt, you maintain a clean, uncluttered aesthetic while still having all the amenities you need.
Brands like West Elm and CB2 have popularized these designs for modern urban dwellers, offering stylish storage ottomans and expandable dining tables. A lift-top coffee table from a retailer like Wayfair can instantly create a comfortable workspace or a spot for a casual meal, with hidden storage for laptops and magazines. This approach ensures your studio remains both practical and polished. Explore more options for multi-functional furniture on endless-storage.com.
Actionable Tips for Implementation
To make the most of multi-functional pieces, a thoughtful approach is necessary.
- Prioritize Quality Mechanisms: For pieces that transform often, like a lift-top table or convertible sofa, invest in a durable, well-made mechanism. Test it in the store to ensure it operates smoothly and feels sturdy.
- Evaluate All Configurations: Make sure the furniture looks and functions well in all its forms. An expandable table should be just as stable when fully extended as it is when compact.
- Consider Weight and Mobility: If you plan on reconfiguring your layout often, check the weight of the furniture. Look for pieces with casters or those that are lightweight enough to move easily.
- Measure for Both States: Before buying, measure your space to ensure the item fits when it's both compact and fully transformed. Account for clearance around it in every configuration.
4. Under-Bed Storage Systems
One of the most overlooked yet valuable real estate zones in any studio is the empty void beneath your bed. Transforming this area with a dedicated under-bed storage system is a fundamental strategy for maximizing space in a studio apartment. This approach turns an otherwise wasted footprint into a highly organized, concealed storage powerhouse, capable of holding everything from off-season clothing and extra bedding to shoes and books. It effectively adds a closet's worth of storage without taking up any additional floor space.
Modern solutions go far beyond simple plastic bins. You can now find platform beds with integrated drawers, hydraulic lift mechanisms that raise the entire mattress to reveal a massive storage compartment, or modular rolling containers designed for easy access. This method is crucial for maintaining a clean, uncluttered look, as it keeps possessions out of sight but readily available.
Why It's a Game-Changer for Studios
The primary benefit of under-bed storage is its sheer efficiency. In a studio where every square foot counts, creating 15 to 20 cubic feet of storage from an unused area is a significant win. It allows you to reduce clutter in your main living space, making the apartment feel larger and more serene. Instead of bulky dressers or overflowing closets, you can consolidate your belongings in a hidden, centralized location.
Brands like IKEA have made this accessible with affordable options like their MALM storage bed, while The Container Store and Pottery Barn offer a range of stylish and functional solutions, from discrete rolling drawers to elegant platform beds with built-in storage. Hydraulic lift beds, in particular, offer the most storage volume, perfect for items you don't need daily access to. You can learn more about how to maximize space with smart under-bed storage solutions on Endless Storage.
Actionable Tips for Implementation
To make the most of your under-bed space, a little planning goes a long way.
- Measure Your Clearance: Before purchasing any containers, measure the vertical height from the floor to the bottom of your bed frame. This ensures your chosen bins or drawers will fit perfectly.
- Use Vacuum Storage Bags: For bulky items like duvets, winter coats, and pillows, use vacuum-sealed bags. They can reduce the volume of these items by up to 75%, allowing you to store much more.
- Consider Bed Risers: If your bed frame is too low, sturdy bed risers are a cheap and effective way to instantly create more vertical storage space underneath.
- Organize for Accessibility: Store items you access frequently, like shoes or extra blankets, in containers near the foot or sides of the bed. Reserve the harder-to-reach central space for long-term or seasonal storage.
5. Room Dividers and Zones
Creating distinct zones is a powerful psychological trick for maximizing space in a studio apartment. By using room dividers, you can visually separate your sleeping, living, and working areas, making a single room feel more like a multi-room home. This approach defines functional spaces without building permanent walls, which preserves the open and airy feel that is crucial in a small layout. A well-placed divider brings order and purpose to your floor plan.
Modern room dividers are far more than just folding screens. They have evolved into stylish and multi-functional pieces that can provide much-needed storage, display space, and architectural interest. This strategy allows you to compartmentalize your life, helping you to "switch off" from work when you move to your living area or fully relax in a designated sleeping nook.
Why It's a Game-Changer for Studios
A studio's biggest challenge is the lack of separation. Room dividers solve this by creating boundaries that improve functionality and flow. This technique allows you to host guests without them feeling like they are in your bedroom, or to create a dedicated home office that doesn't bleed into your personal space. It is a foundational strategy for anyone looking to bring a sense of structure and calm to a one-room living situation.
Brands like IKEA have popularized this concept with affordable solutions like their KALLAX shelving units, which are frequently used as semi-transparent walls. These dividers define a room while allowing light to pass through, avoiding the boxed-in feeling that a solid barrier might create. For more inspiration on creating these distinct areas, you can explore various studio apartment layout ideas. To discover how different dividers can shape your space, check out these studio apartment layout ideas on endless-storage.com.
Actionable Tips for Implementation
Strategically placing a divider can transform your studio. Here’s how to do it right:
- Use Open Shelving: A bookcase or an étagère is a perfect room divider. It separates the space without blocking light or sightlines, keeping the apartment feeling open while providing valuable storage.
- Opt for Dual-Purpose Dividers: Choose a divider that does more than just divide. A low credenza can separate a sofa from a bed while also serving as a media console. A stylish folding screen can hide clutter and add a decorative accent.
- Consider Curtains: For ultimate flexibility, install a ceiling-mounted curtain track. You can pull the curtain closed for privacy at night and open it during the day to reclaim the open-plan feel. This works especially well for sectioning off a sleeping alcove.
- Plan for Traffic Flow: Ensure your divider doesn’t obstruct natural pathways or block access to windows, closets, or emergency exits. The goal is to improve flow, not create an obstacle course.
6. Loft Sleeping Areas
For studios blessed with high ceilings, a loft sleeping area is a transformative strategy for maximizing space. This approach involves elevating the bed on a raised platform or mezzanine level, creating a distinct new living area underneath. It effectively doubles the usable square footage of one section of your apartment, turning a single-purpose area into a multi-functional zone. This is a common and highly effective solution seen in many professionally designed micro-apartments, particularly in cities like New York where vertical space is a key asset.
Unlike a simple loft bed, a true loft sleeping area feels like a separate room. The space created below can be used for a home office, a cozy living room, a walk-in closet, or even a dining nook. This physical separation between your sleeping and living quarters is a huge psychological benefit in a studio, helping to create a healthier work-life balance and a more organized home environment.
Why It's a Game-Changer for Studios
A lofted bed is the ultimate vertical storage solution, leveraging unused ceiling height to solve the fundamental problem of a studio: fitting all life's functions into one room. By moving the largest piece of furniture, the bed, up and out of the way, you free up the main floor for daily activities. This creates a more open, breathable, and functional living space that feels significantly larger than its actual footprint.
Manufacturers like Adura and even mainstream retailers like IKEA offer robust loft bed systems designed for adults, but custom-built solutions offer the most seamless integration. A well-designed loft can be an architectural feature, adding character and value to the apartment.
Actionable Tips for Implementation
Proper planning is essential for a safe and functional loft sleeping area. This is a major installation, so attention to detail is critical.
- Confirm Ceiling Height: You need a minimum ceiling height of 10 to 12 feet to make a loft comfortable. This allows for adequate headroom both above and below the loft.
- Measure Headroom: Aim for at least 42 inches of space above the mattress to allow you to sit up comfortably. The space underneath should have at least 6.5 feet (78 inches) of clearance to feel like a usable room.
- Prioritize Safety and Access: Install sturdy safety railings on all open sides of the loft. If space permits, a small staircase is much safer and more convenient than a ladder, especially for daily use.
- Check Local Building Codes: Before beginning any construction, check your local building codes and get permission from your landlord or building management. Some areas have specific requirements for lofted structures.
7. Convertible Dining Solutions
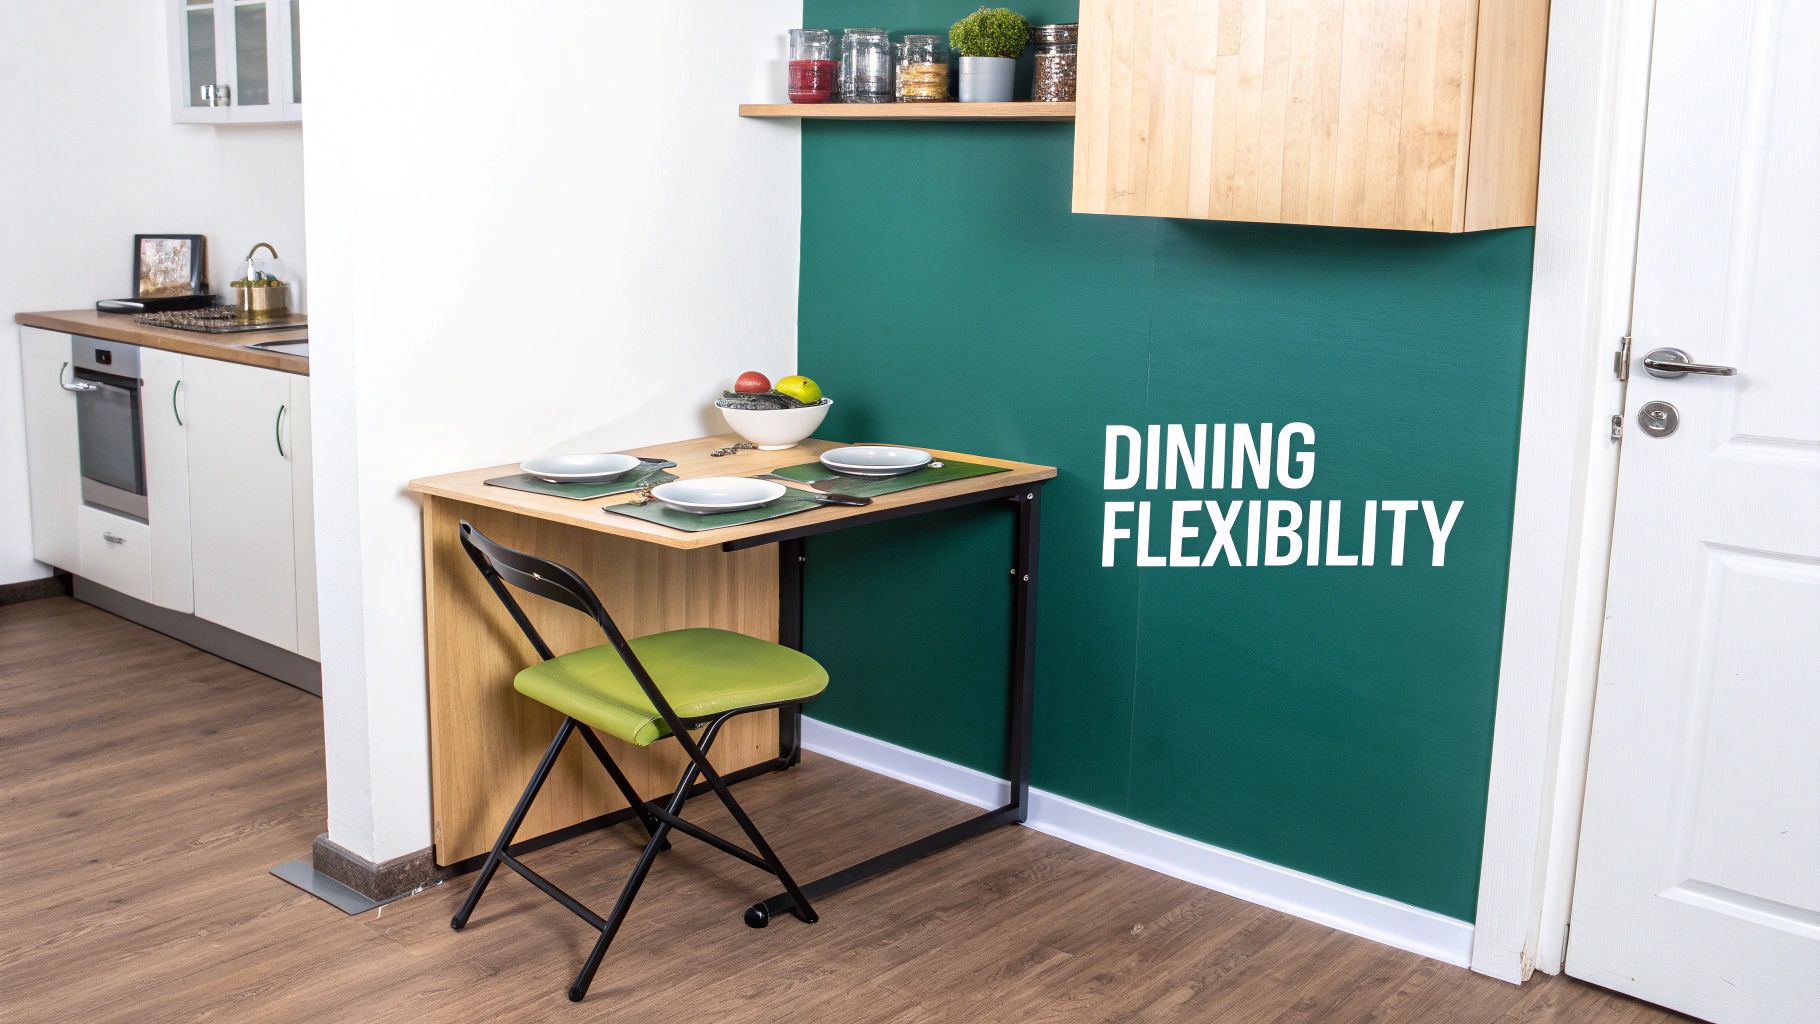
A dedicated dining table is a luxury few studio apartments can afford, often forcing residents to eat on the sofa or at a desk. Convertible dining solutions masterfully solve this problem by providing a proper dining surface that disappears when not in use. These innovative pieces transform, fold away, or serve multiple functions, allowing you to host a dinner party one evening and enjoy an open, uncluttered living space the next. This approach is key to maximizing space in a studio apartment by ensuring that every piece of furniture earns its keep.
From a coffee table that rises and extends to a full six-person dining table, to a sleek console that unfolds into a banquet surface, the options are as clever as they are stylish. Popular examples include IKEA's wall-mounted drop-leaf tables, which sit flat against the wall, and high-end lift-top coffee tables from brands like CB2 and West Elm that offer both a dining surface and hidden storage.
Why It's a Game-Changer for Studios
A traditional dining table consumes a significant, permanent chunk of your floor plan. By opting for a convertible solution, you reclaim that valuable real estate for daily living, making your studio feel more spacious and adaptable. This strategy allows you to define a dining "zone" only when needed, which is a core principle for effective small-space living.
These pieces are designed specifically for the challenges of urban apartments. They eliminate the need to compromise between having a place to eat and having an open area for relaxing or working out. By integrating dining functionality into furniture that already exists, you reduce clutter and improve the flow of your home. To dive deeper into multi-purpose furniture, you can explore various storage ideas for small spaces on endless-storage.com.
Actionable Tips for Implementation
To choose the right convertible dining solution, you need to assess your space and lifestyle needs carefully.
- Prioritize Stability: Whether it's a lift-top or a folding mechanism, test the table for stability. The locking mechanisms should be strong and secure to prevent wobbling or accidental collapse.
- Consider Seating Storage: Think about where you will store chairs. Some solutions, like gateleg tables, have space to tuck folding chairs underneath. Bar-height tables paired with stackable stools are another excellent space-saving combination.
- Look for Integrated Storage: Many lift-top coffee tables and console tables include hidden compartments. This is a perfect spot to store placemats, coasters, or even flatware, keeping your dining essentials nearby but out of sight.
- Measure Both Forms: Before buying, measure the space for the table in both its compact and its fully extended forms. Ensure you have enough room to comfortably pull out chairs and walk around it when it's set up for dining.
7 Space-Saving Solutions Comparison
Bringing It All Together: Your Blueprint for a Better Studio
Living in a studio apartment presents a unique design challenge, but it is far from an insurmountable one. Throughout this guide, we have explored a comprehensive toolkit of strategies designed to transform your compact living area into a functional, stylish, and spacious-feeling home. The journey to maximizing space in a studio apartment isn't about finding a single magic bullet; instead, it's about layering multiple smart solutions that work in harmony.
By embracing the core principles we've discussed, you can move beyond simply existing in your space to truly thriving in it. The transformative power of a Murphy bed that vanishes into the wall, the organizational might of vertical shelving that draws the eye upward, and the clever utility of a coffee table that converts into a dining set are all individual pieces of a larger, more cohesive puzzle. Your studio is your personal canvas, and these techniques are your brushes.
Key Takeaways for a Transformed Studio
Let's distill our findings into a final, actionable blueprint. Your success hinges on three fundamental concepts:
- Embrace Transformation: Prioritize furniture that can adapt to your needs throughout the day. A wall bed, a convertible dining table, or an expanding console are not just pieces of furniture; they are active participants in making your space work for you, not against you.
- Think Vertically and Horizontally: Don't neglect the unused real estate above your head and below your furniture. Implementing loft beds or comprehensive under-bed storage systems effectively doubles your usable square footage in those specific areas, creating new possibilities for storage and living.
- Define Your Zones: The psychological impact of creating distinct "rooms" within your open-plan layout cannot be overstated. Using strategic room dividers, area rugs, and furniture placement provides the mental clarity of a multi-room home, making your studio feel larger and more organized.
Your Next Steps
The path to maximizing space in a studio apartment begins with a single, decisive step. Start by assessing your biggest pain point. Is it a cluttered sleeping area? A non-existent dining space? Once identified, choose one or two strategies from this list to implement first. Whether it's installing a few floating shelves or investing in a quality room divider, small, incremental changes will build momentum and inspire further innovation.
Ultimately, mastering your studio is about adopting a new mindset. See every corner, every wall, and every piece of furniture as an opportunity. It is a creative endeavor that rewards ingenuity with a home that is not just livable, but deeply personal and highly efficient. The goal is to create a sanctuary that supports your lifestyle, reflecting your personality while providing the calm and order you deserve.
Ready to take the final step in decluttering and create ultimate breathing room? For those cherished items you can't part with but don't need every day, Endless Storage offers the perfect solution. Visit Endless Storage to see how our by-the-box storage service can help you keep your studio pristine and your belongings safe, giving you the best of both worlds.