

Welcome to college life, where every square inch of space is a premium, especially within your dorm room. The closet, often a surprisingly cramped and awkward space, presents one of the biggest organizational challenges you'll face. A disorganized closet doesn't just look messy; it can add unnecessary stress to your mornings and make your small living area feel even more restricted. With the right strategies, however, this tiny area can be transformed from a chaotic jumble into a model of efficiency.
This guide moves beyond generic advice to provide you with seven actionable, in-depth strategies for mastering dorm closet organization. We'll explore innovative hacks and practical systems that do more than just save space. These methods will streamline your daily routine, making it effortless to find what you need, when you need it. Forget rummaging through piles of clothes before an 8 AM class.
By implementing these proven solutions, from maximizing vertical space to integrating smart storage systems, you can conquer closet clutter for good. The goal is to create a more functional, stress-free living environment that supports your focus on academics and campus life, not on finding a matching pair of socks. Let's unlock your closet's true potential.
1. Vertical Space Maximization with Over-Door Organizers
When it comes to effective dorm closet organization, the single most valuable and underutilized asset is vertical space. The back of your closet door, which is often completely ignored, can become a powerhouse of storage. This strategy focuses on transforming this and other empty vertical surfaces into highly functional storage zones without consuming any precious floor area.
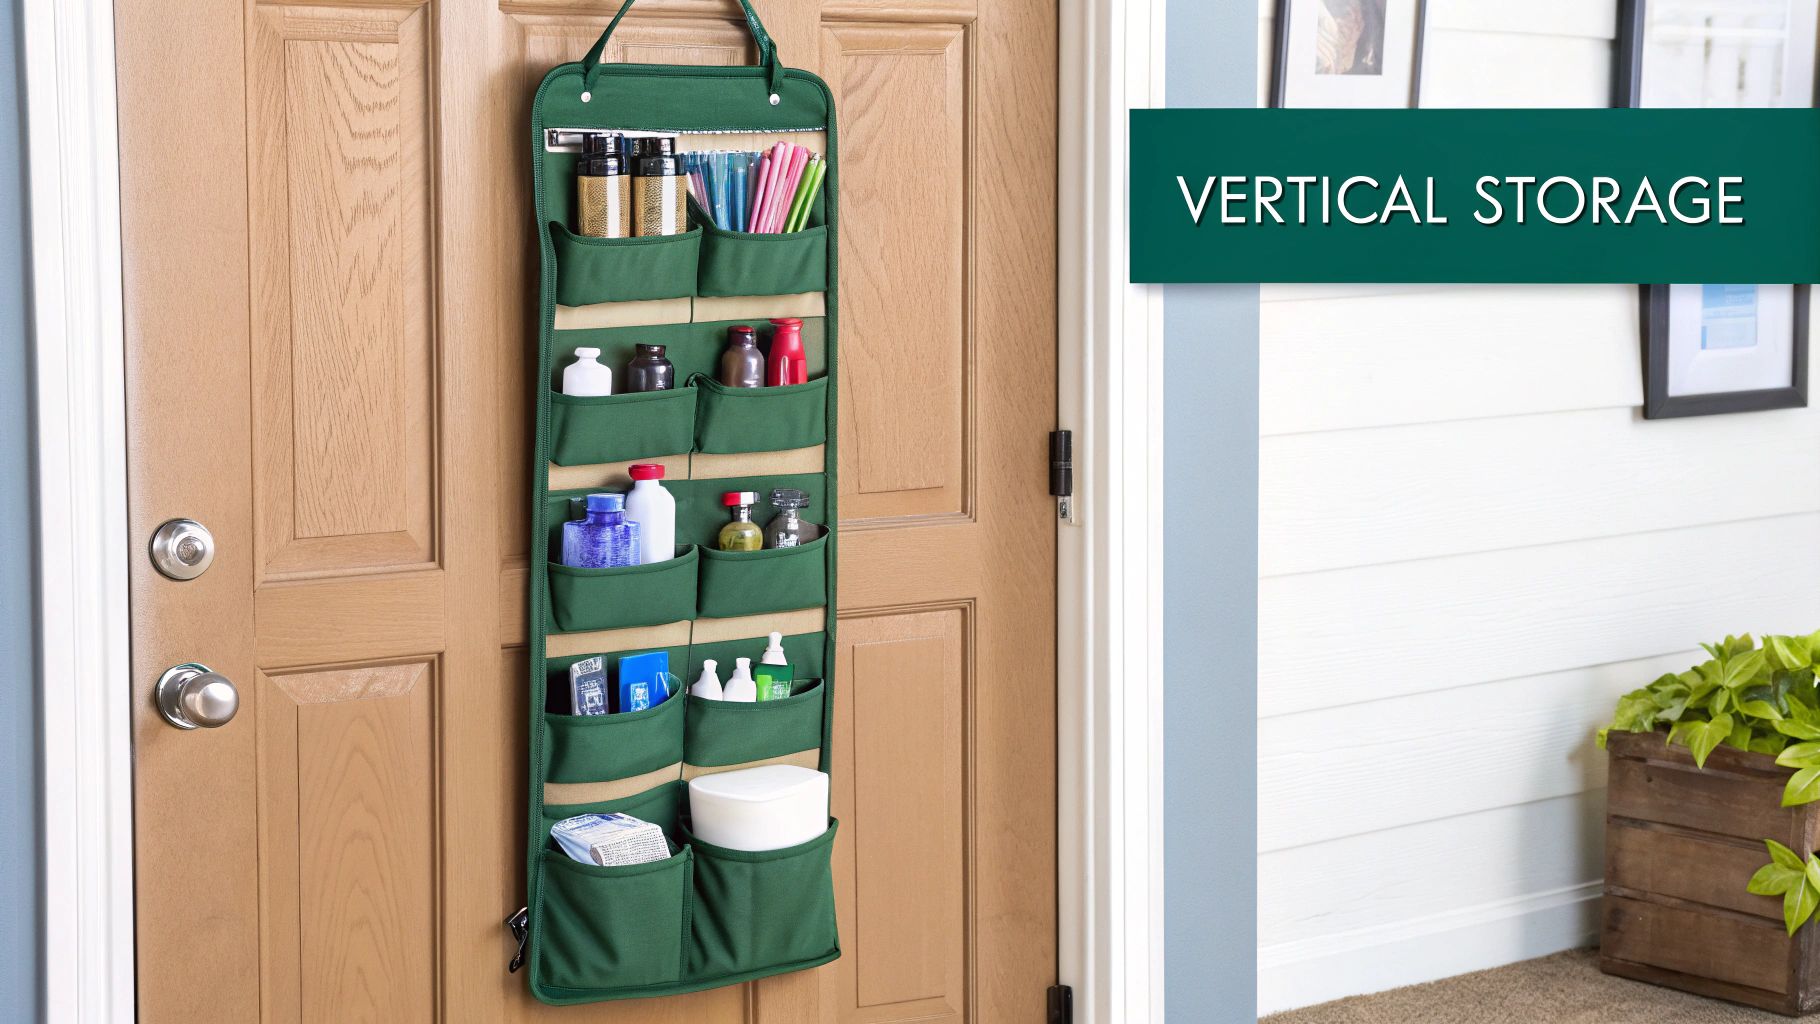
The concept is simple: use systems that hang or mount to reclaim otherwise wasted space. Over-door organizers, famous for shoe storage, are incredibly versatile. You can also install wall-mounted hooks near your closet for frequently used items like jackets, hats, and backpacks. Solutions from brands like The Container Store (Elfa) and IKEA (BOAXEL) have popularized this modular approach, allowing you to customize your vertical setup. If you are looking for even more ways to utilize forgotten spaces, you can explore other dorm room storage hacks for additional inspiration.
How to Implement Vertical Storage
Implementing this strategy is straightforward and highly impactful. Start by assessing your needs and available surfaces.
- For Small Accessories: Use an over-the-door shoe organizer with clear pockets to store toiletries, cleaning supplies, snacks, or folded t-shirts. The transparency is key, as it lets you see everything at a glance, saving you time during busy mornings.
- For Bulkier Items: Install a series of sturdy, command-strip hooks or a multi-hook rack on the wall next to your closet. This is perfect for hanging hoodies, towels, and tote bags, keeping them off your bed or floor.
- For Jewelry and Scarves: A hanging jewelry organizer on your closet door keeps necklaces from tangling and makes it easy to pick the perfect accessory.
Pro Tip: Before buying an over-door organizer, measure the thickness of your dorm door. Most organizers are designed for standard residential doors, and dorm doors can sometimes be thicker or thinner.
This method deserves its top spot because it fundamentally changes how you view your limited space. By going vertical, you effectively multiply your storage capacity, creating a tidy, accessible, and highly efficient closet environment. It's a foundational step in any serious dorm closet organization plan.
2. Cascading Hangers and Space-Saving Hangers
After maximizing your vertical door space, the next frontier in dorm closet organization is optimizing your limited closet rod. Standard hangers take up a surprising amount of horizontal real estate, but cascading and space-saving hangers are designed to multiply your hanging capacity by utilizing vertical space directly on the rod itself. This strategy can instantly triple, or even quintuple, the number of garments you can fit.

This method involves using specially designed hangers that hook onto one another, creating a vertical chain of clothing. The concept was famously popularized by products like Joy Mangano's Huggable Hangers and is now widely available from brands like Amazon Basics. Instead of one shirt taking up several inches of rod space, you can hang five shirts in the same horizontal footprint. This is a game-changer for anyone with a large wardrobe but a tiny closet.
How to Implement Cascading Hangers
Getting started with cascading hangers is simple and offers immediate visual results. The key is to organize strategically.
- Group Similar Items: Use one cascading set for all your tank tops, another for t-shirts, and another for blouses. This makes finding specific items much easier than sifting through a random assortment.
- Utilize for Lightweight Garments: These hangers are perfect for shirts, tank tops, and lightweight bottoms. Avoid using them for heavy winter coats or bulky sweaters, as the weight can strain or break the hooks.
- Create S-Hook Chains: For a DIY approach, you can use soda can tabs or S-hooks to link your existing hangers together vertically. This is a budget-friendly way to test the system.
Pro Tip: Don't convert all your hangers to a cascading system. Leave a section of your closet rod for regular hangers to accommodate frequently worn items like your go-to jacket or hoodie for quick access.
This approach is essential because it directly addresses the most common bottleneck in a dorm closet: a short, crowded clothing rod. By transforming horizontal clutter into vertical order, you create breathing room for your clothes, prevent wrinkles, and make your entire wardrobe visible and accessible. It’s a core tactic for any serious dorm closet organization overhaul.
3. Modular Storage Cubes and Stackable Systems
Dorm closets are notoriously non-standard, often featuring awkward dimensions and fixed shelving that don't match your needs. This is where modular storage cubes and stackable systems shine, offering a tailored approach to dorm closet organization. Instead of fighting against the closet's built-in limitations, this strategy allows you to build a storage structure that perfectly fits the space and your belongings.
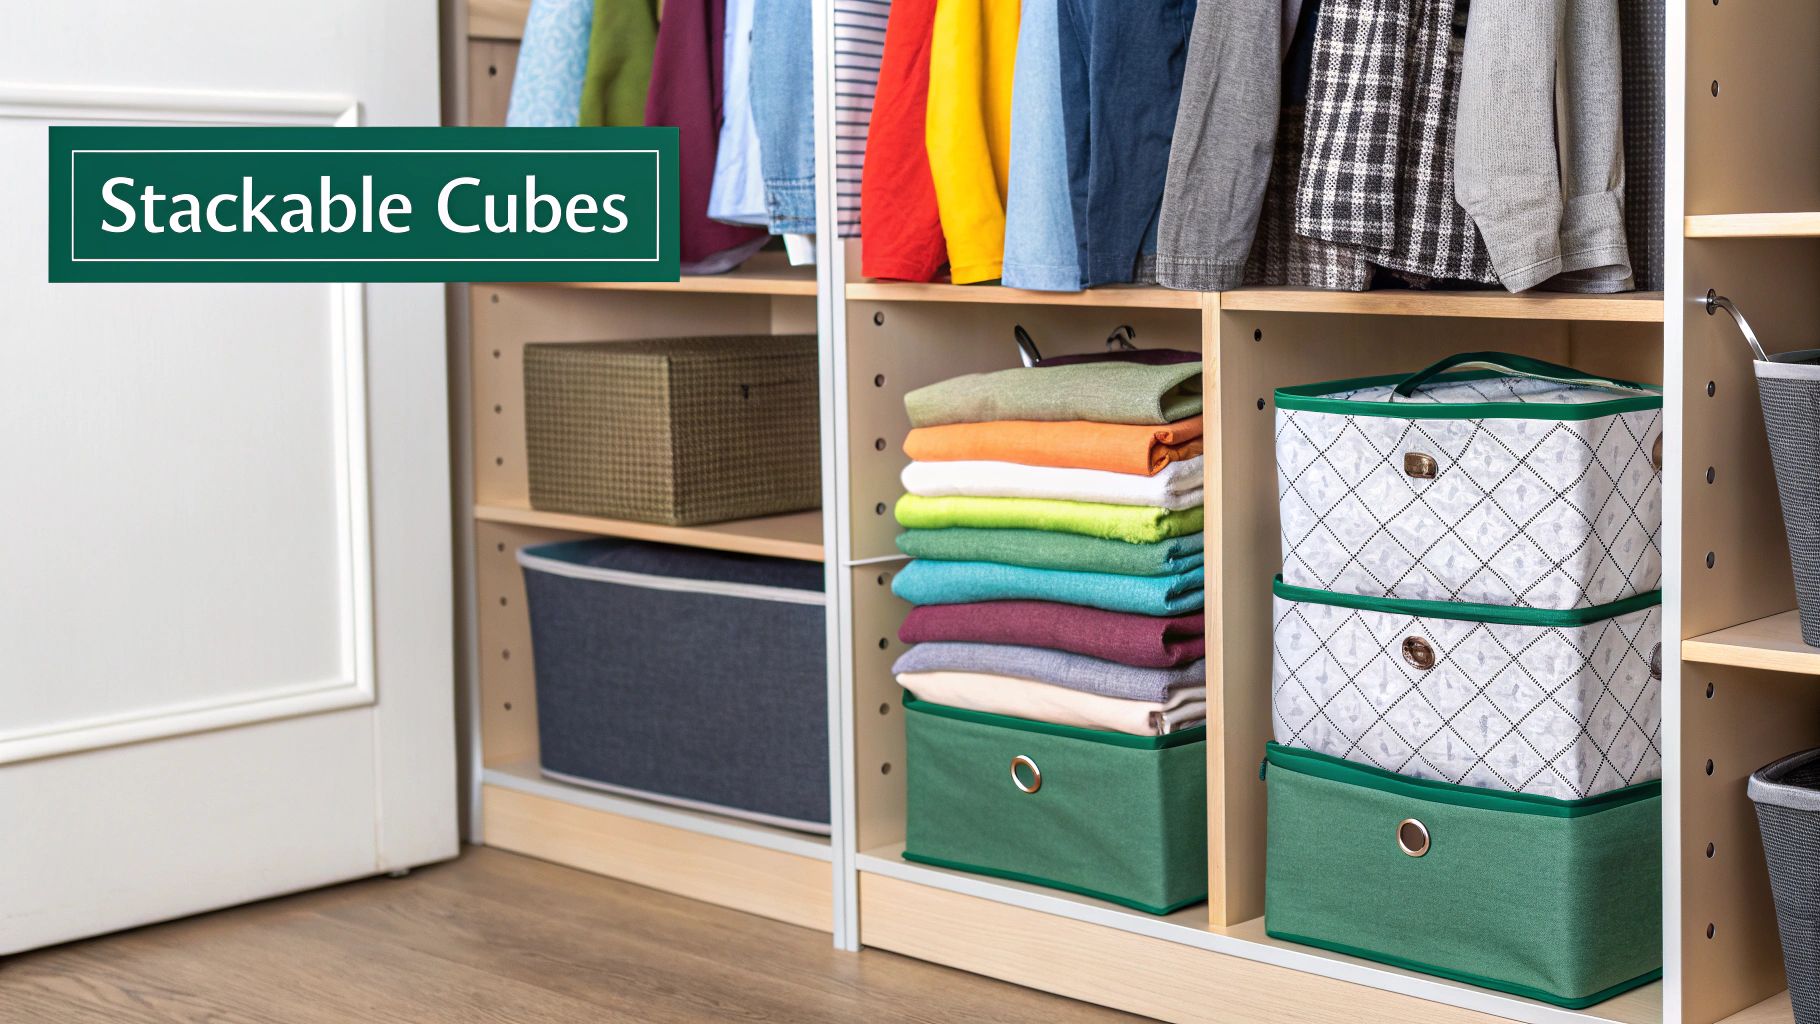
The core idea is to use uniform, stackable units that can be configured in endless ways. This adaptability is key for a dorm room, where your storage needs might change from one semester to the next. To effectively maximize space and keep your belongings tidy, consider investing in flexible and customizable storage solutions such as modular wardrobe storage organizers. Systems from IKEA (KALLAX, SKUBB) and ClosetMaid have popularized this approach, making it accessible and easy to implement.
How to Implement Modular Storage
Building your custom closet setup is a game of Tetris you're guaranteed to win. Start by measuring your closet's floor and shelf space to plan your configuration.
- For Folded Clothes: Use stackable cubes to create dedicated compartments for sweaters, jeans, and t-shirts. This prevents tall, messy piles and makes it easy to grab what you need without toppling the whole stack.
- For Seasonal Items: Assign specific fabric bins or cubes for out-of-season clothing, like heavy winter coats or summer shorts. You can store these on a higher shelf or at the back of the closet and rotate them as the weather changes.
- For Shoes and Accessories: Smaller cubes or bins are perfect for organizing shoes, belts, and bags. Using clear or labeled containers ensures you can quickly find the exact item you're looking for.
Pro Tip: When stacking modular units, always place heavier items like textbooks or bulky sweaters in the bottom cubes. This creates a stable base and prevents the entire structure from becoming top-heavy and tipping over.
This method earns its place by empowering you to create a truly personalized and efficient system. It transforms the awkward, empty floor space of your closet into a structured, highly functional storage hub, making it a cornerstone of effective dorm closet organization.
4. Seasonal Rotation and Under-Bed Integration
A cluttered closet is often a symptom of trying to store too much at once. An essential dorm closet organization technique is to only keep what you currently need accessible. Seasonal rotation is a strategic approach that involves swapping out clothes based on the weather, drastically reducing the volume of items you have to sift through daily while keeping your primary storage space functional and tidy.
This method, championed by organizational experts like Peter Walsh and integral to Marie Kondo's philosophy, relies on using secondary storage spots, like the space under your bed, for off-season items. By dedicating your limited closet space to current-season apparel, you create an environment where finding an outfit is quick and stress-free. For a deeper dive into making the most of this often-overlooked area, you can learn more about smart under-bed storage solutions.
How to Implement Seasonal Rotation
Implementing this system requires a bit of planning but pays off with a perpetually organized closet.
- Categorize and Sort: At the start of a new season (e.g., when spring arrives), pull out all your winter items like heavy coats, wool sweaters, and thermal wear.
- Clean Before Storing: It's crucial to wash everything before packing it away to prevent stains from setting and to deter pests. When undertaking seasonal rotation, remember to properly clean and prepare bulkier items for storage. For instance, knowing how to wash your doona before putting it away can help maintain its condition.
- Use Proper Containers: Store off-season clothes in vacuum-sealed bags to compress bulky items or in clearly labeled, flat under-bed storage containers. This keeps them dust-free and easy to identify later.
Pro Tip: Create a simple inventory list of what you've stored in each container and tape it to the lid. When you're looking for a specific item next season, you'll know exactly where to find it without having to open every single box.
This strategy is fundamental for maintaining long-term dorm closet organization. It prevents seasonal creep from overwhelming your limited space and ensures that your closet remains a highly functional, relevant-to-you wardrobe all year round.
5. Color-Coded and Category-Based Organization
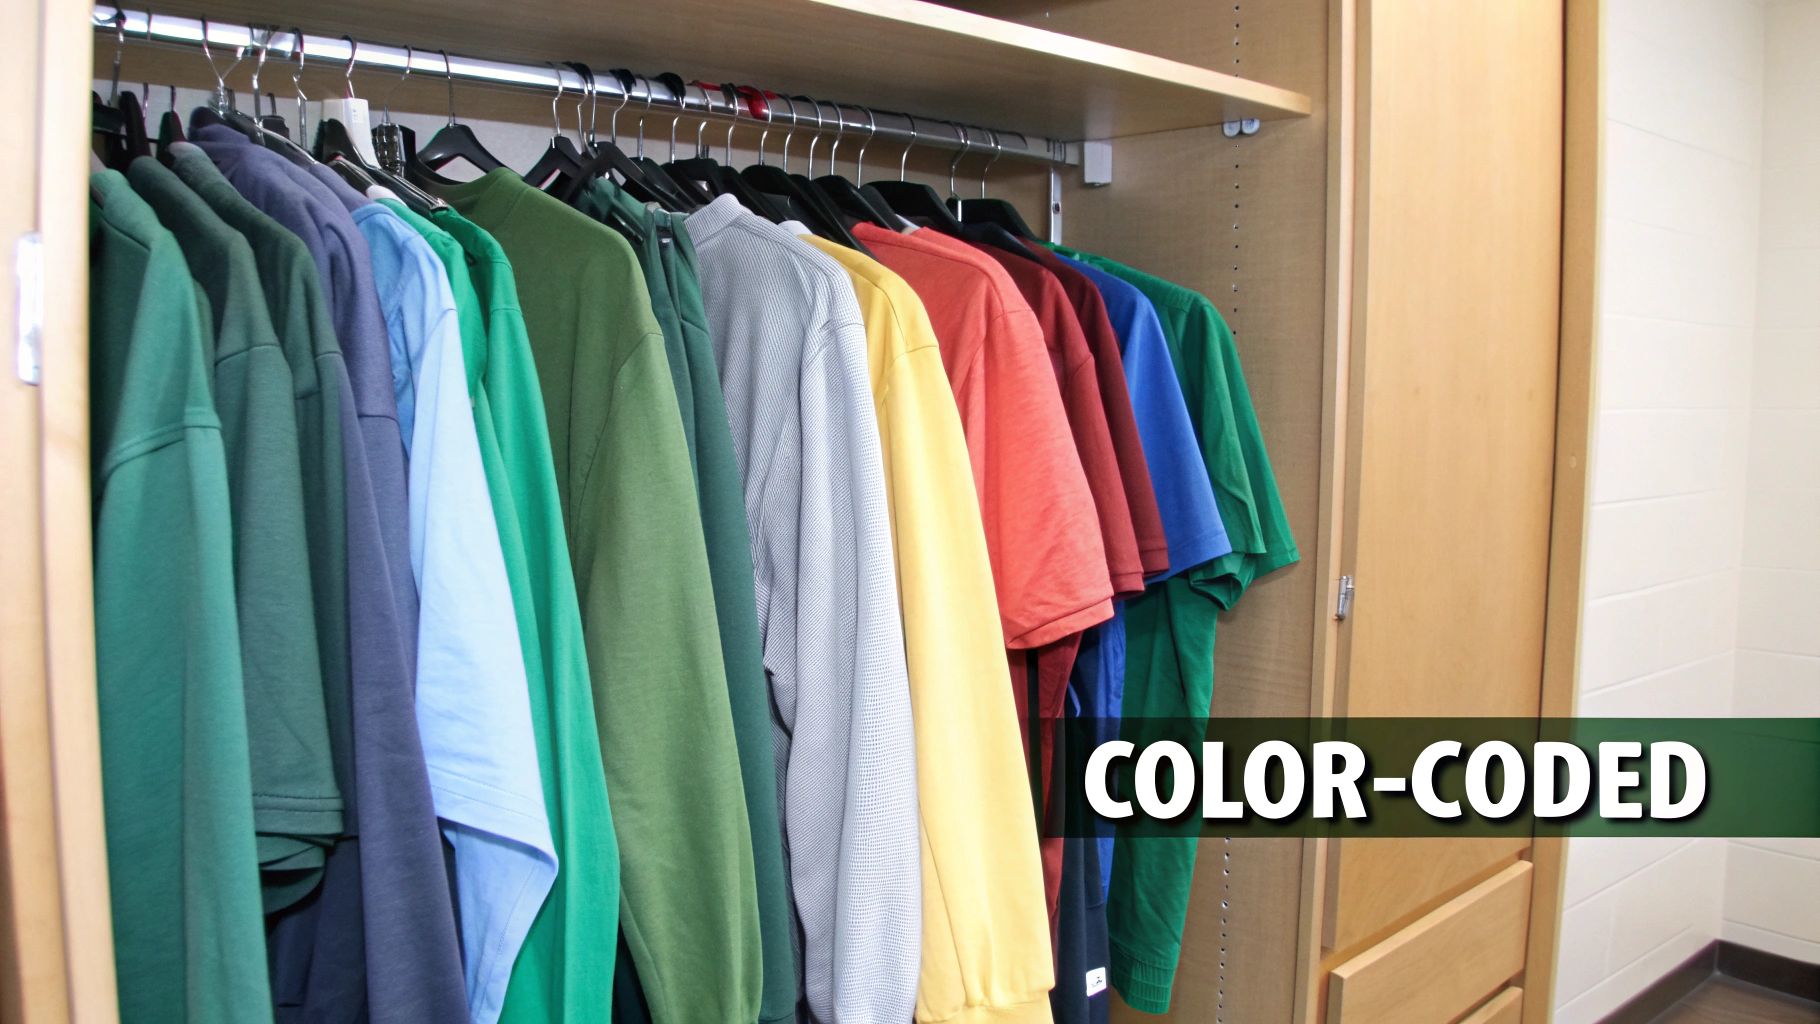
Beyond just adding shelves and bins, a truly functional closet relies on a system that makes finding what you need effortless. An exceptional strategy for dorm closet organization involves grouping your clothes first by category and then by color. This method turns your closet from a chaotic pile into a visually streamlined and intuitive wardrobe, saving you precious time on busy mornings.
The concept, popularized by organizational experts like Clea Shearer of The Home Edit, combines logic with aesthetics. By creating distinct zones for different clothing types (e.g., class attire, workout gear, weekend outfits) and arranging items within each zone in a rainbow or light-to-dark sequence, you create a system that your brain can process instantly. This approach not only makes it faster to get dressed but also simplifies the process of putting laundry away, as every item has a clearly defined home.
How to Implement a Color and Category System
Implementing this system is a rewarding project that pays dividends all semester long. Start by sorting all your clothes into broad categories that make sense for your lifestyle.
- Categorize First, Color Second: Begin by creating distinct piles of clothing based on function. Separate your t-shirts, sweatshirts, pants, dresses, and workout clothes. Once you have your categories, organize the items within each group by color, following a consistent pattern like the colors of the rainbow.
- Use Visual Cues: Employ colored hangers to visually separate your categories. For instance, use blue hangers for jeans, white for tops, and grey for outerwear. This adds another layer of organizational clarity.
- Label Everything: For items stored in bins or on shelves, clear labeling is crucial. Creating specific, visible labels prevents you from having to rummage through every container. You can find excellent guidance on the best way to label storage bins for maximum efficiency.
Pro Tip: Take a "before" and "after" photo of your closet. Seeing the transformation is highly motivating and can serve as a visual reference to help you maintain the system throughout the year.
This organizational method earns its spot by directly addressing the mental clutter that comes with a messy space. It’s a powerful approach to dorm closet organization because it builds sustainable habits, making it easy to keep your small space tidy. By establishing a clear, visual logic, you transform your daily routine from stressful to streamlined.
6. Multi-Functional Furniture Integration
A truly brilliant dorm closet organization strategy extends beyond the closet's physical boundaries. By integrating multi-functional furniture into your room, you create storage solutions that double as essential living pieces. This approach blurs the line between closet and room, ensuring every square inch of your limited space works twice as hard.
The concept is to choose furniture that offers hidden storage, effectively becoming an extension of your closet. An ottoman at the foot of your bed isn't just a seat; it's a home for bulky sweaters or extra shoes. This method has been widely popularized by brands like IKEA and Target, which specialize in designing smart, space-saving furniture for small living environments. By thoughtfully selecting these pieces, you add functionality without adding clutter. For those interested in a deeper dive, you can explore more about space-saving furniture and its impact on small-space living.
How to Implement Multi-Functional Furniture
Integrating this strategy requires smart shopping and a clear understanding of your storage gaps. Assess what items are overflowing from your closet and choose furniture that can absorb them.
- For Shoes and Accessories: An ottoman storage bench is a game-changer. It provides a spot to sit while putting on shoes and can secretly store a dozen pairs, along with scarves, belts, or hats.
- For Folded Clothes and Bedding: Utilize bed risers that come with built-in drawers. This elevates your bed to create under-bed storage space and provides organized compartments for T-shirts, jeans, or extra linens, items that typically cram a closet.
- For Everyday Items: A storage headboard or a nightstand with multiple deep drawers can serve as a mini-closet for pajamas, socks, and underwear, freeing up valuable drawer space inside the main closet.
Pro Tip: Before you buy, measure everything: your room dimensions, doorways, and the furniture itself. It’s crucial to ensure your new multi-functional piece will actually fit into your dorm room and through the door.
This method earns its place by being one of the most intelligent forms of dorm closet organization. It solves the core problem of limited space by making your furniture do double duty, creating a room that is as practical as it is comfortable and organized.
7. Vacuum-Sealed Storage and Compression Systems
Seasonal clothing and bulky bedding can be the biggest culprits when it comes to a cluttered closet. A highly effective strategy for dorm closet organization involves using vacuum-sealed bags and compression systems to reclaim a significant amount of space. This method works by removing air from the bags, shrinking items like comforters, winter coats, and bulky sweaters to a fraction of their original size.
This approach is a game-changer for storing off-season items that you don't need daily access to but must keep in your room. By compressing these items, you can neatly stack them on a high shelf, slide them under your bed, or tuck them into the back of your closet without them overflowing into your everyday space. Brands like SpaceBag and various Amazon Basics compression bags have made this technique accessible and affordable for students. If you're looking to invest in this space-saving solution, you can find a breakdown of the best vacuum storage bags on endless-storage.com to help you choose.
How to Implement Compression Storage
Using vacuum bags is simple, but a few key steps ensure your items stay protected and your space remains optimized.
- For Seasonal Clothing: When the weather warms up, place your clean, dry winter coats, thick sweaters, and flannels into a large vacuum bag. Use a vacuum cleaner hose to suck out the air, seal the bag, and store the now-flattened package on the top shelf of your closet.
- For Extra Bedding: That bulky extra comforter or set of pillows for guests can be compressed and stored easily. This keeps them clean, dust-free, and out of the way until needed, freeing up valuable shelf or floor space.
- For Organization: Use smaller compression bags to group similar items together before storing them. For example, one bag for heavy sweaters and another for winter accessories like scarves and hats. Be sure to label each bag clearly with its contents.
Pro Tip: Before sealing, toss a dryer sheet, a cedar block, or a lavender sachet into the bag. This will keep your clothes smelling fresh when you open them months later and helps deter moths.
This method is invaluable because it directly addresses the problem of bulk. It allows you to keep all your belongings within your limited dorm space, eliminating the need to transport seasonal items back and home. It’s a core component of any advanced dorm closet organization plan for students dealing with four seasons of clothing in one tiny room.
7 Key Dorm Closet Organization Methods Compared
Maintaining Your Organized Oasis
Transforming your compact dorm closet from a chaotic jumble into a streamlined, functional space is a significant achievement. But the real victory lies in keeping it that way. The tips we've explored, from maximizing vertical space with over-the-door organizers to the genius of cascading hangers and vacuum-sealed bags, are not just one-time fixes. They are the building blocks of a sustainable system for successful dorm closet organization. Mastering this system frees up more than just physical space; it liberates your mental energy, reduces daily stress, and creates a more peaceful and productive living environment.
Remember, the goal isn't to create a static, picture-perfect closet. Your needs will change from semester to semester, season to season. The true power of these strategies lies in their adaptability. Your modular cubes can be reconfigured, your color-coded system can be updated, and your seasonal rotation strategy will become a seamless annual ritual.
From Project to Habit: Your Action Plan for Lasting Order
The initial overhaul is the most intensive part. Now, the focus shifts to maintenance. A perfectly organized space is the result of small, consistent actions, not sporadic, heroic efforts. Integrating these habits into your daily and weekly routine is the secret to preventing clutter from ever taking hold again.
Here are the key takeaways and actionable next steps to ensure your dorm closet remains an organized oasis:
- The 5-Minute Reset: Dedicate just five minutes at the end of each day to put things back where they belong. Hang up the hoodie you tossed on your chair, place your shoes back on the rack, and return accessories to their designated bins. This simple habit is the single most effective way to prevent chaos from creeping back in.
- Embrace the Weekly Tidy: Once a week, take 15 minutes to do a slightly deeper reset. Straighten your hanging clothes, refold any items in your storage cubes that have become messy, and quickly wipe down shelves. This prevents small messes from turning into overwhelming projects.
- The Seasonal Swap is Non-Negotiable: Don't let your bulky winter coats and sweaters steal precious real estate during the warmer months. Actively practice seasonal rotation. Integrating your under-bed storage or a separate solution for off-season items is crucial for maintaining functional dorm closet organization year-round.
The Bigger Picture: More Than Just a Tidy Closet
Ultimately, mastering your dorm closet is a lesson in intentional living. It teaches you to be mindful of what you own, to create systems that support your goals, and to build an environment that fosters calm instead of chaos. The principles of maximizing small spaces, decluttering regularly, and maintaining systems will serve you well beyond your college years, from your first apartment to any future home. You've now equipped yourself with a versatile toolkit of strategies. By committing to these simple maintenance habits, you ensure your closet remains a source of ease and efficiency, allowing you to focus on what truly matters: your education and your college experience.
Ready to conquer seasonal clutter and maximize your limited space? For bulky winter gear, extra bedding, or items you won't need until next semester, Endless Storage offers the perfect solution. Visit Endless Storage to see how their affordable, by-the-box storage service can help you maintain a pristine and organized dorm room all year long.
Frequently Asked Questions
Unveiling the Secrets to Effortless Storage
Endless Storage is available nationwide. You pick a plan, tell us where to pickup, and we'll send a UPS van to collect, whichever state you're in.
Your shipping label will be sent to your email within a few minutes, if not instantaneously. It can also be accessed through your customer profile.
Your box will be shipped to one of our climate controlled self storage facilities in our closest self storage facility. Our manager will accept your package, notify you that your box has been received, and securely stored. Only our managers will have access to Endless Storage boxes.
Email us at admin@endless-storage.com click to live chat with us, or send us a message below.
Never! We're committed to transparent pricing with no surprises. You'll lock in your rate with no hidden fees and no long-term contracts.
Fast access guaranteed! Your boxes will arrive at your doorstep within 48 hours of requesting them back. Need to check on delivery? We provide tracking information for complete peace of mind.
Totally flexible! Store month-to-month with no long-term commitment and cancel anytime.
Everything's online! Use your account dashboard to:
• Set up automatic monthly payments
• Request box returns
• Update your address
• Order additional boxes
• Track shipments
Your boxes are insured up to $100 each. Our customer service team will help you file any necessary claims and resolve issues quickly.
Don't worry – we'll email you right away if there's a payment issue. Your items stay safe, though you may have temporary service interruption or late fees until payment is resolved.
When you request our free storage kits, you'll have 30 days to send in your boxes to activate your 3 months of free storage. Think of it like starting a gym membership – your activation window begins when you receive your kits, and your full free trial begins once you send in your first box. During your free months, you'll experience our complete storage service at no cost.
Your 30-day activation window begins when you receive your storage kits. We'll send you an email confirmation when your kits are delivered, marking the start of your activation period.
If you haven't sent any boxes for storage within your 30-day activation window, your free trial will expire and we'll begin charging the regular monthly rate of $9.99 per box. This helps ensure our storage kits go to customers who are ready to use our service.
A box costs $9.99 per month to store (plus sales tax). This price includes free shipping for standard boxes under 50 lbs. and smaller than 16"x16"x16"
Log into your Endless Storage account, locate the box you would like returned, and simply click Return My Box.
Yes, each box stored with us is insured for up to $100 throughout transit as well as the duration of storage within our facilities.
Your box will be at your doorstep within 48 hours of you requesting it back.
Store 10+ boxes? We'll pick them up for free! After your purchase, we'll contact you to schedule a convenient pickup time and arrange UPS collection.
We trust UPS with all shipments, and every box includes $100 insurance coverage. You'll receive tracking information to monitor your items' journey.
Yes! Visit any of our locations by appointment. Just bring a photo ID matching your customer profile.
For everyone's safety, we can't store hazardous materials, firearms, or perishables. All items must fit within our standard boxes.
It's easy! Order your storage kit online, and we'll ship it to you within 1-2 business days. Your shipping labels will be emailed instantly and available in your account.
We're here to help! Email us at admin@endless-storage.com, use our live chat, or send us a message through your account.
To cancel your storage service with Endless Storage, please email your cancellation request to admin@endless-storage.com. Our team will process your request within 2 business days and confirm your cancellation via email.
We understand packing takes time. However, to maintain your free trial benefits, you'll need to send at least one box within the 30-day activation window. If you need more time, you can always start with one box to activate your trial and send the rest later. You can always reach out to admin@endless-storage.com if you have any issues or concerns.
When you request our free storage kits, you're starting a 30-day window to begin using our storage service.
Important: To activate your free trial, send at least one box for storage within 30 days. If no boxes are sent within this 30-day window, a one-time $50 fee applies to cover materials and shipping costs. This fee is clearly disclosed before you sign up.
Think of it like reserving a hotel room – we're setting aside space and sending specialized packing materials for your use. The fee only applies if you request materials but don't begin storage, similar to a hotel's no-show charge.