
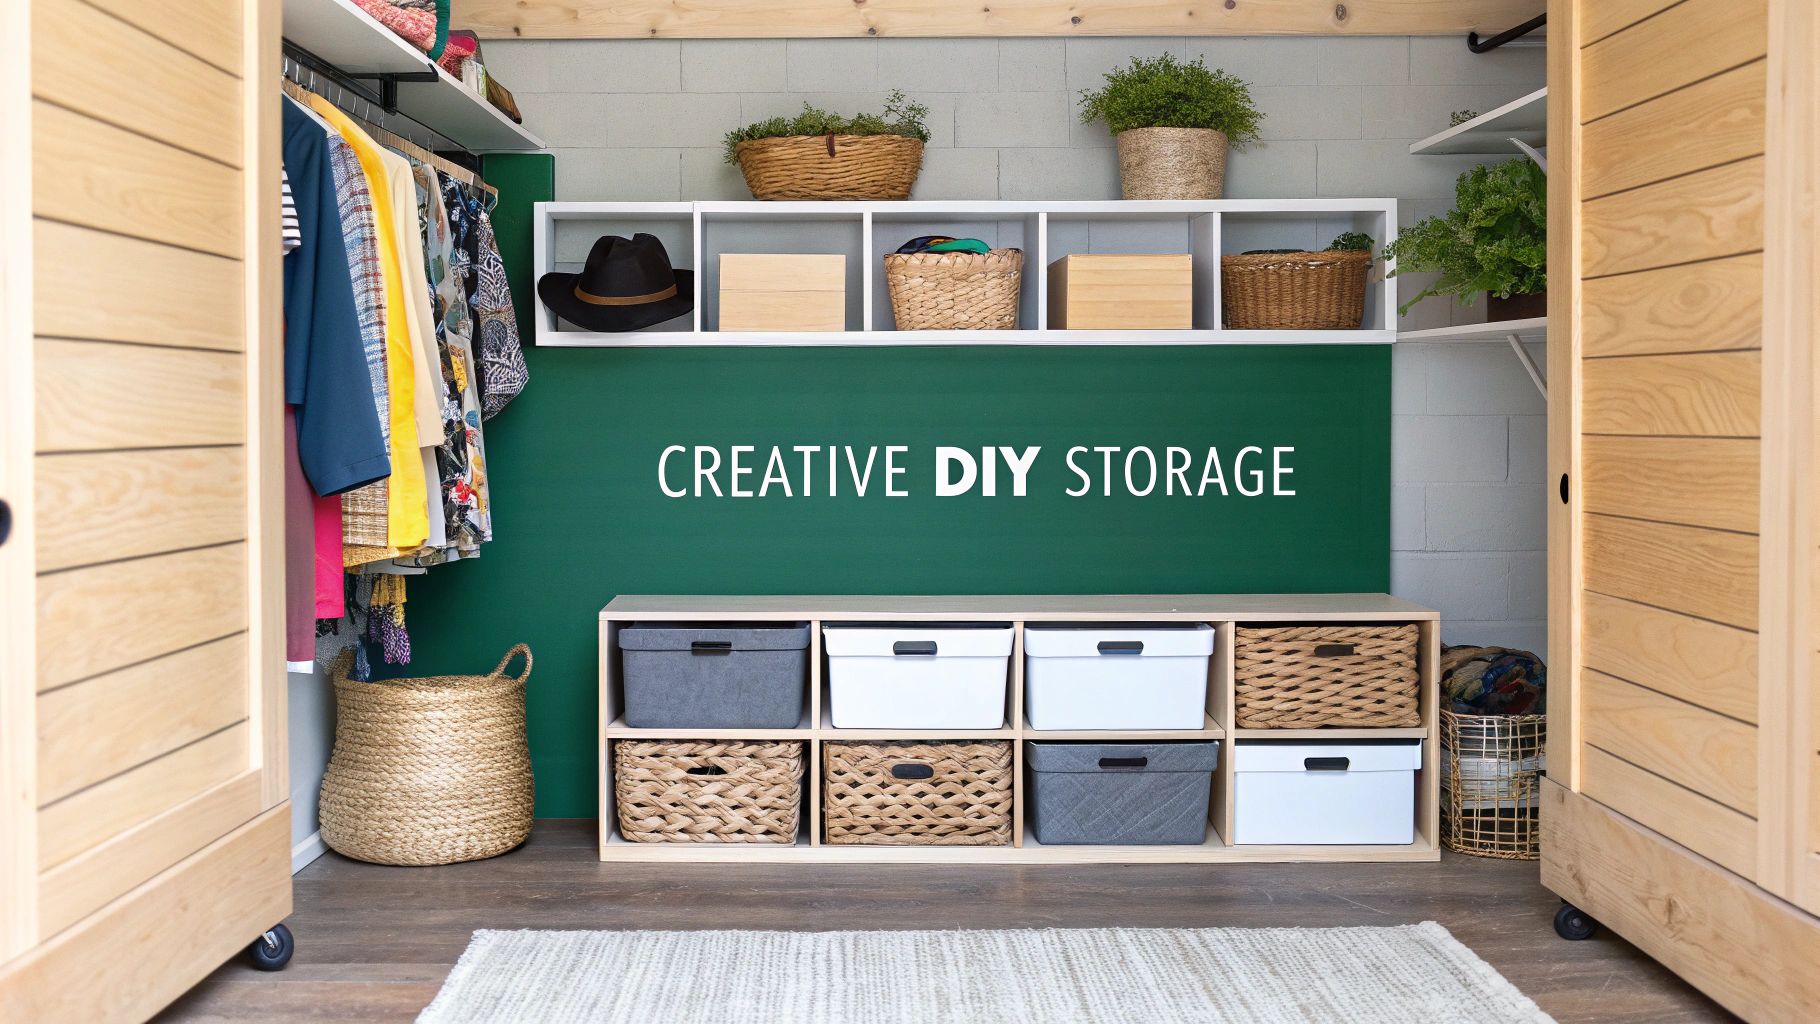
Feeling overwhelmed by clutter is a common struggle, especially when dealing with limited square footage. In homes where every inch counts, finding smart storage is not just a convenience; it's essential for a calm and organized environment. The good news is that you don't need a massive budget or a complete renovation to reclaim your space. This guide is packed with creative and actionable DIY ideas for storage that transform overlooked nooks and everyday objects into highly functional organizational systems. These projects are specifically designed to maximize your home's potential without breaking the bank.
We'll explore nine ingenious projects, from transforming the dead space under your stairs into a practical closet to creating stylish, multi-functional furniture that hides messes in plain sight. For those living in compact environments, exploring clever small space storage ideas can be game-changing, and the solutions here are tailored for exactly that challenge. Each idea is designed to be accessible, budget-friendly, and highly effective, empowering you to conquer clutter once and for all. Get ready to build, repurpose, and organize your way to a more spacious and serene home with these practical, hands-on solutions.
1. Under-Stair Storage Solutions
The awkward, triangular space beneath a staircase is often one of the most underutilized areas in a home. By transforming this void into a custom storage unit, you can unlock significant organizational potential. This project involves framing the space and installing built-in features like shelving, pull-out drawers, or even a mini-mudroom, making it one of the most impactful diy ideas for storage for multi-level homes.
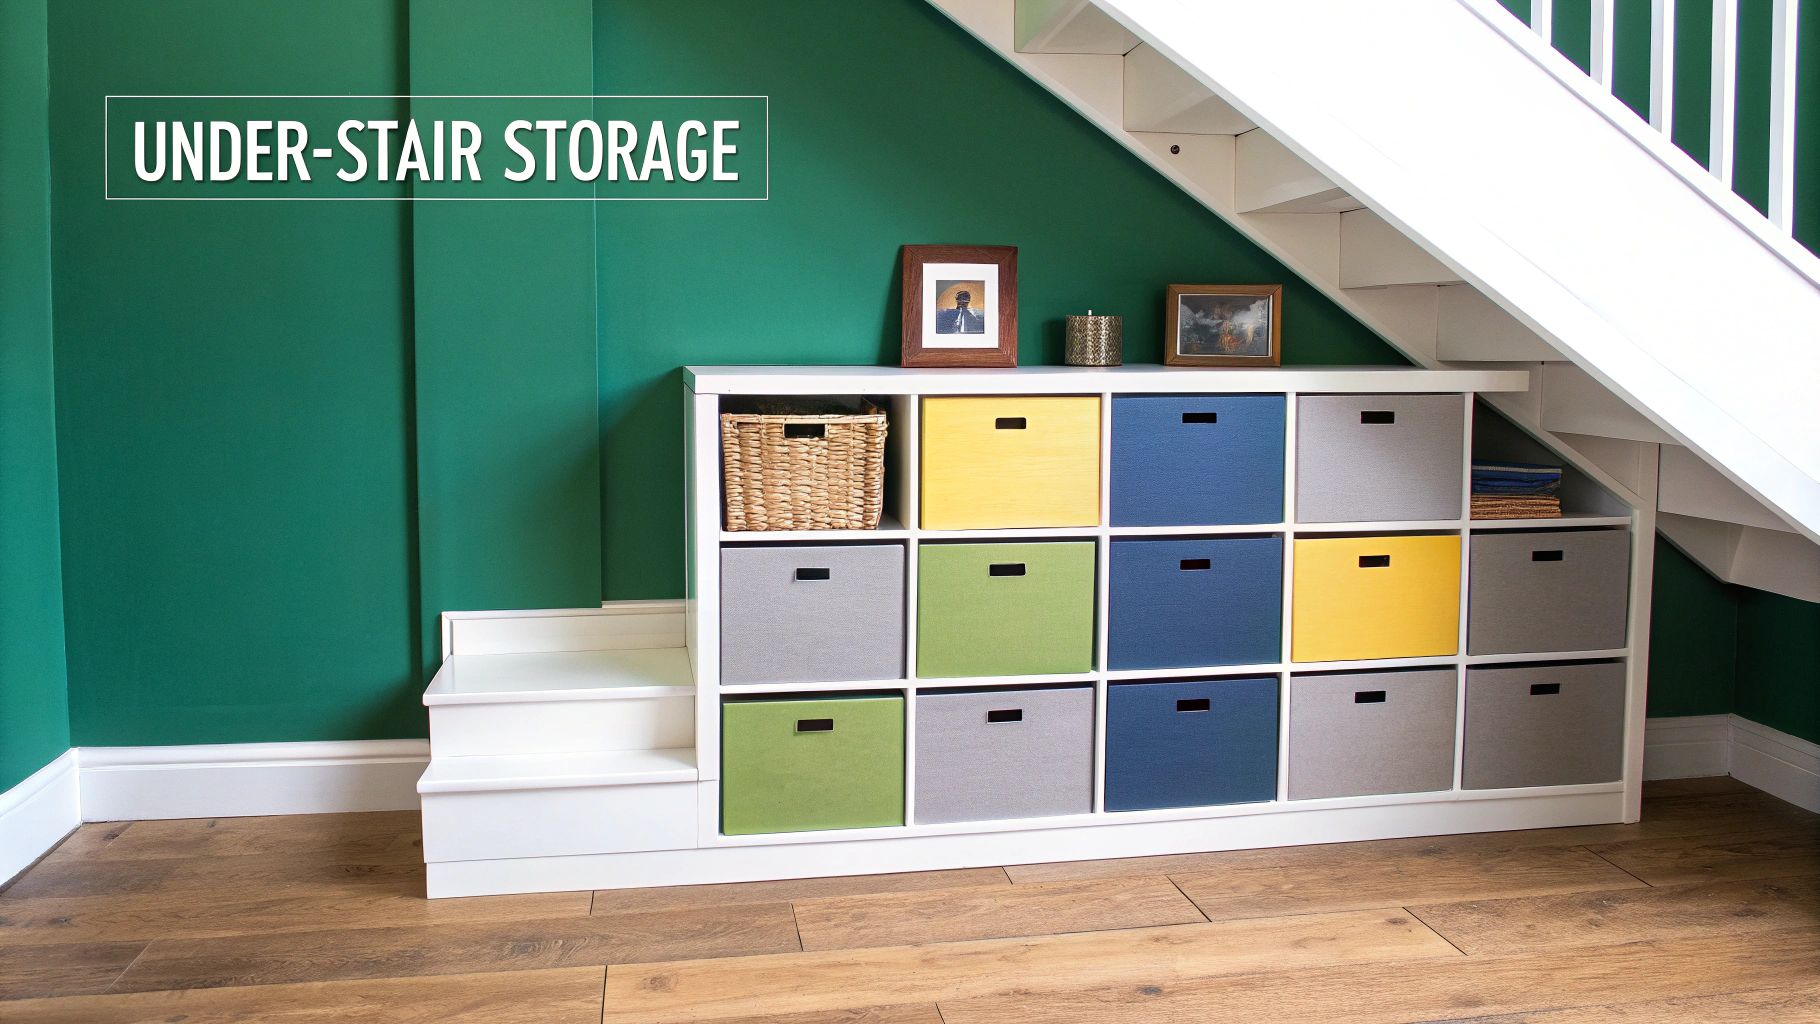
Why It Works for Cluttered Spaces
This approach is perfect for homes lacking dedicated closets or entryways. It centralizes storage for seasonal items, sports equipment, or everyday essentials, preventing clutter from spreading into main living areas. The custom nature of the build means you can tailor it precisely to your needs, whether that’s a small home office or a place for coats and boots.
Project Implementation Tips
- Measure Meticulously: Accurately measure the height, depth, and angle of the space. Create a detailed plan on paper before cutting any materials to ensure everything fits the unique triangular shape.
- Start Simple: If you're new to DIY, begin with open shelving. This is less complex than installing custom drawers with slides and hardware. You can always add more complex elements later.
- Prioritize Lighting and Ventilation: The under-stair area can be dark and stuffy. Install simple LED strip lighting for visibility. If storing items like wine or certain textiles, ensure there is adequate air circulation to prevent moisture buildup.
- Choose Quality Hardware: For drawers or pull-out cabinets, invest in high-quality, full-extension drawer slides. These can handle heavy loads and will withstand frequent use, making your storage solution both functional and durable.
2. Pegboard Organization Systems
Pegboard systems transform empty walls into highly adaptable and efficient storage hubs. Originally a workshop staple, this perforated hardboard is now a stylish and practical solution for kitchens, offices, and craft rooms. By using a customizable array of hooks, shelves, and containers, you can create a vertical storage space that keeps frequently used items visible and within easy reach, making it one of the most versatile diy ideas for storage.
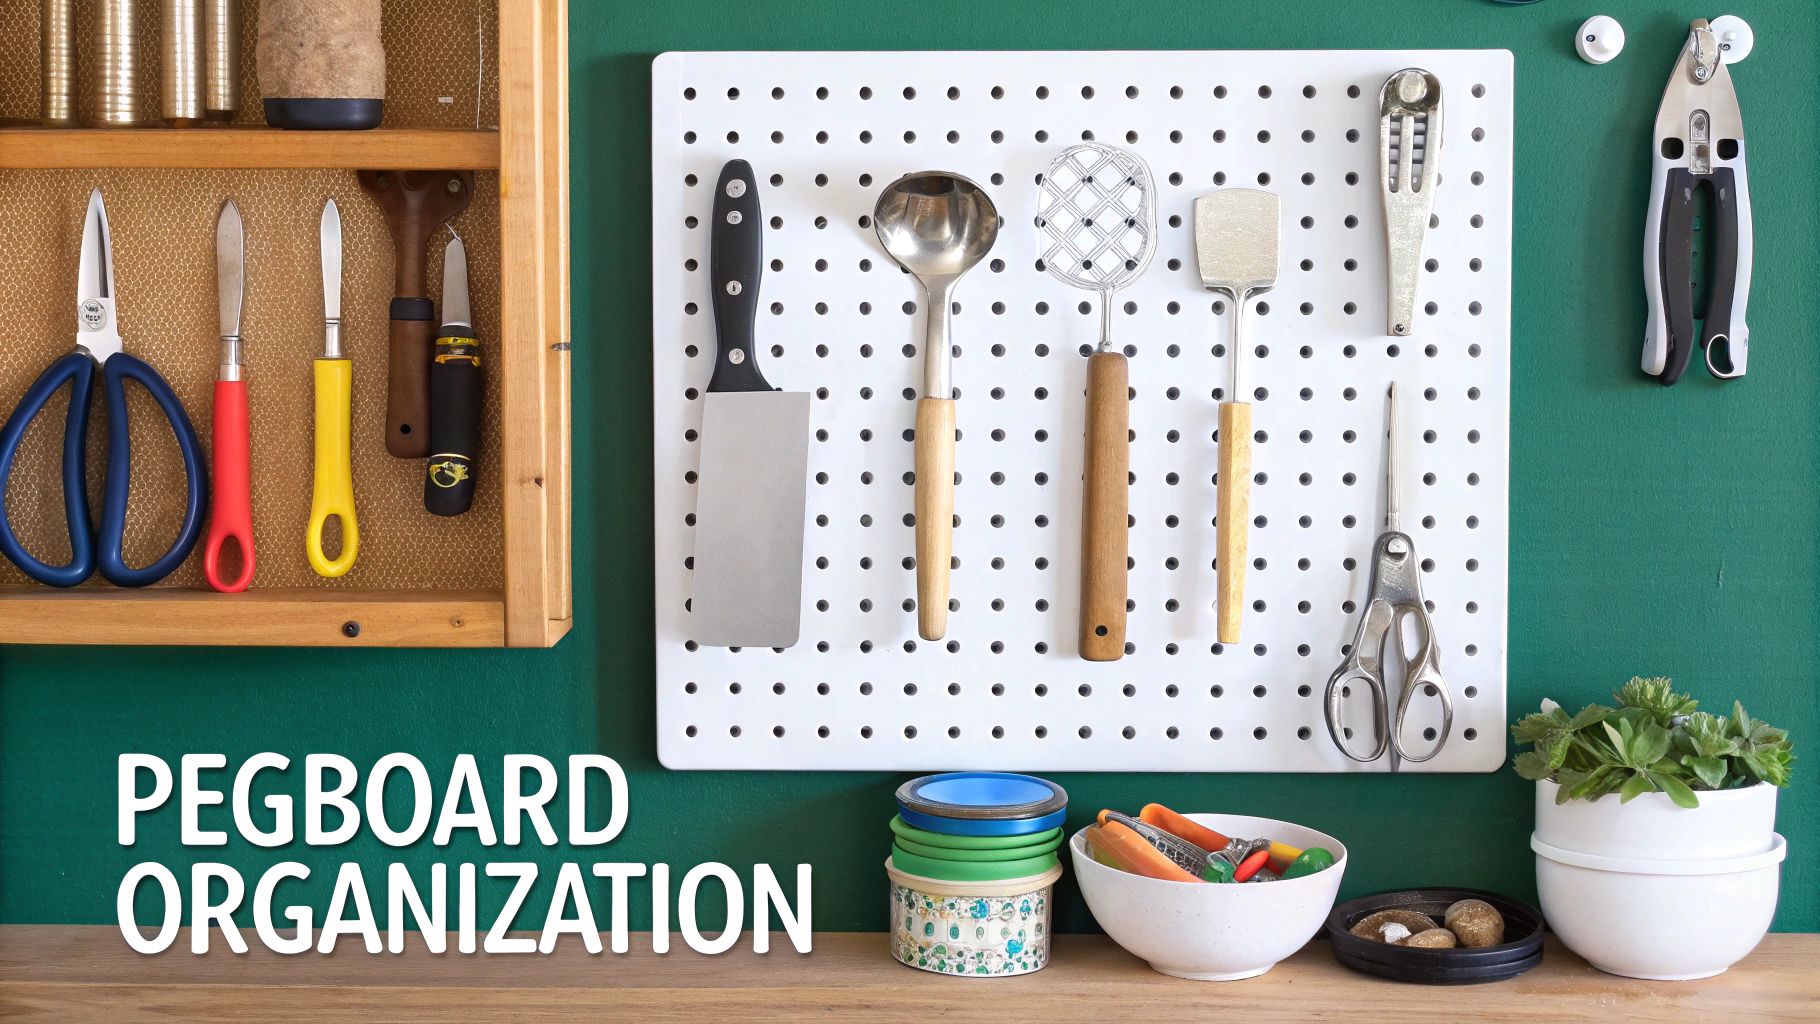
Why It Works for Cluttered Spaces
This method excels in areas where counter and drawer space is limited, like small kitchens or craft nooks. It gets items off horizontal surfaces, reducing clutter and making cleanup easier. The visual nature of pegboard storage means you can quickly find what you need, whether it’s a specific kitchen utensil, a roll of ribbon, or a hand tool, which streamlines your daily routines and creative projects.
Project Implementation Tips
- Plan Your Layout: Before drilling any holes, lay the pegboard on the floor and arrange your items. This helps you visualize the most efficient layout and ensure everything has a designated spot.
- Create a Frame: Mount the pegboard on a simple frame made of 1x2 lumber rather than directly on the wall. This creates the necessary space behind the board for the hooks to be inserted properly.
- Secure Your Hooks: For items that are frequently removed and replaced, use zip ties or a dab of hot glue on the back of the hooks to prevent them from falling out of the board.
- Customize for Aesthetics: Don’t stick with plain brown hardboard. Paint the pegboard a color that complements your room’s decor or even create a pattern for a functional accent wall.
3. Ottoman Storage Furniture
Multifunctional furniture is a game-changer in compact living, and the storage ottoman is a prime example. This versatile piece serves as a comfortable footrest, extra seating, and a discreet storage container all in one. By creating your own, you can customize the size, fabric, and features to perfectly match your decor and organizational needs, making it one of the most practical diy ideas for storage for any room.
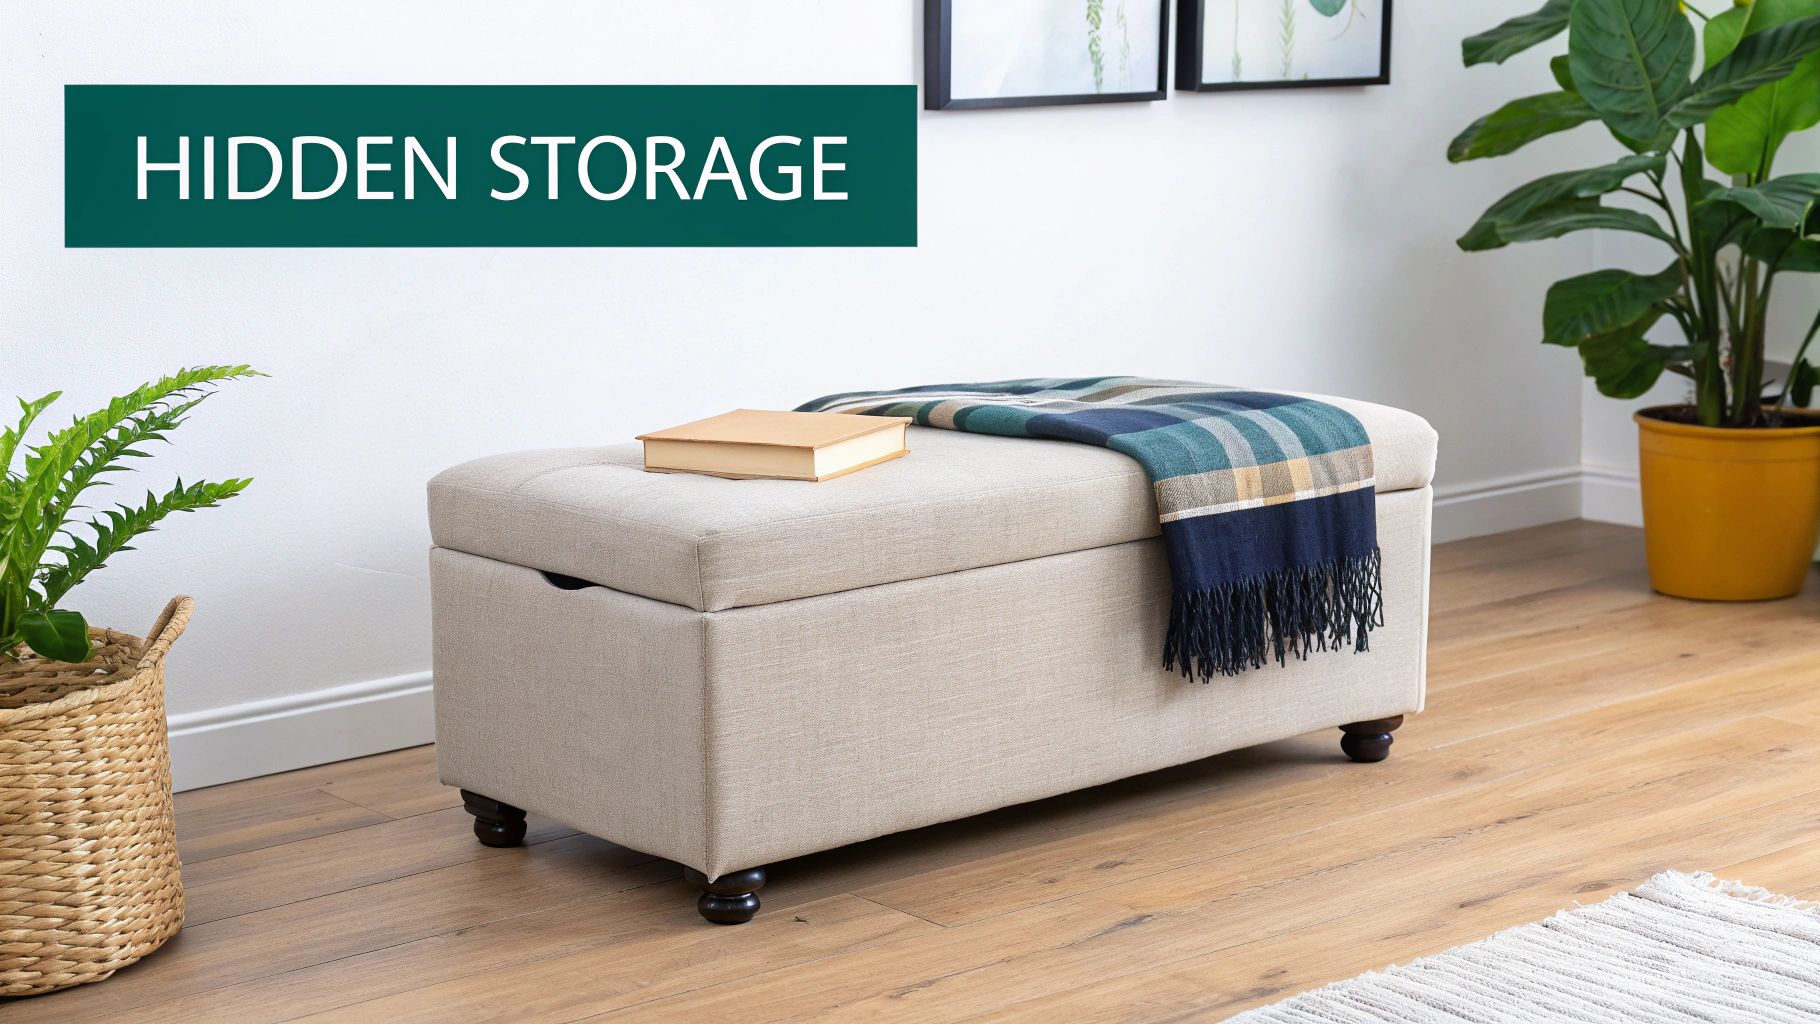
Why It Works for Cluttered Spaces
This solution is ideal for hiding away items that create visual clutter, such as extra blankets in the living room, toys in a playroom, or shoes in an entryway. It provides accessible, out-of-sight storage without sacrificing valuable floor space. Because it's a functional piece of furniture, it seamlessly integrates into your existing layout, unlike purely utilitarian plastic bins or containers. These ottomans are just one of many affordable storage solutions you can implement.
Project Implementation Tips
- Build on a Sturdy Base: Start with a solid foundation like a wooden crate, an old toy box, or a custom-built plywood frame. The base must be strong enough to support the weight of a person sitting on it.
- Choose High-Density Foam: For a comfortable and durable seat, use high-density foam for the padding. A thickness of 2-3 inches is usually sufficient to create a plush, supportive top that won’t flatten quickly.
- Add Casters for Mobility: Attaching small, lockable wheels (casters) to the bottom of your ottoman makes it easy to move around for cleaning or rearranging furniture. This is especially useful for larger or heavier pieces.
- Incorporate Interior Dividers: To keep the inside organized, consider adding simple plywood or fabric dividers. This helps separate items like shoes, magazines, or gaming controllers, preventing them from becoming a jumbled mess.
4. Floating Corner Shelves
Room corners are frequently neglected, creating dead zones that contribute nothing to your home's functionality. By installing floating corner shelves, you can transform these awkward angles into valuable vertical storage. This project involves mounting custom-cut shelves directly to the wall without visible brackets, creating a clean, modern look and making it one of the most efficient diy ideas for storage for any room.
Why It Works for Cluttered Spaces
This solution is ideal for small apartments or rooms where floor space is at a premium. It draws the eye upward, making a room feel larger while providing a dedicated spot for toiletries in a bathroom, spices in a kitchen, or decorative items in a living room. By utilizing vertical corner space, you add storage capacity without consuming a single square foot of your floor plan.
Project Implementation Tips
- Secure Your Mounting: Use a stud finder to locate wall studs for the most secure installation. If studs aren't available, use heavy-duty drywall anchors specifically designed to support the weight of the shelf and its contents.
- Plan Your Spacing: Before drilling, determine what you’ll store on each shelf and measure the items. Plan the vertical distance between shelves accordingly to ensure everything from tall books to small plants fits perfectly. For more project inspiration, explore these DIY floating shelf ideas.
- Consider Rotational Hardware: For deeper kitchen or pantry corners, consider installing a lazy Susan mechanism on one of the shelves. This allows you to easily access items stored in the back without having to remove everything in front.
- Test Weight Limits: After installation and before loading the shelves completely, gently apply downward pressure to test their stability. It's better to discover a weak point now than after you've arranged your fragile items.
5. Repurposed Ladder Storage
An old wooden ladder can be transformed into a charming and functional vertical storage unit, perfect for adding character to any room. By repurposing its rungs as shelves or adding planks across them, you create a tiered display for books, plants, or decorative items. This approach is one of the most stylish diy ideas for storage, blending rustic appeal with practical organization, making it ideal for small spaces where floor area is limited.
Why It Works for Cluttered Spaces
This solution excels in rooms that need storage without the bulk of traditional furniture. In a bathroom, it can hold towels and toiletries; in a living room, it becomes a unique bookshelf or plant stand. Its open design prevents a space from feeling heavy or closed-in, while its vertical nature draws the eye upward, creating an illusion of height and spaciousness.
Project Implementation Tips
- Prep the Ladder: Thoroughly clean and sand the ladder to remove splinters and create a smooth surface. Apply a fresh coat of paint or wood stain to match your decor and protect the wood.
- Reinforce for Stability: Before placing any weight on it, check and reinforce any weak joints with wood glue and screws. For taller ladders used as bookshelves, securely anchor the top to the wall to prevent tipping.
- Create Custom Shelves: For wider storage, cut wooden planks to fit across the rungs. You can leave them loose for adjustability or secure them with screws for a more permanent setup.
- Add Functional Hooks: Attach S-hooks or screw-in hooks to the sides or rungs to hang accessories, kitchen utensils, or even small planters for a versatile and customized storage system.
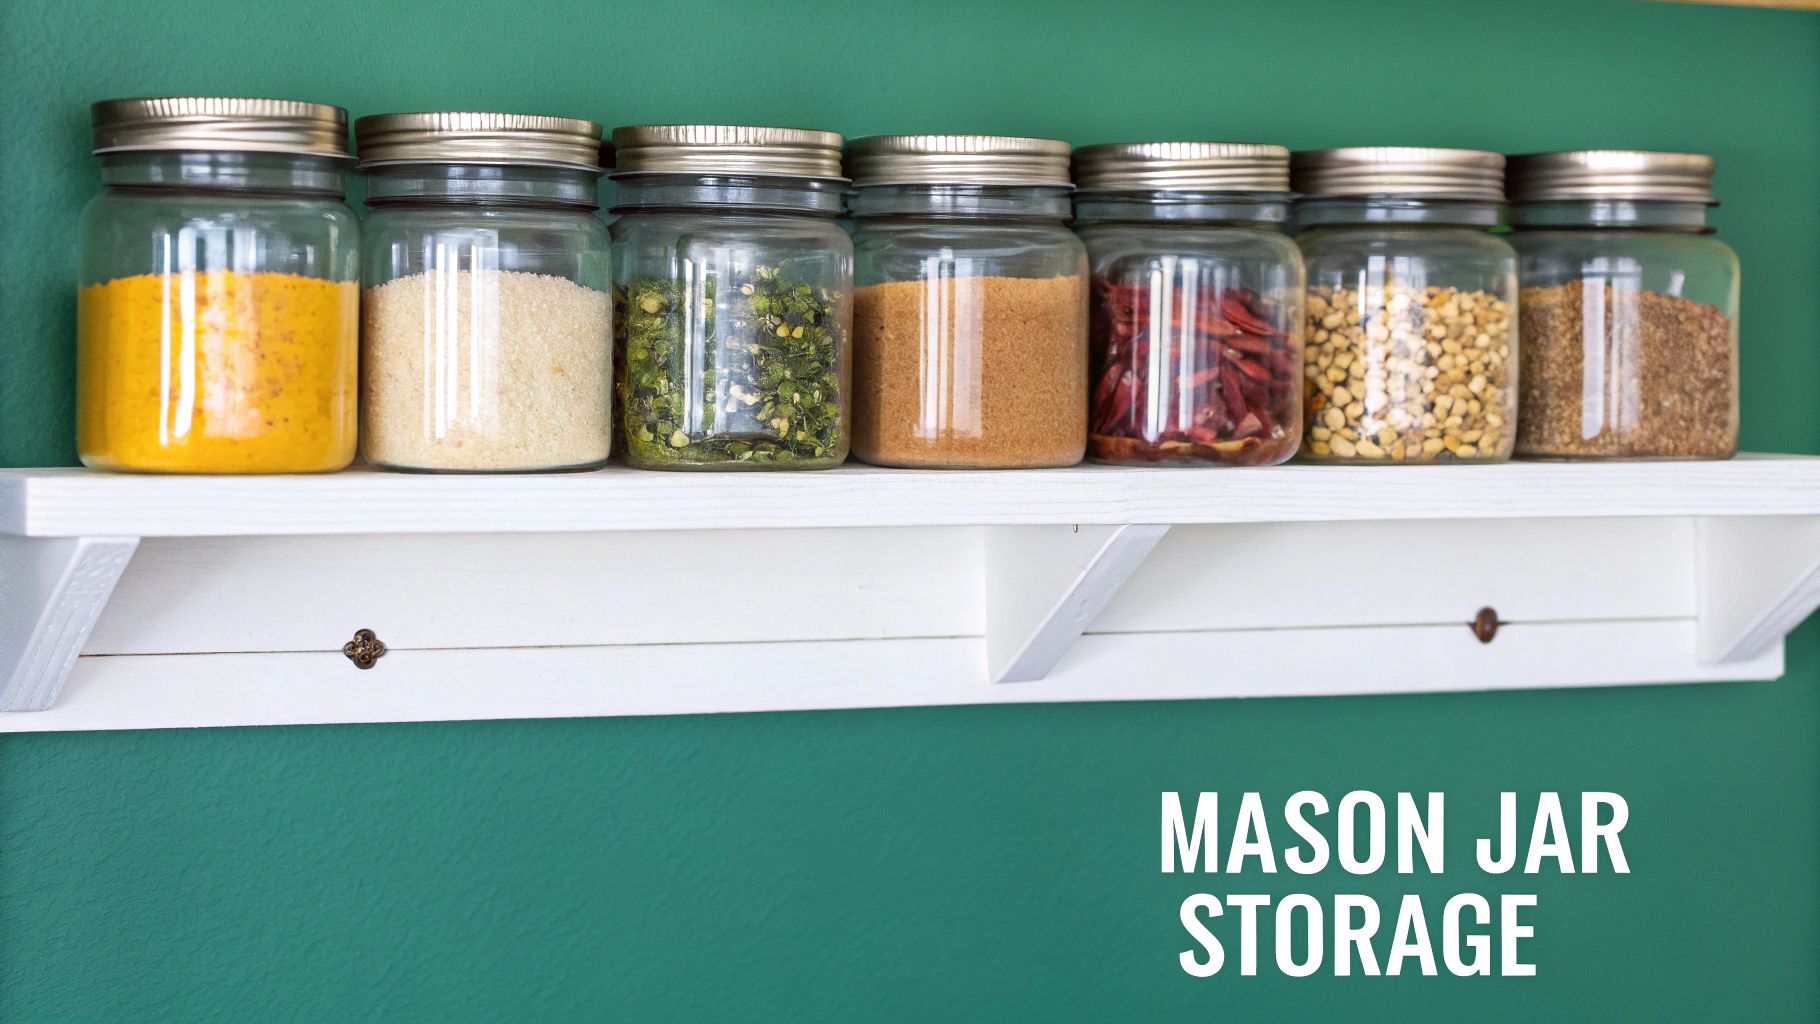
6. Mason Jar Organization Systems
Mason jars offer a visually appealing and highly practical solution for organizing small items that often create clutter. This method involves using clear glass jars to store everything from kitchen spices to workshop hardware, providing a clear view of the contents. These systems are one of the most versatile diy ideas for storage, as they can be displayed on shelves, mounted under cabinets, or arranged in custom-built holders to fit any space.
Why It Works for Cluttered Spaces
This system excels at corralling small, easily lost items like craft supplies, screws, nails, or spices. By getting these tiny objects out of junk drawers and into a uniform, transparent container system, you instantly reduce visual noise and make items easier to find. It’s an ideal solution for craft rooms, pantries, garages, and bathrooms where small-scale organization is key to maintaining order.
Project Implementation Tips
- Mount Jars Under Shelves: To save counter or shelf space, screw the jar lids directly to the underside of a cabinet or shelf. The jar can then be twisted on and off, creating a clever floating storage effect.
- Label Everything Clearly: Use a label maker, chalkboard paint, or simple stickers to clearly identify the contents of each jar. This saves time and prevents you from having to open multiple jars to find what you need.
- Create a Magnetic Wall Display: Glue strong magnets to the jar lids and attach them to a magnetic board or a metal sheet mounted on the wall. This is a great option for spices in the kitchen or small supplies in a home office.
- Test Mounting Strength: Before filling jars with heavy items like screws and bolts, ensure your mounting system (screws, adhesive, or magnets) can handle the weight. Test one jar with its full intended contents for 24 hours first.
7. Bed Frame Storage Integration
The space under your bed is prime real estate for storage, yet it often becomes a forgotten zone for dust bunnies and lost socks. By building or modifying a bed frame to include integrated storage, you can reclaim this valuable area. This project can range from a simple platform bed with cubbies to a sophisticated captain's bed with deep drawers, making it one of the most transformative diy ideas for storage for any bedroom.
Why It Works for Cluttered Spaces
This method is ideal for small bedrooms or apartments where traditional dressers and closets are insufficient. It provides a dedicated, out-of-sight home for bulky items like extra bedding, seasonal clothing, and shoes, keeping your living space visually clean and uncluttered. A DIY approach lets you customize the number and size of compartments to perfectly match your storage needs.
Project Implementation Tips
- Plan Around Your Needs: Before you build, take inventory of what you need to store. This will help you decide between large drawers for blankets, smaller cubbies for shoes, or even a hydraulic lift mechanism for accessing the entire under-bed area.
- Invest in Quality Slides: For drawers, use full-extension, heavy-duty ball-bearing slides. They ensure smooth operation, prevent sagging, and allow you to access the entire drawer without it tipping, which is crucial for heavy items.
- Ensure Proper Ventilation: A solid platform can trap moisture from the mattress. Drill ventilation holes into the mattress support surface or use a slatted base to promote airflow and prevent mildew growth. If you are struggling with a cluttered bedroom, you can find more tips on how to organize a small apartment here.
- Add Internal Dividers: Maximize the utility of large drawers by adding simple plywood or acrylic dividers. This keeps smaller items like socks, belts, or t-shirts neatly organized and easy to find.
8. Magnetic Storage Solutions
Magnetic storage leverages the power of magnets to create versatile and space-saving organization systems, especially for metal items. This approach involves installing magnetic strips, panels, or individual containers to hold everything from kitchen knives to workshop tools, transforming unused vertical surfaces into functional storage. It is one of the most flexible diy ideas for storage because it can be adapted to almost any room with minimal installation effort.
Why It Works for Cluttered Spaces
This method is exceptionally effective in small or cluttered areas like kitchens, garages, and craft rooms where drawer and counter space is limited. By moving items onto walls or the sides of appliances, you free up valuable horizontal surfaces. It keeps frequently used tools and utensils visible and easily accessible, eliminating the need to rummage through crowded drawers and helping to maintain a tidy environment.
Project Implementation Tips
- Test Magnet Strength: Before permanently mounting anything, test the magnet's strength with the items you plan to store. Ensure it is strong enough to hold them securely without risk of falling.
- Create Custom Magnetic Surfaces: For a fully integrated look, consider using magnetic paint on a wall or inside a cabinet door. This allows you to create a large, seamless magnetic area tailored to your specific needs.
- Protect Your Surfaces: Opt for rubber-coated magnets or add a thin layer of felt to the back of magnetic strips to prevent them from scratching delicate surfaces like refrigerators or painted walls.
- Keep Electronics Separate: Be mindful of placement. Keep powerful magnets away from sensitive electronics, credit cards, and computer hard drives to avoid potential damage to their magnetic components. To discover more creative uses, you can explore various magnetic storage solutions on endless-storage.com.
9. Vertical Garden Storage
Marrying the beauty of indoor plants with practical organization, vertical garden storage is a brilliant way to breathe life into your walls while decluttering your space. This concept uses wall-mounted planters, tiered structures, or pocket organizers to grow herbs, succulents, or decorative plants alongside designated spots for tools and supplies. It is one of the most aesthetically pleasing diy ideas for storage, perfect for bringing a touch of nature indoors without sacrificing valuable floor space.
Why It Works for Cluttered Spaces
This solution is ideal for small apartments or homes without garden space, such as urban dwellings. A kitchen herb garden can incorporate hooks for utensils, while a balcony installation can store watering cans and small tools. It transforms a blank wall into a functional, living focal point, keeping small, easily misplaced items organized and accessible while enhancing your home's air quality and ambiance.
Project Implementation Tips
- Choose Appropriate Plants: Select plants that match the light conditions of your chosen wall. Low-light plants like pothos or snake plants are great for interior walls, while herbs and succulents thrive in sunny spots.
- Ensure Proper Drainage: Water damage is a key concern. Use planters with built-in drainage systems or add a layer of gravel at the bottom. For fabric pocket planters, ensure the material is waterproof or place a tray underneath.
- Use Waterproof Materials: When building storage components like shelves or pockets near the plants, use moisture-resistant or waterproof materials like sealed wood, plastic, or metal to prevent rot and water damage.
- Plan for Accessibility: Arrange both plants and storage compartments for easy access. Place frequently used items within arm's reach and ensure you can water every plant without having to move the entire setup.
9 DIY Storage Ideas Comparison
From Clutter to Clarity: Your Next Steps
We’ve explored a wide array of creative and practical diy ideas for storage, moving far beyond generic plastic bins and uninspired shelving units. From transforming the forgotten space under your stairs into a functional powerhouse to repurposing a vintage ladder into a chic display, the core takeaway is clear: your home’s storage potential is limited only by your imagination. The journey from a cluttered, chaotic space to a streamlined, organized sanctuary is not about buying more containers but about thinking differently about the space you already have.
Each project, whether it's a modular pegboard system for your craft room or a magnetic spice rack that frees up precious counter space, is a testament to the power of ingenuity. These solutions prove that effective organization doesn't require a massive budget or a sprawling floor plan. Instead, it requires a willingness to see potential in overlooked corners, unused vertical areas, and everyday objects.
Recapping Your Path to an Organized Home
The true value of these projects extends beyond simple tidiness. Implementing these diy ideas for storage brings a profound sense of accomplishment and personal connection to your living space. You are not just organizing; you are curating and customizing your environment to perfectly suit your lifestyle.
Key principles we've covered include:
- Maximizing Vertical Space: Floating shelves, pegboards, and ladder storage draw the eye upward, making rooms feel larger while putting walls to work.
- Embracing Multi-Functionality: The storage ottoman is a prime example of furniture that works smarter, not harder, providing seating, style, and hidden storage in one package.
- Repurposing with Purpose: Mason jars and vintage ladders find new life, proving that sustainable and stylish solutions are often hiding in plain sight.
- Thinking Inside the Box (or Frame): Integrating drawers under your bed or building custom under-stair units taps into previously wasted, high-potential areas.
Taking Action: Your First DIY Project
The sheer number of possibilities can feel overwhelming, but the path to a decluttered home begins with a single, manageable step. Don't try to overhaul your entire home at once. Instead, identify your biggest "clutter pain point." Is it the chaotic tangle of pots and pans in your kitchen? Or perhaps the pile of shoes by the front door?
Choose one project from our list that directly solves that specific problem and genuinely excites you. If you're a beginner, a simple mason jar organizer or a magnetic knife strip is a fantastic way to build confidence. For those ready for a bigger challenge, tackling an under-stair storage system can be a transformative weekend project. The key is to start small, celebrate the victory, and let that momentum carry you forward to the next challenge. By breaking down the larger goal of "getting organized" into a series of satisfying, hands-on projects, you make the entire process more enjoyable and sustainable.
For those items you love but simply can't accommodate with even the most clever diy ideas for storage, there's a simple, stress-free solution. Let Endless Storage help you reclaim your space by securely storing your seasonal items, sentimental keepsakes, and bulky equipment. Visit Endless Storage to see how their convenient, by-the-box service can complement your home organization journey and give your new DIY projects room to shine.
Frequently Asked Questions
Unveiling the Secrets to Effortless Storage
Endless Storage is available nationwide. You pick a plan, tell us where to pickup, and we'll send a UPS van to collect, whichever state you're in.
Your shipping label will be sent to your email within a few minutes, if not instantaneously. It can also be accessed through your customer profile.
Your box will be shipped to one of our climate controlled self storage facilities in our closest self storage facility. Our manager will accept your package, notify you that your box has been received, and securely stored. Only our managers will have access to Endless Storage boxes.
Email us at admin@endless-storage.com click to live chat with us, or send us a message below.
Never! We're committed to transparent pricing with no surprises. You'll lock in your rate with no hidden fees and no long-term contracts.
Fast access guaranteed! Your boxes will arrive at your doorstep within 48 hours of requesting them back. Need to check on delivery? We provide tracking information for complete peace of mind.
Totally flexible! Store month-to-month with no long-term commitment and cancel anytime.
Everything's online! Use your account dashboard to:
• Set up automatic monthly payments
• Request box returns
• Update your address
• Order additional boxes
• Track shipments
Your boxes are insured up to $100 each. Our customer service team will help you file any necessary claims and resolve issues quickly.
Don't worry – we'll email you right away if there's a payment issue. Your items stay safe, though you may have temporary service interruption or late fees until payment is resolved.
When you request our free storage kits, you'll have 30 days to send in your boxes to activate your 3 months of free storage. Think of it like starting a gym membership – your activation window begins when you receive your kits, and your full free trial begins once you send in your first box. During your free months, you'll experience our complete storage service at no cost.
Your 30-day activation window begins when you receive your storage kits. We'll send you an email confirmation when your kits are delivered, marking the start of your activation period.
If you haven't sent any boxes for storage within your 30-day activation window, your free trial will expire and we'll begin charging the regular monthly rate of $9.99 per box. This helps ensure our storage kits go to customers who are ready to use our service.
A box costs $9.99 per month to store (plus sales tax). This price includes free shipping for standard boxes under 50 lbs. and smaller than 16"x16"x16"
Log into your Endless Storage account, locate the box you would like returned, and simply click Return My Box.
Yes, each box stored with us is insured for up to $100 throughout transit as well as the duration of storage within our facilities.
Your box will be at your doorstep within 48 hours of you requesting it back.
Store 10+ boxes? We'll pick them up for free! After your purchase, we'll contact you to schedule a convenient pickup time and arrange UPS collection.
We trust UPS with all shipments, and every box includes $100 insurance coverage. You'll receive tracking information to monitor your items' journey.
Yes! Visit any of our locations by appointment. Just bring a photo ID matching your customer profile.
For everyone's safety, we can't store hazardous materials, firearms, or perishables. All items must fit within our standard boxes.
It's easy! Order your storage kit online, and we'll ship it to you within 1-2 business days. Your shipping labels will be emailed instantly and available in your account.
We're here to help! Email us at admin@endless-storage.com, use our live chat, or send us a message through your account.
To cancel your storage service with Endless Storage, please email your cancellation request to admin@endless-storage.com. Our team will process your request within 2 business days and confirm your cancellation via email.
We understand packing takes time. However, to maintain your free trial benefits, you'll need to send at least one box within the 30-day activation window. If you need more time, you can always start with one box to activate your trial and send the rest later. You can always reach out to admin@endless-storage.com if you have any issues or concerns.
When you request our free storage kits, you're starting a 30-day window to begin using our storage service.
Important: To activate your free trial, send at least one box for storage within 30 days. If no boxes are sent within this 30-day window, a one-time $50 fee applies to cover materials and shipping costs. This fee is clearly disclosed before you sign up.
Think of it like reserving a hotel room – we're setting aside space and sending specialized packing materials for your use. The fee only applies if you request materials but don't begin storage, similar to a hotel's no-show charge.