
Successfully moving a refrigerator isn't about brute force—it's about smart preparation. I've seen it a hundred times: rushing the job is the fastest way to dented walls, scratched floors, and a broken fridge. The difference between a smooth move and a costly mistake comes down to the work you do before you even think about lifting it.
Your Damage-Proof Refrigerator Moving Plan

Think about it: modern refrigerators can easily weigh between 200-400 pounds. Trying to wrestle one of those without a plan is a recipe for disaster. Hasty moves are notorious for causing internal damage, often because the compressor oil didn't have time to settle properly. A little bit of prep goes a long way.
To keep things simple, here's a quick rundown of the essential prep work.
Quick Guide to Refrigerator Move Prep
Following these steps is the single best thing you can do to guarantee your fridge arrives at its new home in one piece.
Unplug and Defrost Early
If you only remember one thing, make it this: unplug your refrigerator at least 24 hours before the move. This is non-negotiable. It gives the compressor oil and coolant time to settle, preventing them from flowing into the cooling lines when the fridge is tilted. Plugging it in too soon after a move can clog the whole system, leading to damage that's often impossible to repair.
While it's unplugged, go ahead and defrost the freezer if it's a manual model. A solid block of ice adds a surprising amount of weight and is guaranteed to melt during the move, creating a huge puddle and a serious slipping hazard.
Pro Tip: Toss a few old towels inside the empty freezer and at the base of the fridge. They'll soak up any leftover moisture or condensation that forms during the move.
Empty, Clean, and Secure Everything
With the power off, it’s time to get everything out. This is the perfect chance to toss out that questionable jar of pickles and give the inside a good wipe-down with some warm, soapy water. A clean fridge is just much nicer to handle and you won't have to worry about mystery spills in the moving truck.
Next, take out all the loose parts. You'll thank yourself later.
- Shelves (both glass and wire)
- Crisper and deli drawers
- Ice cube trays and buckets
- Any other removable bins or organizers
Wrap the glass shelves in moving blankets or bubble wrap to keep them safe. Then, grab some painter's tape and secure the doors shut—it holds tight without leaving behind a sticky mess or peeling off the finish like duct tape would. Don’t forget to disconnect and drain the icemaker’s water line if you have one.
Measure Twice, Move Once
Before you even try to budge that fridge, find your tape measure. This simple step can save you from a world of hurt.
First, measure the refrigerator’s height, width, and depth. Then, measure the entire path it needs to take out of your home. Get the width of every doorway, hallway, and staircase. Look out for tricky corners or low-hanging light fixtures that could get in the way.
Doing this now helps you spot problems before they happen. If a doorway is just a half-inch too narrow, you'll know you need to take the door off its hinges before the fridge is stuck. It's much better to know that now than to find out when you're wedged in a hallway. For a full breakdown of how to plan your entire move, our moving checklist and timeline has you covered.
Assembling Your Tools and Moving Crew
Trying to wrestle a 300-pound refrigerator on your own is a recipe for disaster. I've seen it happen. Having the right equipment is what separates a smooth, successful move from a dented fridge, scratched floors, or worse, an actual injury.
Don't rely on brute strength. This is all about working smarter, not harder.
The Essential Toolkit for a Refrigerator Move
Before you even think about tilting that fridge, get your gear together. You can rent most of what you need from a local hardware or moving supply store, which is way cheaper than buying it all.
Here’s your must-have list:
- Appliance Dolly: This is non-negotiable and your absolute best friend for this job. It's not the same as a standard dolly. An appliance dolly is taller, built tougher, and has integrated straps to hold the fridge in place. Many even have rubber stair-climbers to make navigating steps much, much safer.
- Moving Straps or Ratchet Straps: These are your safety net. You'll use them to tightly secure the refrigerator to the dolly, preventing it from tipping over mid-move. This is where most accidents and damage happen.
- Moving Blankets: Your floors and the fridge itself will thank you. Wrap the entire unit in thick, padded blankets to protect it from getting scratched, dented, or dinged up along the way.
- Furniture Sliders: These little plastic discs are miracle workers for your floors. Just slip them under the fridge's feet, and you can slide it away from the wall without leaving a single mark on your hardwood or tearing up your linoleum.
- Painter's Tape and Cleaning Supplies: You'll want painter's tape to hold the doors shut and keep the power cord neatly bundled. And, of course, have your cleaning spray and some rags on hand for that final wipe-down.
If you're looking for more ways to make your entire move go smoothly, take a look at our complete guide on the best packing supplies for moving. It’s packed with tips for protecting everything you own.
Choosing Your Moving Crew Wisely
Even with all the right tools, moving a fridge is not a one-person task. The sheer size and awkward weight distribution make it a team effort.
You need at least two strong people, minimum. Trying to go it alone isn't just a bad idea; safety stats show it can lead to a 50% higher injury rate. One person guides and balances the dolly, while the other acts as a spotter—clearing the path, holding doors open, and helping lift over thresholds.
If you’re dealing with stairs, bring in a third or even fourth person. It’s best to have one or two people positioned below the dolly to help bear the weight and another person above to guide.
Your most important tool is communication. Before you move an inch, get on the same page. Agree on simple commands like "Lifting on three," "Stop," "Clear left," or "Watch the wall." The spotter's main job is to be the eyes of the operation, calling out obstacles before they become a problem.
Getting your tools and team ready is the foundation of a successful move. It turns a risky chore into a manageable one, protecting your appliance, your home, and most importantly, you. Never underestimate how heavy and bulky a refrigerator is—plan ahead and you’ll avoid the common mistakes that lead to expensive damage.
Executing a Safe and Strategic Move
Alright, you've done the prep work, and your tools are ready. Now it’s time for the main event: actually moving the refrigerator. This is all about steady hands and clear communication. The best way to move a refrigerator is slowly and deliberately—no rushing.
First, you need to slide the fridge away from the wall. This is where those furniture sliders you gathered earlier come in handy. Tip the refrigerator back just an inch or two, enough for your helper to slip a slider under each of the front feet.
From there, gently pull the top of the fridge forward. This will let it glide out smoothly, giving you all the space you need to work around it.
Positioning and Securing the Refrigerator
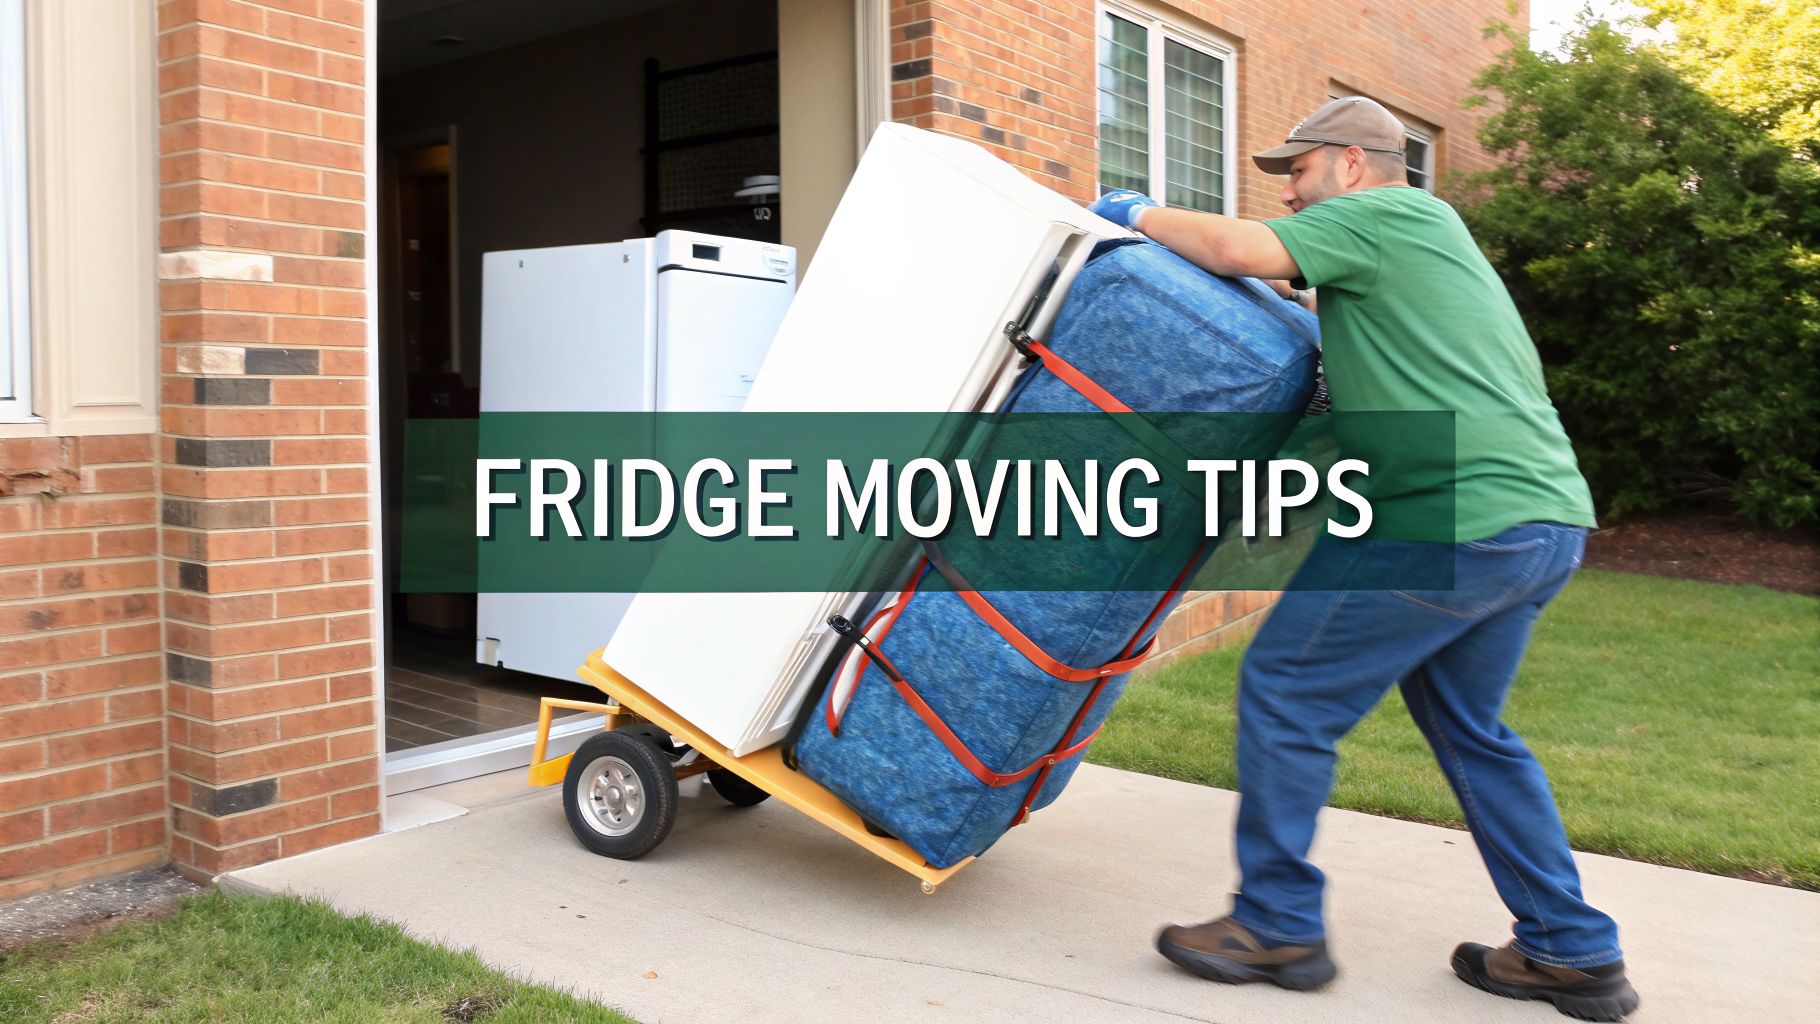
Now it's time to introduce your most important tool: the appliance dolly. Always approach the refrigerator from one of its sides, never the front or back. This gives you far better leverage and control over its weight.
Gently tilt the refrigerator away from you just enough for your partner to slide the dolly's base plate completely underneath. You want the fridge sitting dead center on the dolly’s frame. Getting this balance point right is everything.
Critical Safety Rule: Never, ever tilt a refrigerator more than a 45-degree angle. Tipping it any further risks letting the compressor oil seep into the cooling lines. If that happens and you plug it in too soon, you could cause permanent damage. Keep it as upright as you can.
With the dolly in position, grab your moving straps. Feed them through the dolly's frame and wrap them snugly around the body of the refrigerator. Crank those ratchet straps down as tight as you can get them.
A perfectly secured fridge should feel like it's part of the dolly. Give it a little shake—there should be zero wobble. This one step is what prevents the most common and dangerous moving accidents.
The image below shows how your key tools—the dolly, protective blankets, and your team—all work together.

Think of it as a small, coordinated system designed to get your appliance from point A to point B safely.
Navigating Obstacles Like a Pro
Rolling in a straight line on a flat floor is the easy part. The real test comes when you hit corners, thresholds, and especially stairs. Since refrigerators are so top-heavy, the core principles are similar to other big moves. For a great overview, check out this guide on how to move heavy furniture without injury or damage.
For every obstacle, the person pulling the dolly should move backward, keeping their eyes on where they're going. The spotter stays in front of the fridge, facing the puller, ready to guide them.
Here’s how to tackle the usual suspects:
Doorways and Tight Corners: Stop and slow down. The spotter’s job is to be your eyes, calling out clearances like, "You've got three inches on the left," or "Watch that right corner." You’ll probably need to pivot. Turn the dolly just enough to get one corner of the fridge through the doorway first, then straighten out.
Stairs (The High-Low Technique): This is where a third person is a game-changer. The primary mover stands at the top of the stairs, pulling the dolly up and back toward them. One or two helpers stay below, supporting the weight. This "high-low" carry is crucial for keeping the fridge balanced and preventing it from tipping forward. Go one step at a time and talk constantly.
Thresholds: Don't just ram the dolly into a threshold. Instead, approach it, get a little momentum, and give one strong, smooth pull to lift the wheels up and over the bump. Your spotter can give a small lift from the front to make it even smoother.
Navigating these challenges is much easier when you know what to expect. Here’s a quick-reference table for the most common hurdles and how pros handle them.
Common Moving Obstacles and Pro Solutions
By breaking down the move into these small, manageable steps, a really intimidating job becomes a series of controlled actions. The final ingredient is simply constant, clear communication with your team. It’s what makes the difference between a rough day and a smooth, damage-free move.
Loading and Transporting Your Refrigerator

You’ve successfully navigated the fridge out of your house—that’s a huge win. But the job isn't over yet. Now you have to get it into the moving truck and make sure it arrives in one piece.
Think about it: an unsecured, 300-pound appliance is basically a wrecking ball waiting for a sudden brake or a sharp turn. Proper loading isn't just a suggestion; it's what protects your fridge from dents, dings, and internal damage.
Navigating the Loading Ramp
The loading ramp is your best friend, but it needs to be treated with respect. Whether you're dealing with a pickup truck or a full-sized moving van, it's all about controlling the angle and your speed. The person pulling the dolly should be walking backward up the ramp, with a spotter down below pushing and keeping things steady.
- Go slow and steady. Never let the dolly's momentum run away from you. A controlled pace is far safer than rushing.
- Keep the communication flowing. The puller is walking blind. The spotter needs to be their eyes, calling out "Keep coming," "A little to your left," or "Stop!"
- Get a good footing. Ramps can be slick. Make sure everyone is wearing solid, non-slip shoes and has a firm grip before you even start.
This is the exact point where a lot of moves go wrong due to a simple loss of balance. It helps to review the basics on how to move heavy furniture safely and easily to get your whole team on the same page and reduce risk.
The safest place for a refrigerator is standing upright and wedged against the front wall of the moving truck, the one closest to the cab. This stops it from lurching forward during a hard stop. If that spot's already taken, a side wall is your next best bet.
Securing the Refrigerator for Transport
Once the fridge is positioned inside the truck, it's time to lock it down. Don’t ever assume its weight alone will keep it put. Bumps and road vibrations can easily make it slide or tip over, which is why those ratchet straps are so important.
Use at least two heavy-duty ratchet straps, wrapping them around the body of the fridge. Anchor them securely to the truck's E-track rails or tie-down points. You'll want the straps high enough to stop any tipping, but not so high that they could slip off the top.
Crank the straps until the fridge is completely solid. Give it a good push—it shouldn't wiggle or shift at all. This tight grip is vital, especially when you think about how everything else will be packed around it. For more tips on loading your vehicle, our guide on the best way to pack a moving truck offers a complete game plan.
Protecting Against In-Transit Damage
Vibrations are the silent enemy during any move. Constant jostling and bumping on the road can cause damage you won't see until it's too late. To minimize this, pack other heavy, soft items like mattresses or big, sturdy boxes around the refrigerator to create a buffer.
This extra padding adds another layer of stability and absorbs some of the shock from the road. Just be careful that nothing with sharp corners is pushed up against the fridge's finish.
Reinstallation and Post-Move Care
You got the refrigerator to its new home. Congratulations, the heavy lifting is over! But don't get ahead of yourself—this next part is arguably the most critical. What you do now determines whether your fridge runs smoothly for years or dies an early death.
The golden rule here is simple: patience. Before you even think about finding an outlet, you have to let the refrigerator stand completely still and upright in its final spot.
The Crucial Waiting Period
When you move a fridge, especially if you had to tilt it, the compressor oil can slosh around and get into the sealed cooling lines. Plugging it in while that oil is out of place is a catastrophic mistake. It can clog the capillaries, starve the system of lubrication, and cause permanent compressor failure. That's a repair that often costs more than a new fridge.
To avoid this disaster, just follow a simple timeline:
- If the fridge stayed upright: You still need to wait a minimum of 4 hours. This lets any oil that was jostled around settle back into the compressor where it belongs.
- If the fridge was tilted (over 45 degrees): Wait for a period equal to the time it was on its side. For instance, if it was tilted for 30 minutes to get through a doorway, let it stand for at least 30 minutes.
- If the fridge was laid completely flat: This is the riskiest move. A 24-hour wait is non-negotiable. You have to give the oil every possible chance to drain back completely.
Resist the temptation to rush this. A few hours of waiting is nothing compared to the cost of a new fridge. Impatience is the number one killer of recently moved appliances.
Final Placement and Leveling
While you’re waiting, you can get it positioned perfectly. Slide it into its new home, but make sure to leave a few inches of clearance on the sides and the top. This breathing room is essential for air circulation, which lets the condenser coils get rid of heat. A suffocated fridge works harder, burns more electricity, and will wear out much faster.
Once it's in place, grab a level. Nearly all fridges have adjustable feet at the front you can twist to raise or lower each side. A level appliance ensures the doors seal tight, keeping the cold air in. Some manuals even suggest a tiny backward tilt so the doors swing shut on their own.
Reconnecting and Cleaning
After the long wait is finally over, take a look at the condenser coils on the back. They probably picked up some dust bunnies during the trip. A quick once-over with a vacuum brush attachment will boost its efficiency from day one.
Now, you're ready for the final hookup:
- Reconnect the Power: Plug the cord directly into a grounded wall outlet. Steer clear of extension cords, as they often can't handle the heavy electrical load and can be a fire hazard.
- Reconnect the Water Line: If your model has an icemaker or water dispenser, carefully screw the water supply line back on. Turn the water on slowly and double-check for any drips at the connection point.
- Monitor for Cooling: Don't start loading it up with groceries just yet. It can take several hours for a refrigerator to get down to a safe temperature. Let it get fully cold first.
Following these final steps is just as important as the move itself. It ensures all your hard work wasn't for nothing. Think of it like the final walkthrough you’d do in a new apartment to make sure everything is right. For more on that, you can find our apartment walkthrough checklist super helpful.
Your Refrigerator Moving Questions Answered
Even when you think you have everything planned, moving a fridge always seems to bring up a few last-minute questions. It’s a job where the little details really matter. We've been there, so we're tackling the most common questions we get with straightforward, practical answers.
Can I Lay My Refrigerator Down to Move It?
This is the big one, and the short answer is a hard no—if you can possibly avoid it. It might seem like the only way to squeeze through a low doorway or fit it in a van, but laying a refrigerator flat is a recipe for disaster. When you do, the compressor oil can flow back into the cooling lines.
If you plug it in before that oil has had plenty of time to drain back where it belongs, you’re risking a permanent blockage. This can kill the compressor, which often costs more to fix than buying a new fridge. The best way to move a refrigerator is always upright.
If you have zero other options, lay it on the side opposite the compressor lines. Then, you absolutely must let it stand upright for a full 24 hours at its destination before you even think about plugging it in.
How Long Should I Wait to Plug in a Fridge After Moving?
Patience is key after the move is done. How long you need to wait depends entirely on how the fridge was transported. You have to give the internal fluids time to settle back into place.
- If it stayed perfectly upright: Give it at least 4 hours. This ensures any oil that got jostled around has time to settle back into the compressor.
- If it was tilted significantly: A good rule of thumb is to let it stand for at least as long as it was on an angle. If you spent 15 minutes wrestling it down a staircase, wait at least that long—though giving it an hour is a much safer bet.
- If it was laid completely down: The 24-hour waiting period is non-negotiable. Don't get impatient. Rushing this step is the number one reason appliances fail after a move.
When Should I Hire Professionals Instead?
Going the DIY route can definitely save you some cash, but there are times when calling in the pros is the smarter, safer, and ultimately cheaper choice. It’s all about weighing the cost against the risk of breaking your appliance or, worse, hurting yourself.
You should seriously consider hiring movers if:
- Your move involves tricky staircases, especially narrow or spiral ones.
- You have a premium or oversized unit, like a Sub-Zero or a smart fridge.
- You don't have at least one other strong, reliable person to help.
- You or your helper have a history of back problems.
Professional movers have the right gear, the experience, and—most importantly—insurance. A single-item move for a fridge typically costs between $150 and $350. When you stack that against the price of a new fridge or a potential medical bill, it’s often money well spent. If you decide to go this route, our guide on how to choose the right moving company can help you vet your options.
Experts often use a 'high-low' carry on stairs to minimize tipping, which is a factor in 25% of damages. It's also smart to protect the exposed coils on the back with a piece of cardboard, as they snag easily. Once in the truck, always secure the fridge upright with ratchet straps. Side-loading increases the risk of dents by 35%. You can explore more insights about the global household refrigerator market on databridgemarketresearch.com.
Knowing these details ahead of time can help you sidestep the common mistakes that turn a straightforward move into a major headache.
Sometimes, the real challenge isn't moving your stuff, but figuring out where it will all go. If you're downsizing or just need to clear out some space, Endless Storage offers a simple solution. We send you boxes, you pack them, and we store them until you need them back. Learn more about our hassle-free storage options and make your next move a little lighter.
Frequently Asked Questions
Unveiling the Secrets to Effortless Storage
Endless Storage is available nationwide. You pick a plan, tell us where to pickup, and we'll send a UPS van to collect, whichever state you're in.
Your shipping label will be sent to your email within a few minutes, if not instantaneously. It can also be accessed through your customer profile.
Your box will be shipped to one of our climate controlled self storage facilities in our closest self storage facility. Our manager will accept your package, notify you that your box has been received, and securely stored. Only our managers will have access to Endless Storage boxes.
Email us at admin@endless-storage.com click to live chat with us, or send us a message below.
Never! We're committed to transparent pricing with no surprises. You'll lock in your rate with no hidden fees and no long-term contracts.
Fast access guaranteed! Your boxes will arrive at your doorstep within 48 hours of requesting them back. Need to check on delivery? We provide tracking information for complete peace of mind.
Totally flexible! Store month-to-month with no long-term commitment and cancel anytime.
Everything's online! Use your account dashboard to:
• Set up automatic monthly payments
• Request box returns
• Update your address
• Order additional boxes
• Track shipments
Your boxes are insured up to $100 each. Our customer service team will help you file any necessary claims and resolve issues quickly.
Don't worry – we'll email you right away if there's a payment issue. Your items stay safe, though you may have temporary service interruption or late fees until payment is resolved.
When you request our free storage kits, you'll have 30 days to send in your boxes to activate your 3 months of free storage. Think of it like starting a gym membership – your activation window begins when you receive your kits, and your full free trial begins once you send in your first box. During your free months, you'll experience our complete storage service at no cost.
Your 30-day activation window begins when you receive your storage kits. We'll send you an email confirmation when your kits are delivered, marking the start of your activation period.
If you haven't sent any boxes for storage within your 30-day activation window, your free trial will expire and we'll begin charging the regular monthly rate of $9.99 per box. This helps ensure our storage kits go to customers who are ready to use our service.
A box costs $9.99 per month to store (plus sales tax). This price includes free shipping for standard boxes under 50 lbs. and smaller than 16"x16"x16"
Log into your Endless Storage account, locate the box you would like returned, and simply click Return My Box.
Yes, each box stored with us is insured for up to $100 throughout transit as well as the duration of storage within our facilities.
Your box will be at your doorstep within 48 hours of you requesting it back.
Store 10+ boxes? We'll pick them up for free! After your purchase, we'll contact you to schedule a convenient pickup time and arrange UPS collection.
We trust UPS with all shipments, and every box includes $100 insurance coverage. You'll receive tracking information to monitor your items' journey.
Yes! Visit any of our locations by appointment. Just bring a photo ID matching your customer profile.
For everyone's safety, we can't store hazardous materials, firearms, or perishables. All items must fit within our standard boxes.
It's easy! Order your storage kit online, and we'll ship it to you within 1-2 business days. Your shipping labels will be emailed instantly and available in your account.
We're here to help! Email us at admin@endless-storage.com, use our live chat, or send us a message through your account.
To cancel your storage service with Endless Storage, please email your cancellation request to admin@endless-storage.com. Our team will process your request within 2 business days and confirm your cancellation via email.
We understand packing takes time. However, to maintain your free trial benefits, you'll need to send at least one box within the 30-day activation window. If you need more time, you can always start with one box to activate your trial and send the rest later. You can always reach out to admin@endless-storage.com if you have any issues or concerns.
When you request our free storage kits, you're starting a 30-day window to begin using our storage service.
Important: To activate your free trial, send at least one box for storage within 30 days. If no boxes are sent within this 30-day window, a one-time $50 fee applies to cover materials and shipping costs. This fee is clearly disclosed before you sign up.
Think of it like reserving a hotel room – we're setting aside space and sending specialized packing materials for your use. The fee only applies if you request materials but don't begin storage, similar to a hotel's no-show charge.